Fix: Corsair Utility Engine Update Error
Corsair has released a tool called Corsair Utility Engine which can be used to manage light effects, record macros, and tweak other settings related to your Corsair hardware such as their mouse or keyboard. However, it appears that there are an awful lot of users who are struggling either to install or to update this tool. Some of the error messages which appear goes like:
The CUE has detected an error during software update check
It appears that the problem can be solved in numerous ways and it’s important to follow through the entire article if you want to be able to update the Corsair Utility Engine program and gain access to the new features released.
Solution 1: Wait for the New Update
It appears that the update software check has not been optimized yet for the 2.x versions of the Corsair Utility Engine and the “check for update” button is still searching for the 1.x updates which are no longer released.
This was stated officially by the CUE staff and they also reported that the new update will be released properly enabling you to update your tool. There was a lot of backslash for this bug since users were going crazy about this. However, the new patch has been released in the meantime but the update button in certain versions of the tool still won’t work so you will need to update it manually.
- Click on the following link in order to open up a forum post with the download link. The download link is in the first post posted by Corsair James, a member of their staff.
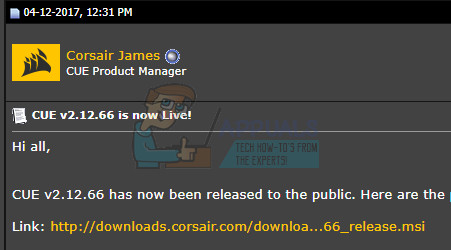
- Locate the file you just downloaded in the Downloads folder and double-click on it. Follow the instructions on-screen in order to proceed with the installation and run the tool after it completed. It should be updated to the v.12.66 version which is currently the latest one.
Solution 2: Having Issues with the Current Version
If you happen to be having issues with the current version of the CUE tool, you might want to check out the solutions above. There are various problems that can start appearing after you update to the latest version of the tool and there are quite a few chances that you will need to reinstall the program completely and manage to install it somehow.
The worst-case scenario is that the CUE tool reports a missing Corsair Utility Engine v.x.x.xx file which will prevent you from performing certain actions.
- First of all, make sure you are logged in with an administrator account as you won’t be able to delete programs using any other account. Backup the data you want to save because uninstalling CUE will remove it.
- Click on the Start menu and open Control Panel by searching for it. Alternatively, you can click on the gear icon in order to open Settings if you are using Windows 10.

- In Control Panel, select to “View as: Category” at the top right corner and click on Uninstall a Program under the Programs section.
- If you are using the Settings app, clicking on Apps should immediately open a list of all installed programs on your PC.
- Locate Corsair Utility Engine in Control Panel or Settings and click on Uninstall.
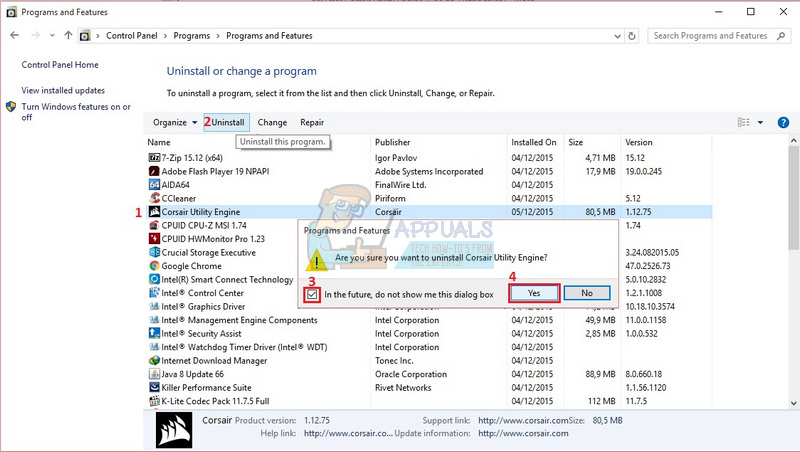
- A message will pop up asking “Are you sure you want to uninstall Corsair Utility Engine?” Choose Yes. Click Finish when the uninstaller completes the process.
After the tool has been uninstalled, it would be nice if you were able to download and install the same version of the tool again. Older versions of the CUE tool can be difficult to find on your own but here is a forum post where you should be able to see the past CUE versions so feel free to pick the one you had installed and installed it again on your PC by running the file you just downloaded and following the instructions on-screen.
- Once you have installed the same version you had before, you will probably encounter the same issue you had before. If that is not the case, you can abort the process right here, especially if you don’t want to update the tool itself.
- Navigate to the following link and scroll down the page until you find the Corsair Utility Engine Software entry on the list matching the hardware you possess and click the black download button next to it.

- Install this version over the one you have installed which should also fix the “No Corsair Utility Engine v.x.x.xx .msi file” error.
- Once the tool has finished installing, check to see if the issue is resolved.
Solution 3: Missing Audio
Another side-effect of certain versions of the CUE tool is missing audio after the update has finished. The usual problem is the firmware update which seems to have disabled Windows Audio services which are unable to start and they throw errors such as:
Error 126: The module could not be found
The service is duplicate
There are several users who managed to fix the issue by a combination of PC restarts and Corsair uninstalls and you should try it out before doing anything else.
Unfortunately, the only 100% solution is a system restore. That is a sort of a last resort that worked for users who have tried out all of the other options and still failed to fix the problem. Make sure you restore your computer to a restore point before you decided to update the CUE tool to the latest version and proceed with the process.
Solution 4: Corsair Utility Engine Freezing on Install
It appears that several users have had problems installing Corsair software, including the CUE. The installation simply freezes their PC and the only possible solution is a restart. Being unable to update or even to install the tools for the first time is annoying but, luckily, there is a solution that went well with plenty of other users and it consists of updating your drivers.
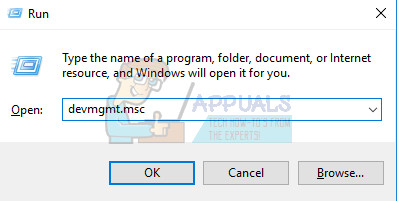
- Click Start and type Run. Select Run, A Run dialog box will appear.
- Type “devmgmt.msc” in the Run box and click OK button. This is to open the Device Manager Window.
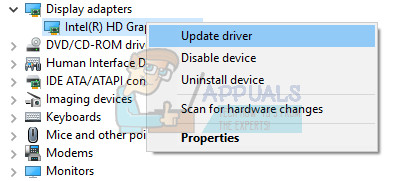
- Locate some of the devices which may be in need for a new driver. Your best bet is to update as many devices as you can as you don’t know which one is causing the issue.
- Right-click on the device and select the Update driver option from the context menu.
- Click Search automatically for updated driver software. Then Windows will search and install the new driver for you.
- Restart your PC for the change to take effect.