Fix: Chromium won’t Uninstall
Some users have been unable to uninstall Chromium from their PC using the conventional ways. While this can certainly be an installation glitch, this particular issue is most likely caused by a fake Chromium package – malware that is often bundled with freeware or shareware available on some download sites.

This article is meant as an informative guide to help users uninstall both the clean version of Chromium and the malware-infected one.
What is Chromium?
Chromium is a legitimate open-source browser project originally created by Google which forms the basis of Google Chrome. Chromium seems almost identical with Google Chrome, but the latest has an impressive list of improved featured over its open source counterpart.
Because it’s open source, the source code of Chromium can be downloaded by anyone interested, modified and then re-compiled into a working web browser. As you can imagine, this can pose a serious security risk with unsuspecting users.
Keep in mind that most Chromium builds are portable and will not require you to install them. However, there are certain Chromium-derived projects that distribute it via installers. Even more, a clean Chromium build will not start automatically at startup and is not bundled with other software.
Potential security risk posed by Chromium
At its core, Chromium is harmless by itself and should not be regarded as a security concern. However, given the fact that its open source, some malware creators use Chromium to create malware-infected versions and trick users into installing them on their PCs.
The main purpose of infected Chromium installations is to pump your PC full of adware, redirect you to certain links, track your online behavior and convince you to download additional infected software.
The good news is, malware-infected Chromium versions are quite easy to identify if you know where to look. Here’s a list of some of the problems you might experience if you are dealing with a malware infected Chromium browser:
- Your computer suddenly has the Chromium browser even if you didn’t manually installed it on your system – This occurs because the malware is often bundled with other software and will install automatically.
- Your default browser is changed to Chromium without your permission.
- Chromium isn’t listed in Control Panel > Programs and Features and can’t be uninstalled conventionally.
- The default search engine is replaced with a shady search provider automatically.
- You get constant redirects, pop-ups and new tabs while browsing.
- You start experiencing extremely low start-ups and your PC runs increasingly slow.
- Every once in a while, you get ad pop-ups and notifications that cannot be blocked. They often prompt you to download additional software (which is also malware).
If your PC is having some of the symptoms above, you’re probably dealing with an infected Chromium version. Ignoring an infection such as this is not advisable since it can cause huge problems along the way. Here’s a list of Chromium-based browsers that are known to engage in malware activities:
- BoBrowser
- Chedot
- eFast
- BrowseAir
- MyBrowser
- Olcinium
- Palikan
- Tortuga
- Qword
- WebDiscover Browser
Note: Keep in mind that this is only a shortlist with obscure Chromium-based browsers that are bundled with malware. On top of this list, there’s a whole lot of Chromium clones that look and behave exactly the same as the real Chromium (same icon, same name, same menus).
Identify if your Chromium Browser is Malware
If you’re currently unable to uninstall Chromium, it’s important to identify if you’re dealing with a malware-infected version or the clean Chromium. A quick way to determine this is to pop up Task Manager (Ctrl + Shift + Esc) and see whether you have multiple instances of the Chromium browser in your Processes tab.

Note: Multiple Chromium processes that use High CPU resources are a clear sign of a malware infection. If you have multiple Chromium instances, there’s a high chance that you’re dealing with a malware infection – in this case, the first two methods and start directly with Method 3. Keep in mind that this particular scenario can also be encountered with Chrome (where you have multiple Chrome processes).
In the event that you only see one Chromium process (with little resource usage), you might not be dealing with a malware infection – in this case, start with the first method and follow the rest in order until you encounter a fix that manages to remove Chromium from your PC.
Below you have a collection of methods that have successfully helped users to uninstall Chromium from their systems. If you didn’t see multiple Chromium processes in Task Manager, follow each method in order until you find a fix that is effective in your situation.
Steps to Forcefully Uninstall Chromium
1. Uninstall from Control Panel and Delete AppData folder
There have been some reports where users were unable to install the clean version of Chromium. Some users have reported that Chromium was still loaded at startup despite being uninstalled from Programs and Features. As it turns out, this is actually a known glitch and has nothing to do with a malware infection. In this case, the solution would be to find the Chromium folder in the AppData folder and delete it manually.
Follow the steps down below to remove the legitimate version of Chromium:
Note: Skip the first two steps if you already uninstalled Chromium from Programs and Features.
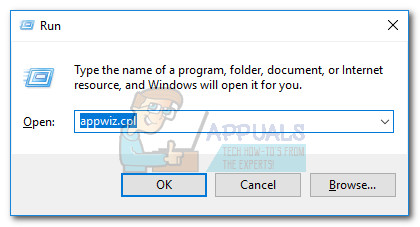
- Press Windows key + R to open a Run window. Type “appwiz.cpl” and hit Enter to open Programs and Features.
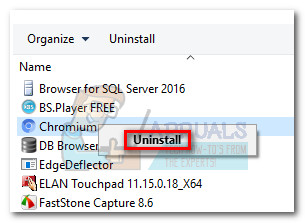
- Scroll down through the Programs and Features list, right-click on Chromium and choose Uninstall. Follow the on-screen prompts to remove it from your computer.
 Note: Reboot your computer and see whether you’re still seeing traces of Chromium. If you’re still seeing a Chromium icon in your System Tray, continue with the next steps.
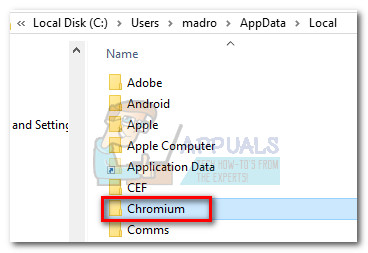
 - Open a File Explorer window and navigate to C (Windows Drive) > Users > “Your Personal Folder” > AppData > Local.
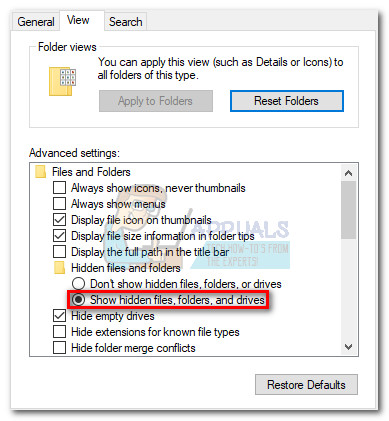
 Note: If you’re not able to locate the AppData folder, it’s probably because you have hidden folders disabled by default. In this case, open a Run window (Windows key + R), type “control.exe folders” and hit Enter to open Folder Options. Then, go to the View tab and select Show hidden files, folders and drives under Hidden files and folders. Hit Apply to confirm the changes.
- In AppData, locate the Chromium folder and delete it completely – make sure to clean your Recycle Bin after deleting it from AppData.
Note: If you got the “Folder in use” error while trying to delete the AppData folder, make sure that Chromium is completely closed. Check your System Tray for a Chromium icon – if you see the Chromium icon, right-click on it and choose Exit, then try to delete the Chromium folder again.
Now that you removed the Chromium’s AppData folder, reboot your computer and see if you managed to uninstall it completely. If you’re still seeing traces of Chromium, continue with Method 2.
2. Use an uninstaller software
Because Chromium comes in a lot of different shapes and sizes, some packages might have bugs that will prevent the software from uninstalling successfully. If the first method was not effective, let’s see if a specialized removal tool can do the trick.
There are a lot of powerful uninstallers out there, so feel free to use whichever you feel more comfortable with. We happened to use iOBit Uninstaller because it was already installed. You can also use CCleaner or Revo to achieve the same purpose.
If you’re having trouble using a specialized tool to uninstall Chromium, here’s a quick guide to doing it with iOBit Uninstaller:
- Download and install iOBit Uninstaller from the official link (here). Be sure to check Custom Installation and prevent any bundled software from installing to your PC.
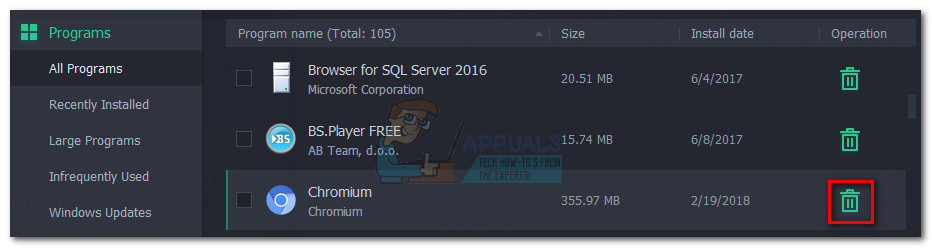
- Open iOBit Uninstaller, click on All Programs in the left-hand panel, then find Chromium in the right-hand panel. Then, click the recycle bin icon associated with the Chromium entry.
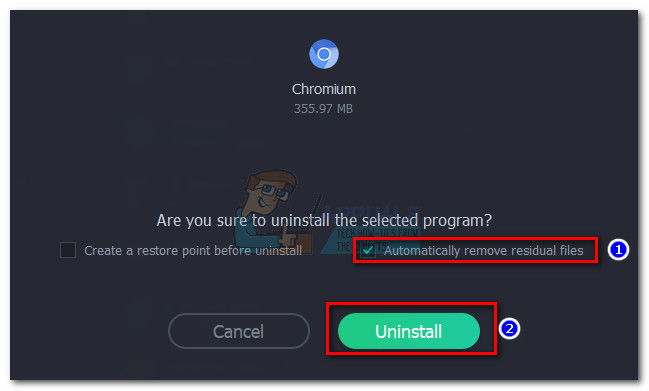
- Check the box next to Automatically remove residual files, then hit the Uninstall button.
 Once the software is uninstalled, reboot your system and see whether this removed any signs of Chromium.
If you’re still seeing signs of Chromium (System Tray icon or processes in Task Manager), you’re probably dealing with a malware infection. In this case, follow the methods below to remove it from your computer.
3. Remove the Chromium Malware manually
Chromium-derivated malware is known to have regenerative properties. As some users have pointed out, the virus has the capacity of re-infecting your PC if not removed properly the first time. The virus is known to be quite heavy on your system resources, so expect your overall PC performance to get worse and worse over time if you leave the malware infection unattended.
If the previous two methods have been ineffective in removing Chromium (or you discovered multiple Chromium processes in Task Manager), it’s clear that you’re dealing with a malware infection.
Fortunately, there is a way of removing the malware permanently from your computer. Do so by following the full instructions below:
Note: Keep in mind that depending on the malware you’re struggling with, the exact name of the folders might be different, but the process is exactly the same.
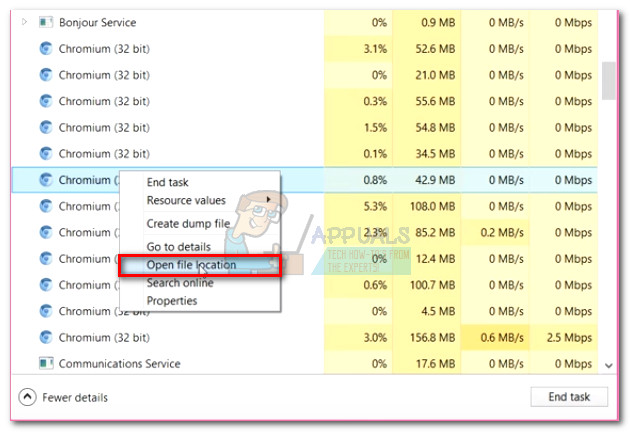
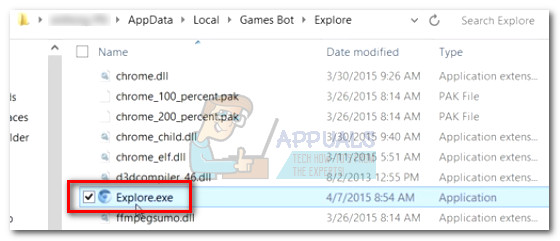
- Open Task Manager (Ctrl + Shift + Esc), go to the Processes tab and locate the Chromium processes. Then, right-click on any of them and choose Open File Location.
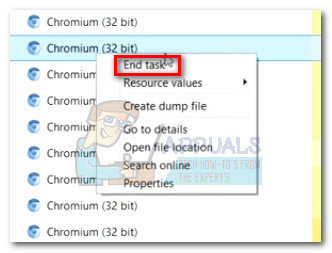
- By now, you should have gained entry to the malware’s location. But before you remove the malware folder, we’ll need to close every Chromium process. If you don’t do it, it will say that the files are in use and you won’t be allowed to delete the malware. With this in mind, close every Chromium process (Right-click > End Task) in Task manager and quickly move down to the next step.
 Note: These processes will automatically re-open over time, so do the steps as quickly as possible.
 - Once every Chromium process is closed, return to the malware location folder and delete the main executable (Explore.exe). The executable hosts the vast majority of data related to the malware – deleting it should prevent new processes from spawning again.
 Note: If right-click > Delete doesn’t work, manually drag the file to your Recycle Bin.
 - Once the executable is removed, delete the rest of files from the Explore folder. Once all the files are removed, hit the Up arrow and delete the Explore folder as a whole.
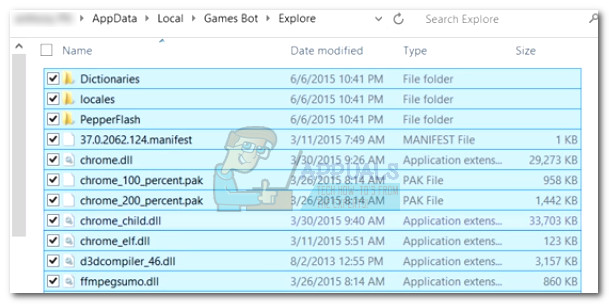 Note: You can’t delete the folder as a whole unless you remove its contents first.
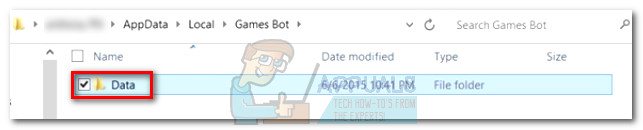
 - Next, delete the leftover Data folder and move upwards in the folder hierarchy to Local.
- Finally, delete the Games Bot folder from Local.
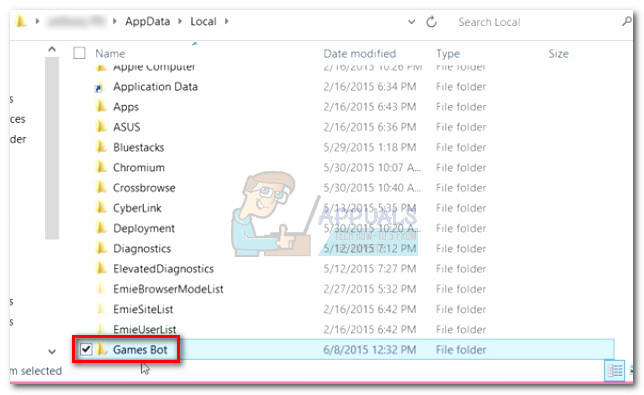
- Make sure to empty the contents of your Recycle Bin and reboot your system. Your system should restart without any traces of the Chromium malware.
Even if this method has been effective, please follow through with the final method to ensure that you remove every trace of the malware.
4. Remove Malware left overs
As mentioned above, this particular virus has regenerative properties. If not removed entirely, it has the means to re-download the missing files and keep at it. Even more, if you had it for a while, it might have infected other processes as well.
To ensure that we remove every trace of it, let’s do an anti-malware scan to remove every last trace of the malware. This particular Chromium-derived malware is known to leave behind registry entries that can leave to successful browser hijacks. You can use a number of tools to get this job done, but we recommend Malwarebytes because it’s a free, all-around solution.
Follow the guide below to remove any trace of the Chromium Malware:
- Download & install Malwarebytes from the official link (here).
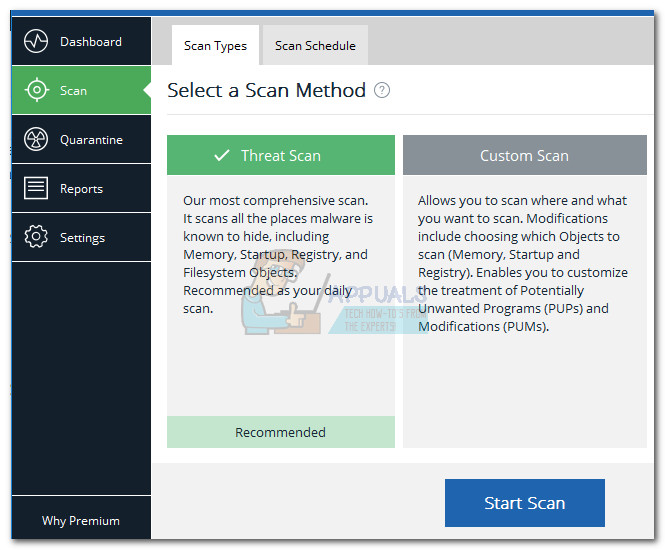
- Open Malwarebytes and click Scan from the left-most panel. Then select Threat Scan and hit the Start Scan button.
- Wait until the scan is complete, it might take a couple of hours, depending on your system.
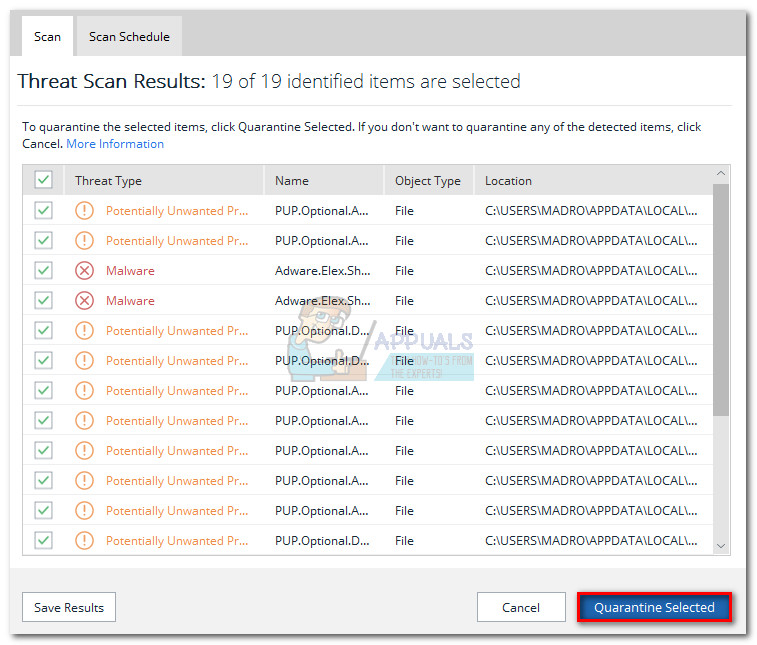
- Once it’s complete, see if it removed any registry entries or browser related files by clicking on View Identified Threats. Then, make sure all threats are selected and hit the Quarantine Selected button.
- Regardless of the outcome, reboot your system one last time. At the next startup, there should not be any trace of the Chromium malware.
Somewhat incorrect advice, as I have a laptop running Win10 that not only fails to show Chromium in the “remove programs” section of control-panel, BUT Chromium also is not listed anywhere in the list when you press “Windows key + R”, and the only trace I can find is to end the process in Task Manager, but so far no way to locate the actual program components for removal. I guess you could try to locate something that sounds related to Chromium in Windows Registry and remove that to cripple the program, but I am leery of tinkering with manual-edits inside Windows Registry for obvious reasons. The components of this particular version of Chromium have been purposefully disguised with other unknown names to make location and removal more difficult.
I could use a service like Re-Image (no good results with their repair tool), they’re expensive but did a good job the 1 time I used them in the past, but it’s a couple hundred bucks I cannot afford right now. I did notice that Re-Image was using a program called “Revo Uninstaller”, but not sure how much that program costs and weather it will actually FIND these rogue Chromium components for me, or if the components must be located using other means first.