Fix: CHKDSK cannot continue in read-only mode
The “CHKDSK cannot continue in read-only mode” error is usually encountered by users after trying to run a CHKDSK command on the OS drive (C:/) or an external drive. This particular issue usually occurs due to a write protection, if the disk is read-only, or because the drive in question is currently being scanned in a similar manner by a different program.

What is CHKDSK?
CHKDSK is a command of Windows command line that is used to run the utility known as Check Disk. The main purpose of the Check Disk utility is to make sure that the computer’s files and the file system are in a logical order. In addition to this, it also checks the physical disk to see if it holds any damaged sectors. In the event that it finds any damaged sectors, the utility will automatically try to recover data from them (given that the right command is provided).
Fixing the “cannot continue in read-only mode” error
If you’re currently struggling with this particular issue, there are two ways that will help you bypass the “cannot continue in read-only mode” error. Please follow the two methods below in order. If the scheduled chkdsk fails, move down to Method 2 and follow the steps to run the Check Disk utility from Recovery Options.
Method 1: Scheduling a CHKDSK on Reboot
If you’re scanning a system partition, there’s a high chance that you’re seeing the “cannot continue in read-only mode” error because the disk is currently in use by another program. If that’s the case, the issue can be bypassed by scheduling a CHKDSK scan on reboot. This will trigger a scan of the Check Disk utility before another program gets the chance to use the drive in question.
Follow the steps down below to schedule a chkdsk scan on reboot:
- Open an elevated Command Prompt by accessing the start bar (bottom-left corner) and searching for “cmd“. Once it finds Command Prompt, right-click on the entry and choose Run as Administrator.

- If prompted by the UAC window, hit Yes to launch the elevated Command Prompt.
- In the elevated Command Prompt, type “chkdsk /r x:” and hit Enter. Keep in mind that “x” is a substitute for your drive letter.

- Shortly after you press Enter, you will be informed that the current drive cannot be locked and be asked if you’re willing to schedule a scan at the next system restart. Press the letter Y and hit Enter to schedule the chkdsk scan at the next reboot.

- Restart your system. The Check Disk utility will be launched automatically and scan for disk errors.
In the event that scheduling the chkdsk scan didn’t trigger it at the next startup, continue with Method 2.
Method 2: Running CHKDSK from Recovery Options (Advanced options)
If the first method has failed, you’ll probably manage to run the chkdsk scan from the Recovery Options (Windows 7) or Advanced Startup (Windows 10) – the hard part is to get there. Depending on your computer, you’ll likely need the installation media in order to access the Recovery Options (Advanced Options).
Note: If you don’t have the installation media, consult our in-depth articles about creating one for Windows 7 (create windows 7 bootable usb or dvd) or Windows 10 (create windows 10 bootable usb).
Because the exact steps of getting to the Recovery Options are different depending on the Windows version, the guide below is split into two sections – one is tailored for Windows 7 and one for Windows 10. Please follow the steps appropriate to your Windows version.
Running CHKDSK from Recovery Options on Windows 7
- Insert your Windows installation media in order to boot from it. If your system doesn’t automatically boot from the newly inserted media, you might need to access your BIOS settings and change the boot sequence order.
- At the first Install Windows screen hit Next, then click on Repair your computer. You can also press the R key for the same result.

- Select Use recovery tools that can help you fix problems starting Windows. Then, make sure Windows 7 is selected and hit Next.

- In the System Recovery Options, click on Command Prompt.

Now you should be able to run the chkdsk command successfully from here. Depending on what you’re trying to achieve, consider using one of the following commands:
chkdsk x: – locates errors but doesn’t fix them
chkdsk x:/f – locates and fixes errors without scanning for bad sectors
chkdsk x:/r – locates and fixes errors as well as scans for bad sectors (and repairs problems found).
Note: x is a placeholder for your drive letter.
Running CHKDSK from Recovery Options on Windows 10
Note: If you don’t have the installation media, you can force Windows 10 to start into Advanced Startup by forcing two (or three) consecutive failed startup attempts. In order to do this, shut down the machine unexpectedly when it’s in the middle of booting up.
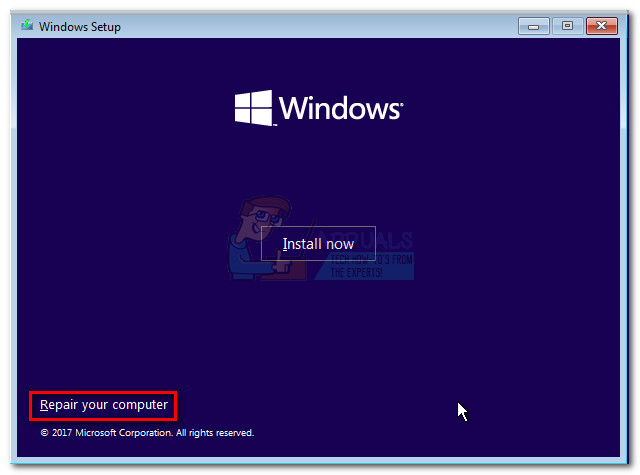
- Insert the installation media and make sure your computer boots from it.
Note: If you’re unable to boot from the installation DVD/USB, access your BIOS / UEFI settings and change the boot order. - In the first Windows Setup screen, click Next, then click on Repair your computer.
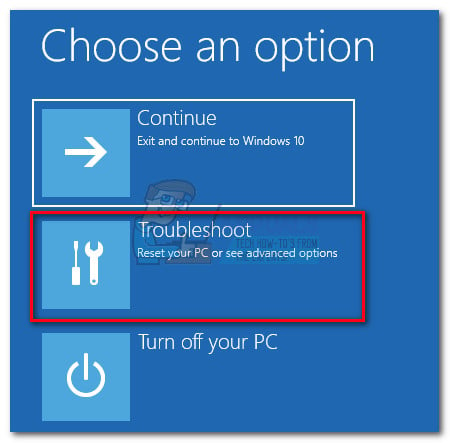
- At the following screen, click on Troubleshoot to access the Advanced options.
- Under Advanced options, click on Command Prompt.

- Now you should be able to run the chkdsk command successfully from here. Depending on what you’re trying to achieve, consider using one of the following commands:
chkdsk x: – locates errors but doesn’t fix them
chkdsk x:/f – locates and fixes errors without scanning for bad sectors
chkdsk x:/r – fixes errors as well as scans for bad sectors (and repairs problems found).
Note: x is a placeholder for your drive letter.