Fix: Can’t add new user account on Windows
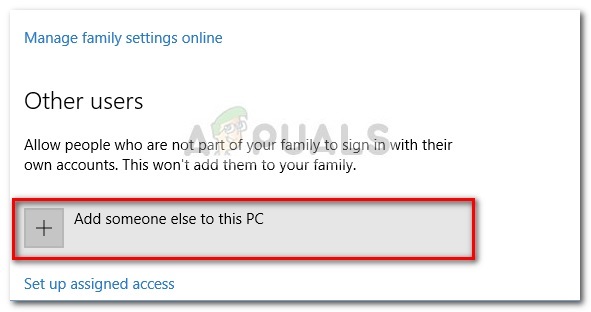
There’s a weird problem going around with various Windows 10 builds where users report being unable to create new user accounts. Users struggling with this issue report that clicking the Add someone else to this PC link doesn’t do anything, leaving them unable to proceed further with the user creation process.
This situation is regularly reported by users that have recently upgraded from Windows 7 or Windows 8 to Windows 10.
The exact causes for this problem are extremely miscellaneous, as the culprit is often tied to vital factors such as the dependency services or the current network configuration.
Note: This error should not be confused with the “something went wrong” error that appears when creating a new account on Windows 10. If you get the “Something went wrong. Please try again later.” error when trying to create a new user account on Windows 10, please refer to this guide (here) for a list of effective troubleshooting methods.
If nothing happens when you click the Add someone else to this PC button, one of the fixes below will allow you to resolve the issue. Below you have a collection of methods that users in a similar situation have used to resolve the issue and create a new user account on Windows 10. Please follow each potential fix in order until you encounter one that resolves the problem in your particular scenario. Let’s begin!
Method 1: Creating a new user account with Netplwiz
By far, the most popular method that enabled users to go around the inability to create a new user account via the Add someone else to this PC is to use the Netplwiz interface. This will allow you to create a new user account (standard, administrator or guest) – all from a graphical interface.
Here’s a quick guide on using the Netplwiz (User Account) Interface to create a new user account:
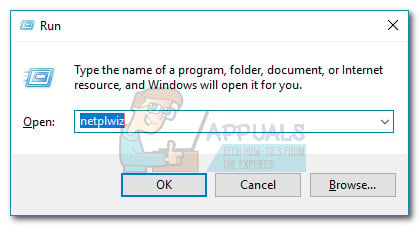
- Open a new Run box by pressing Windows key + R. Then, type “netplwiz” and hit Enter to open the User Accounts window.
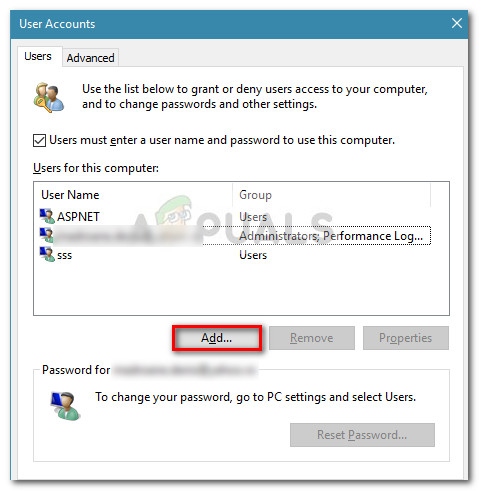
- In the User account window, go to the Users tab and click on the Add button.
- In the next screen, enter the email that will be used for your Microsoft account in the box at the top. If you want to avoid using an email, click on Sign in without a Microsoft account (not recommended) at the bottom of the sign-in window.
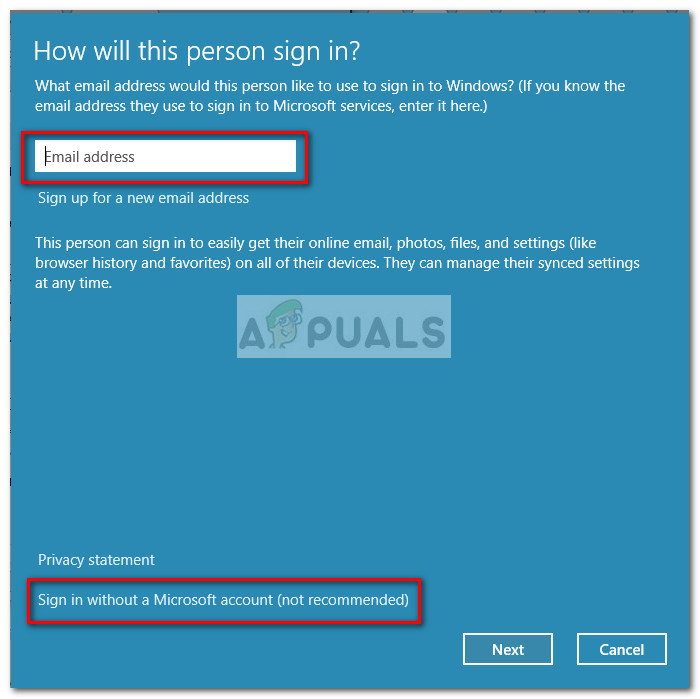
- In the next, screen, either click on Local account or Microsoft account, depending on your preferences.

- Type in the username, password and password hint, then click the Next button. Follow the on-screen prompts to complete the account creation process, then restart your computer.
- At the next startup, you will be able to log-in with your newly created user account.
If this method wasn’t successful or you’re looking for a different route, move on to Method 2.
Method 2: Adding a new user account via Command Prompt
You can also create a new Windows user account manually from an elevated Command Prompt. This method involves doing everything manually but the advantage is you don’t have to switch the active user. This will require you to get a little technical, but a lot of users have confirmed that it’s effective in creating a new account where the approach using the graphical interface had failed.
Here’s a quick guide on adding a new local or Microsoft Windows user account by using an elevated Command Prompt:
- Press Windows key + R to open up a Run box. Then, type “cmd” and hit Ctrl + Shift + Enter and choose Yes at the UAC (User Account Control) prompt to open up an elevated Command Prompt.

- In the Elevated Command Prompt, type the following command and press enter to create a new local user account without a password:
net user "AccountName" /add
Note: Keep in mind that AccountName is merely a placeholder for the actual username that you want for your new local account.
If you want to create a local account protected by a password, use the following command instead:
net user "AccountName" "Password" /add
Note: AccountName and Password are placeholders for the actual values that you want to enforce. Please substitute them with your own preferences.
- Close the elevated Command Prompt and reboot your computer. By default, account that you’ve just created will be a standard user account by default. You can, of course, change the account type to administrator or guest if you like (just like you would do with an account created using the conventional way). Or better yet, you can also convert the newly created local account to a Microsoft account.
- Either way, you can begin using your newly created user account by signing in at the next startup.
If this method wasn’t effective or you’re looking for a way to treat the cause that prevents you from adding a new user conventionally, move down to Method 3.
Method 3: Disabling Interrupting services
Some users have managed to resolve the issue with the creation of new user accounts conventionally after discovering that the problem is caused by an interrupting background service. Some of them managed to identify the culprit after using a hit and trial approach that enabled them to identify and disable the service that was causing the issue.
Here’s a quick guide on how you can identify and disable a service that might be interfering with the creation of new user accounts:
- Press Windows key + R to open up a new Run box. Then, type “msconfig” and hit Enter to open System Configuration.

- In the System Configuration window, go to the Services tab and check the box associated with Hide all Microsoft services.
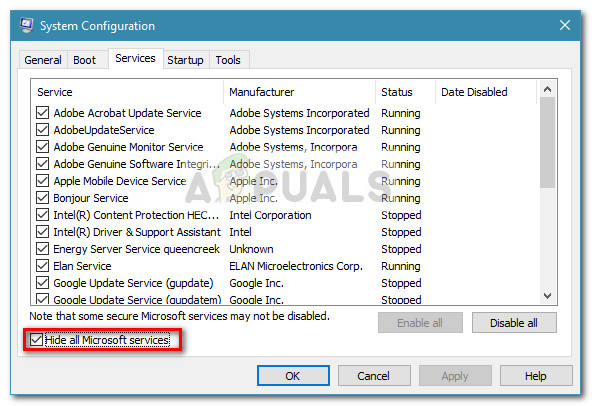
- Once all the services belonging to Microsoft have been hidden, click on the Status column to see a clear list of the processes that are currently running. Then, uncheck each process that has the status listed as Running and hit Apply to save the changes.

- Once all 3rd-party services are disabled, attempt to create a new user account successfully and see if you’re successful. If you are successful, it’s clear that one of the processes that you’ve recently disabled was causing the issue.
- You can finish adding a new user, then restart the services back by returning to the System Configuration screen, check the boxes associated with the disabled services and clicking Apply.
- If you want to pinpoint the exact cause, you should return to the System Configuration screen and systematically re-enable the stopped processes and check the Add someone else to this PC button until you determine the cause.
If this method didn’t enable you to resolve the issue, move down to Method 4.
Method 4: Doing an in-place Reinstall
Some users have reported that they finally managed to treat the cause of the issue and manage to create new users accounts conventionally after doing an in-place reinstall. Don’t be afraid of the fancy name, this procedure is actually a lot more simple than it sounds. If you decide to do an in-place reinstall (also known as repair install), follow this guide (here) for complete step-by-step instructions.
A repair-install will require you to provide (or create) some kind of installation media. But the major advantage is that it ensures minimal user data loss.
If you’re looking for a simpler fix that will allow you to create user accounts conventionally, move down to Method 5.
Method 5: Resetting Windows 10
If you’ve come this far without a result, one final resolution would be to reset or refresh your Windows 10 PC. This is not ideal since it will make you lose most of your personal information, but it will definitely solve the problem that you’re currently struggling with when creating a new user account conventionally.
If you decide to go for a reset, you can make it easier for yourself by following our comprehensive guide (here).


