Fix: Black Screen After Sleep Windows
Windows releases frequent updates to fix various problems which are present in the operating system. Even though most of the problems are solved very quickly, the famous error of the screen going black after waking up from sleep mode continues to trouble users.
The reasons why this error occurs are primarily clashes between modules or a bad update by Microsoft (in most cases, the 1709 update). While some of the solutions might solve the problem entirely; we still have to resort to workarounds if they don’t. Start with the solutions starting with the first one and work your way down accordingly.
Note: Before following these solutions, it is advised that you update your Windows to the latest version. Microsoft released updates to fix various problems which included this issue.
Solution 1: Disabling Fast Startup, Hibernation, and Hybrid Sleep
Windows has introduced many modules in the latest updates ranging from Fast startup mechanisms to hybrid sleep phases of your computer. These are meant to reduce the boot time whenever you start your computer up again and give a feel of using an ‘SSD’. These very features were diagnosed in causing the black screen after the sleep phase of both laptops and towers.
We will try disabling these modules one by one and see if this solves the problem. If they don’t, we will move on to the workarounds to prevent the black screen from happening. First, we will disable Fast startup and work our way down to disabling other modules accordingly.
- Press Windows + R and type “control panel” in the box and press Enter.
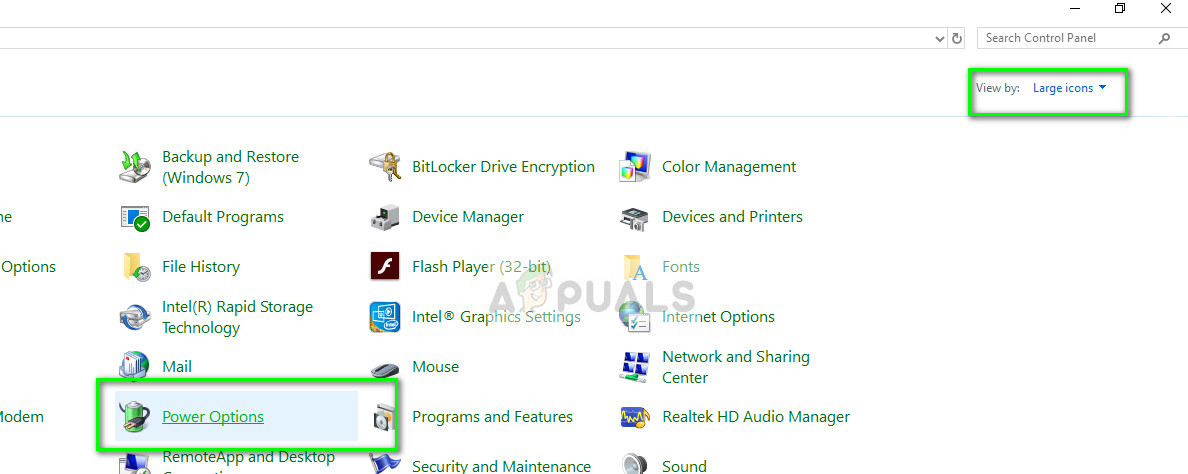
- Once in the control panel, select Large icons and click on Power Options.

- Once in the Power Options, click on “Choose what the power buttons do” present at the left side of the screen.

- Now you will see an option which requires administrative privileges named as “Change Settings that are currently unavailable”. Click it.

- Now head to the bottom of the screen and uncheck the box which says “Turn on fast startup”. Save changes and exit.

Once you are done making changes, restart your computer completely and try entering sleep mode to check if the changes made any difference. If this doesn’t work, we can move on and try disabling the hibernation mode. Do note that if you are using a laptop, this will mean that your computer will continue to drain energy as you will not be able to hibernate it.
- Press Windows + S, type “command prompt” in the dialogue box, right-click on the application and select “Run as administrator”.
- Once in elevated command prompt, execute the following command:
powercfg /h off

- Restart your computer after executing the command and check if the black screen still occurs when your computer enters sleep mode.
If even this doesn’t solve the problem, we can go to the root cause and disable your computer’s sleep function permanently. This means that your computer will not sleep automatically or even when you close the lid. Disabling sleep might serve as a ‘workaround’ for the problem but it isn’t a proper solution. Feel free to try the other methods before coming back to this.
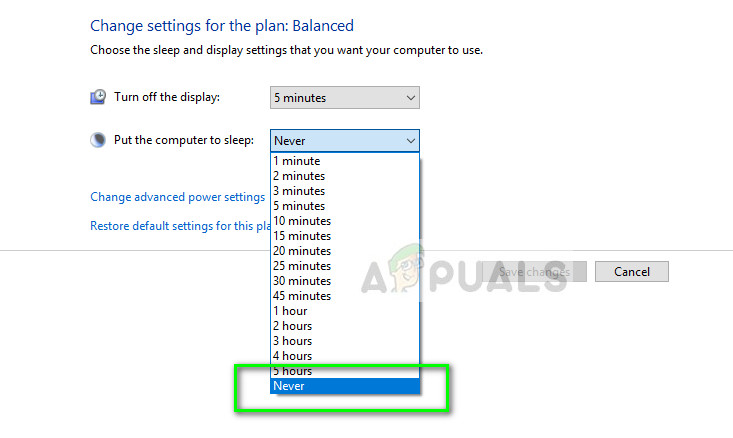
- Navigate back to the power options which we accessed earlier and click on “Change plan settings” present in front of the currently selected option.

- Change the option of “Put the computer to sleep” to Never. In the case of a laptop, there might also be an option of closing the lid.

- Save changes and exit. Restart your computer. Now your computer will not automatically go into sleep mode. It will only go if you use the sleep option from the shutdown options.
Solution 2: Disabling App Readiness
App readiness is reported to be necessary to perform a successful Windows update on your computer but according to official Microsoft statement, this seems to be conflicting with several registry keys on your computer. Here we can either disable the App Readiness service or disable the registry keys which seem to be the root of the problem.
According to Microsoft and HP, the user might experience a ‘black screen’ for around 10 minutes before he is able to get control of the computer again. As ridiculous as this might seem, this is the case and Microsoft even launched a potential update to fix the problem.
- Press Windows + R to launch the Run application. Type “services.msc” in the dialogue box and press Enter.
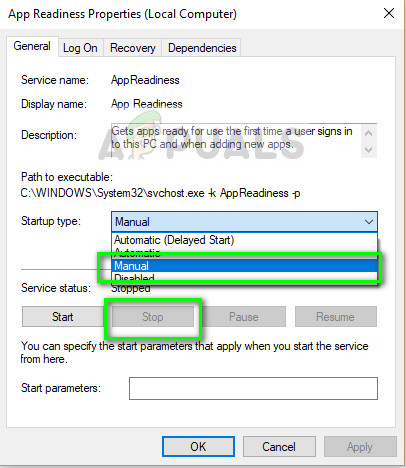
- Once in the services tab, look for the service of “App Readiness”. Right-click it and select Properties.

- Once in the properties, stop the service by pressing the “Stop” button present alongside Service status. Then select the startup type as “manual” instead of automatic. Press Ok to save changes and exit.

- Now restart your computer completely and check if the black screen still occurs.
Solution 3: Changing Registry Keys (Advanced users)
Like mentioned before, the service App readiness seems to conflict with the existing registry keys on your computer. If disabling the service doesn’t do any good, we can go ahead and delete some registry keys.
Note: It is extremely important that you backup your registry first before following the solution below. We will be deleting some keys and if this doesn’t work, you might be required to restore the changes.
- Press Windows + R, type “regedit” in the dialogue box and press Enter.
- Once in the registry editor, navigate to the following path:
HKEY_LOCAL_MACHINE\SOFTWARE\Microsoft\Windows\CurrentVersion\Appx\AppxAllUserStore\Applications

- Now select the sub-keys which begin with the following keywords, right-click them and click Delete.
Microsoft.NET.Native.Framework.

Microsoft.NET.Native.Runtime.

Microsoft.VCLibs.
- Once done deleting the keys, perform a power cycle of your computer and check if this solves the problem. If it doesn’t or your computer goes into some other error state, you should restore the registry values and see if this fixes the problem.
Solution 4: Waking up your computer
There are also some cases where the computer wakes up but the correct display might not be selected or the display might still be sleeping. In that case, a simple mouse click or the pressing of a keyboard key should fix the problem but if it doesn’t, follow the simple tips listed:
- There can be instances where Windows might not be detecting the display. Press Windows + Ctrl + Shift + B to wake up your display forcefully.
- You can also try attaching a different monitor to your PC and check if the display is outputting to that screen. If it is, it probably means that there is some problem with your current monitor. You should press Windows + P a couple of times to change the display output.
- Make sure that all other devices (except for keyboard and mouse) are disconnected from your computer.
In addition to the above methods, if you are still unable to fix the problem, you can try the steps listed below:
- Either update or downgrade your Graphics driver according to your situation. In some cases, even rolling back Intel HD graphics solved the issue.
- Check your PSU (power supply unit) and make sure it is delivering the correct wattage needed.
- Perform a system restore to revert back to a state before or the update. If you don’t have any restore points, do a clean install.


