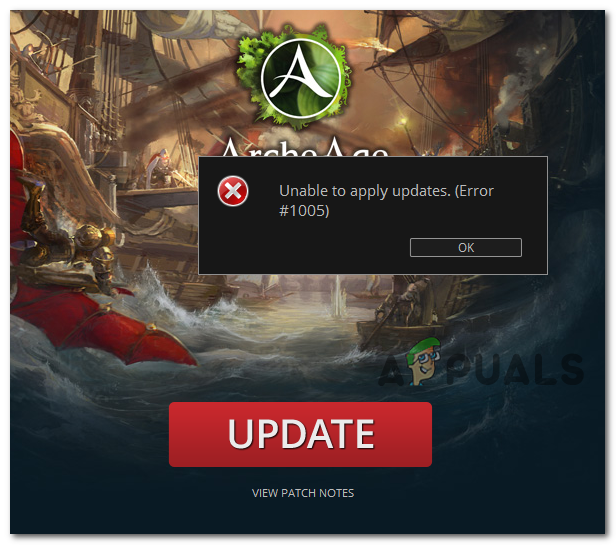
How to Fix Archeage Error 1005 (Unable to Apply Updates)
The Error 1005 appears when some PC users attempt to install ArcheAge or when attempting to install a pending update on the already installed game. This problem is not exclusive to a particular Windows version since it’s confirmed to occur on Windows 7, Windows 8.1, and Windows 10.
As it turns out, there are several different causes that might end up causing this error code with ArcheAge. Here are several different confirmed culprits:
- Corrupted game_pak file – One of the most common instances that will trigger this particular error is a case of a corrupted game_pak file that is preventing the game from auto-updating itself. In this case, you should be able to fix the issue by deleting the file from your game folders, forcing the auto-updating function to create a new instance from scratch.
- Glyph.exe has insufficient permissions – If you’re seeing this error while attempting to update your game to the latest version available, it’s also possible that the main executable used for this (glyph.exe) doesn’t have the required permissions to override old game files with the new equivalents. In this case, you should be able to fix the problem by forcing the executable to run with admin access.
- Corruption inside the AppData folder – Another fairly common instance that might lead to the apparition of this error is corruption inside the AppData folder. To resolve this issue, you’ll need to delete the contents of the Glyph folder (inside the AppData folder) before retying the game update/installation.
- The game launcher is blocked by your AV – If you’re using a security suite that’s known to be overprotective, it’s possible that the main game’s executable is being blocked by your AV due to security reasons. If this scenario is applicable, you should be able to fix the problem by disabling the real-time protection or by disabling the antivirus suite before retrying the update.
- The connection is being interrupted by a firewall – Some 3rd party firewalls are also known for producing the error in instances where the data exchange between the game’s updater and the external download servers are regarded as a suspicious connection. In this case, you can pinpoint the issue by temporarily uninstalling the firewall and then retrying the process.
- Remnant files from previous installations – If you’re seeing this error while attempting to update the game version to the latest, it’s possible that the installation is being halted by some remnant files left behind by a previously botched update attempt. Some users that found themselves in a similar scenario have fixed this by uninstalling the game, clearing the game files, and then installing in a different location.
Method 1: Deleting the game_pak file
One of the most common fixes for the Error 1005 is to search and delete a Bin32 file called game_pak. Several affected users have confirmed that this fix has successfully helped them to either install the game or complete the pending update.
In most cases, this problem will appear due to some conflicting data that the game_pak file holds. By deleting it, you will end up forcing the game to start with no data brought about from the previous installation/updating attempts.
If this scenario is applicable, follow the instructions below to navigate to the location of the game_pak file and delete it conventionally:
- Open File Explorer (or My Computer on older Windows version) and navigate to the following location:
C:\Program Files (x86)\Glyph\Archeage\Live
- Once you’re inside the correct location, double-click on the Bin32 folder o access it, then scroll down through the list of files and locate the one file named game_pak.
- After you finally find the file, right-click on it and click on Delete to remove it from your game folder.

Deleting the game_pak file - Once the game_pak file has been removed, reboot your computer and launch the game once again and repeat the action that was previously causing the Error 1005.
In case you’re still seeing the same error when attempting to install or update ArcheAge, move down to the next potential fix below.
Method 2: Running the glyph.exe as Administrator
As I turn out, this problem can also be caused by a permission issue related to the glyph executable. Some affected users have managed to fix the problem by forcing the glyph.exe executable to run with admin access at every attempted startup.
This operation will fix those instances where the game is unable to update itself due to the fact that the auto-updating function is not permitted to override existing files.
If this scenario is applicable, you should be able to fix the problem by navigating to the location of glyph.exe, running it with admin access and see if the problem is now resolved.
To do this, navigate to C:\Program Files (x86)\Glyph\Archeage\Live\Bin32, right-click on glyph.exe, and choose Run as Administrator from the newly appeared context menu. When you’re prompted by the UAC (User Account Control), click Yes to grant administrative privileges.

If this operation is succesfull, keep in mind that you’ll need to repeat this operation every time a new update is pending.
However, you can make the assignment of admin rights permanent by making some modifications via the Properties screen of the glyph.exe file. Here’s a quick guide on making this happen:
- Open File Explorer (My Computer on older Windows versions) and navigate to the location where you installed the game. The default location is:
C:\Program Files (x86)\Glyph\Archeage\Live\Bin32
- Next, right-click on glyph.exe and then click on Properties from the newly appeared context menu.
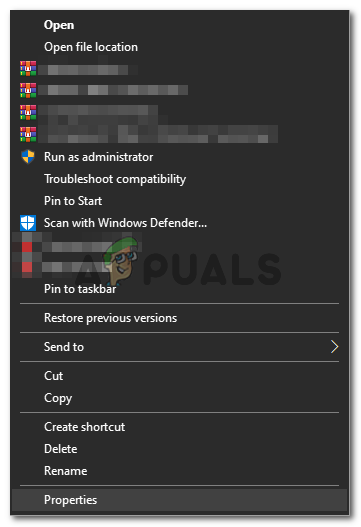
Right-clicking and selecting “Properties”. - Once you’re inside the Properties screen, access the Compatibility tab from the menu at the top and check the box associated with Run this program as administrator (under Settings) and click Apply to save the changes.

Run this program as an administrator
In case forcing admin rights onto the glyph executable didn’t fix the issue in your case, move down to the next potential fix below.
Method 3: Deleting the Glyph AppData folder
As it turns out, you might also see the Error 1005 after the updating client gets stuck in a limbo stake where the game’s client is no longer able to authorize the login with your account. As it’s been documented, this problem is most likely to occur due to some partially corrupted files present in the AppData folder associated with the game.
If this scenario is applicable, you should be able to fix the problem by navigation to the Glyph AppData folder manually (using File Explorer or My Computer) and deleting its contents in order to force the game’s launcher to start fresh.
If you’re unsure on how to do this, follow the instructions below:
- Press Windows key + R to open up a Run dialog box. Next, type ‘%AppData%’ inside the text box and press Enter to open up the AppData folder.
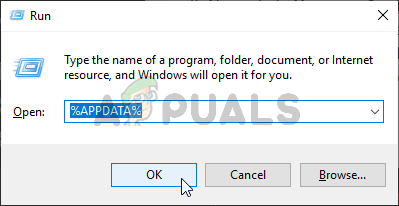
Opening AppData in the Run dialog box Note: Keep in mind that this folder is hidden by default. So unless you enable the View Hidden items toggle from the View tab at the top, you will not be able to visit this location conventionally.
- From the AppData folder, navigate to the following location manually:
C:\Users\*Your USERNAME*\AppData\Local\Glyph
- Once you’re inside the Glyph folder, press Ctrl + A to select everything inside, then right-click on a selected item and click on Delete to delete the contents of this folder.
- Once the contents of the Glyph folder have been successfully deleted, restart your computer and repeat the action that was previously triggering the Error 1005.
In case the same problem is still occurring, move down to the next potential fix below.
Method 4: Whitelisting glyph.exe or Disabling Antivirus
In case you’re using a 3rd party antivirus that has a tendency of being overprotective, you should try disabling the real-time protection before retrying the process that was previously causing the 1005 error.
Keep in mind that most 3rd party suites will allow you to disable the real-time protection directly via the tray bar icon. Simply right-click it and look for an option that allows you to stop the active monitorization.

One the real-time protection has been disabled, attempt to install the game (or apply the update) once again and see if the problem is resolved.
In case you are using Windows Defender and you determined that the firewall is responsible for blocking the glyph.exe executable, you should be able to fix the problem by establishing a whitelisting rule for it in Windows Defender. Here’s a quick guide on how to do this:
- Press Windows key + R to open up a Run dialog box. Next, type ‘firewall.cpl’ inside the text box and press Enter to open up the classing Windows Firewall interface.

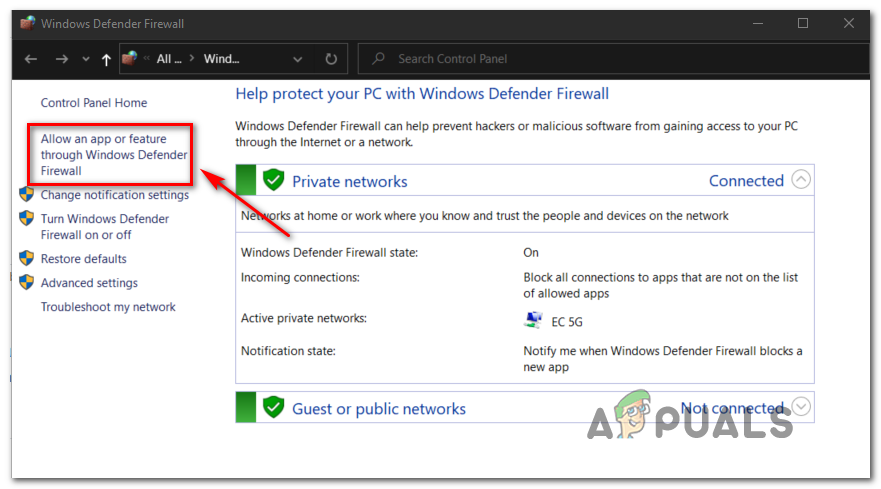
Run dialog: firewall.cpl - Once you’re inside the main menu of Windows Defender, click on Allow an app or feature through Windows Defender Firewall from the left-hand menu of the screen.
Allowing an app or feature through Windows Defender - Once you’re finally inside the next menu, click on the Change settings button, then click Yes at the UAC (User Account Control) prompt.
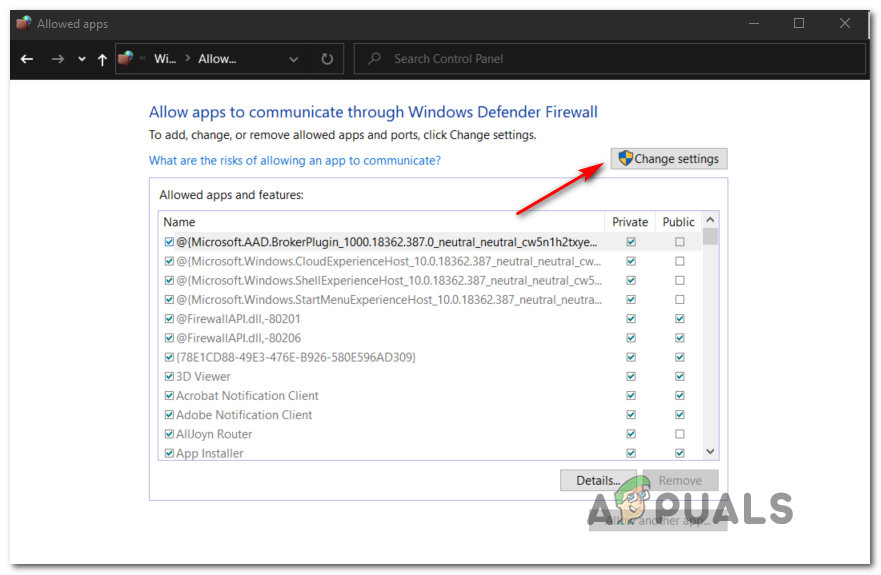
Changing the Settings of the Allowed Items in Windows Firewall - After you manage to obtain full access, scroll down through the list of allowed items, and see if glyph.exe is present in the list. In case you can’t find glyph.exe listed in the list of options, click on Allow another app, then click on the Browse button and add the executable manually.

Allow another app - Next, use the Browse window to navigate to the location of the glyph.exe file. If you didn’t install it in a custom location, you’ll be able to find it in C:\Program Files (x86)\Glyph\Archeage\Live\Bin32.
- Once you’ve made sure that the glyph.exe file is added to the list of allowed items, ensure that both boxes (Public and Private) associated with this executable are checked. Next, click Yes to save the changes.
- When you get this far, you have effectively whitelisted the ArcheAge executable, so your antivirus should no longer interfering.
Check to see if the problem has been resolved by repeating the action that was previously causing the problem.
In case you’re using a 3rd party firewall or the same problem is still occurring even after you disabled your AV or whitelisting the game’s executable, follow the instructions below.
Method 5: Uninstalling 3rd party firewall (if applicable)
In case you’re using some kind of 3rd party firewall that you suspect might be causing this problem, the only way of determining whether it’s actually responsible is to uninstall it completely (along with any remnant file) and see if the 1005 error persists.
By disabling the 3rd party firewall, you’re not actually preventing the previously established security rules from producing their effects.
The only way of pinpointing whether your firewall is responsible for this problem is to uninstall the security program along with its remnant files and see if the issue stops occurring.
After you have successfully uninstalled the 3rd party firewall suite that you were previously using, restart your computer and see if the issue is now resolved.
Note: In case the error code is still occurring, you can attempt to reinstall the overprotective firewall once the game update is complete and look for an option that allows you to exclude the game’s connections from being filtered by your firewall
In case this method was not applicable, move down to the next potential fix below.
Method 6: Reinstalling the game in a different location
If none of the potential fixes above have worked for you, one last thing you should try I to uninstall the game conventionally, clear the remnant files, and then reinstalling the game in a different location. This was confirmed to work by several affected users that were previously encountering the same problem.
If this scenario looks like it could be applicable, follow the instructions below to complete the uninstallation of ArcheAge, clear the remnant files, and then install it in a different location:
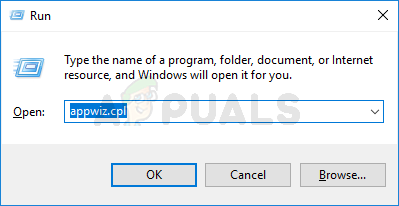
- Press Windows key + R to open up a Run dialog box. Next, type ‘ appwiz.cpl’ inside the text box and press Enter to open up the Programs and Features menu.
Type appwiz.cpl and Press Enter To Open Installed Programs Page - Inside the Programs and Features menu, scroll down through the list of installed applications and locate the ArcheAge installation. When you see it, right-click on it and choose Uninstall from the context menu to initiate the uninstallation.

Uninstalling ArcheAge - Inside the uninstallation screen, follow the instructions to complete the installation, then restart your computer.
- At the next startup, navigate to the location where you previously had saved the game files for Archeage. If you installed in the default location, you will find it here:
C:\Program Files (x86)\
- Right-click on Glyph and choose to Delete to get rid of any remnant files left behind by the uninstallation process you’ve just performed.
- Next, sign in with your account on the official ArcheAge Game website, then download and install the game files in a different location and see if the problem has been resolved.


