How to Fix Event ID 7031 and 7034 Error Windows
Windows 10 Error ID 7031 and 7034 is a recognized Windows bug that occurs on shutdown as soon as the OneDrive sync facility needs to close itself. It should be noted that this event does not affect OneDrive’s operations.

The Event Viewer utilizes event identifiers to identify and elaborate the special events a Windows machine may come across. For example, if a user cannot be authenticated, the program may produce Event ID. The same is the case with Event Ids of 7031 and 7034.
Reasons for Event ID 7031 and 7034
The Event ID 7031 or 7034 is triggered by OneDrive and by the module OneSyncSvc_Session. This usually occurs during the shutting down of the computer. In the shutdown process, OneDrive is expected to shut down by the operating system within a given window of time. When it fails, it is forcefully closed which in turn causes these event ids.

Method 1: Disable OneSyncSvc
Many users reported that turning off OneSyncSvc resolved the issue of OneDrive not shutting down properly. This service is related to OneDrive’s sync mechanism and disabling it usually doesn’t affect your sync capabilities. You can always start the process back if this doesn’t work in your case.
- Open the Task Manager / Services tab.
- Firstly, right-click on the service ‘OneSyncSvc’ and tap on ‘Stop’.
- Secondly, open Command Prompt as an administrator. Type the below-mentioned command at the prompt and then tap ‘Enter’.
sc stop "OneSyncSvc"

sc config "OneSyncSvc" start= disabled

Method 2: Modify Services in Registry Editor
Another thing that we can try is changing some registry entries related to OneDrive. Make sure that you follow the steps very carefully; changing other registry keys might break your computer instead of fixing it. You can also backup your registry before proceeding.
- Click on the ‘Search bar’ and type ‘Regedit’ in it. Click on the ‘Registry Editor’ app as shown.

- Navigate through the below-mentioned path.
Computer\HKEY_LOCAL_MACHINE\SYSTEM\CurrentControlSet\Services\OneSyncSvc

- Lastly, change the value of service to ‘4’ of the file name ‘Start’ and then click ‘OK’ in the window that pops up. This would be heading to deactivate the service. Save changes and exit. Check if the issue is resolved.Note: If this doesn’t work, navigate back to the file path mentioned and perform the actions to all the keys starting with OneSyncSvc. In this example below, there are two other files present that can be changed as well.

Method 3: Disable WarpJITSvc
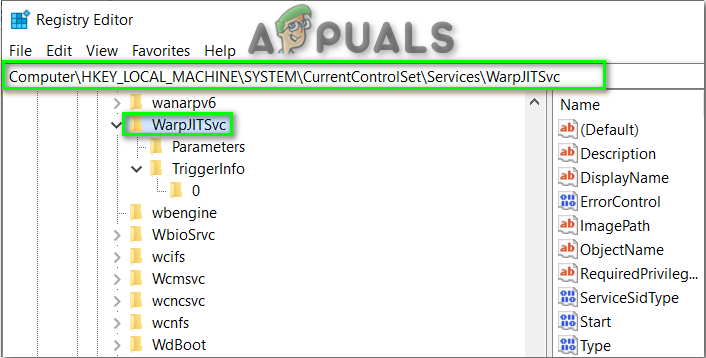
Luckily, another excellent way to solve this error is to disable WarpJitSvc service from Registry Editor. Follow these steps to see if this fixes the problem or not:
- Click on the ‘Search bar’ and type ‘Regedit’ in it. Click on the ‘Registry Editor’ app to open it.
- Navigate through the below-mentioned path.
HKEY_LOCAL_MACHINE\SYSTEM\CurrentControlSet\Services
- Firstly, scroll down a bit to search for ‘WarpJITSvc’ Right-click on it, and tap ‘Properties’.
- In the end, in the general tab of WarpJITSvc, expand the option of ‘Startup Type’ and select ‘Disabled’.

Method 4: Reinstall Video Drivers
Last but not the least solution is to reinstall your video drivers from your PC. Drivers can get outdated over time and they require frequent updating to keep up with the operating system. Hopefully, it will solve your problem at its earliest.


