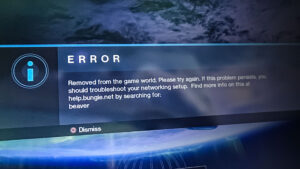
Easy Fix for ‘Error Code: Beaver’ in Destiny
Error code Beaver in Destiny occurs when your network is not working optimally for Destiny (like the DNS settings of your device). Moreover, the wrong configuration of the router (like Flood Protection or QoS) may also cause the issue at hand.
The user encounters the error code Beaver in Destiny when launching (or playing) the Destiny game.
You can fix the error code Beaver by the solutions discussed below but before that, check if restarting the game/launcher or device sorts out the issue. Also, make sure you are using a wired connection to the device (Destiny “hates” Wi-Fi connections). Moreover, check if the in-game NAT type is set to open. Make sure all the Destiny updates are applied to your system. Additionally, check if getting your router out of the bridge mode sorts out the issue.
There is a temporary workaround reported by users to solve the issue, you may check if that sorts out the issue for you:
- Pick your destination (e.g., tower) and when you spawn, check if other players (or NPCs) are shown.
- If not, then wait (do not touch any of the controllers) till other players are shown and once other players are shown, check if you can play Destiny without getting the Beaver error.
1. Renew the IP Address of Your Device
You may encounter the error code Beaver in Destiny if the IP address of your device is marked as unsafe by the Destiny servers. In this scenario, renewing the IP of your device may solve the problem. For elucidation, we will guide you through the process of resetting and changing the IP address for a Windows device.
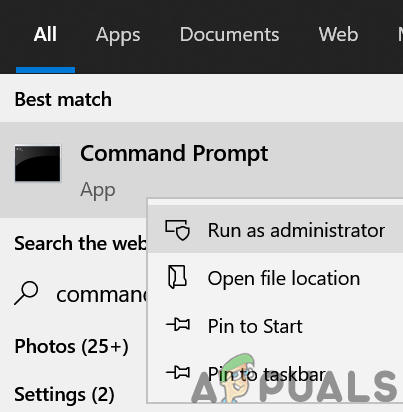
- Click Windows, type: Command Prompt, right-click on Command Prompt, and select Run as Administrator.
Open Command Prompt as Administrator - Now execute the following cmdlets one by one:
ipconfig /release

ipconfig /renew
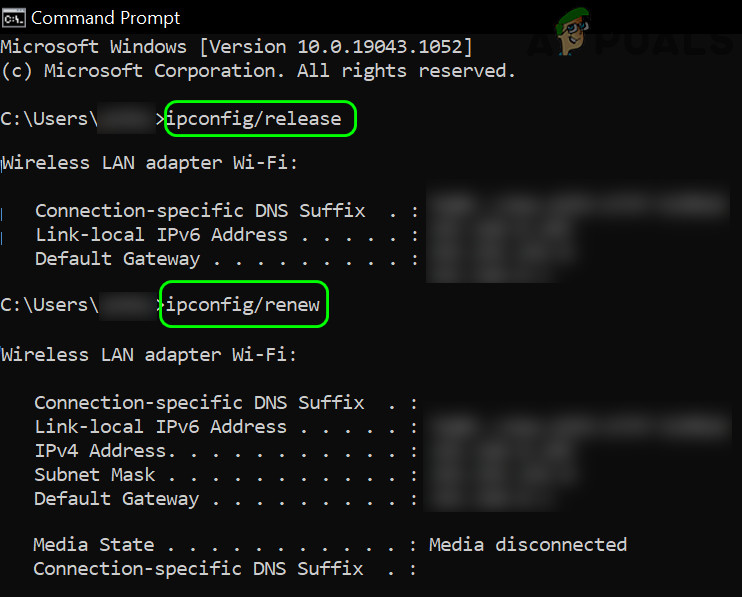
Release and Renew IP of the Windows 10 PC - Once the IP address is renewed, check if Destiny is clear of the error code Beaver.
If not, you may check if restarting your device and networking equipment solves the Destiny issue. If you are using a static IP, then you may contact your ISP to renew your IP Address.
2. Edit the DNS Settings of Your System
Destiny may show the error code Beaver if the DNS settings of your system are not optimal for Destiny. In this context, editing the DNS settings of your system to use another DNS server (like Google DNS) may solve the problem. But before proceeding, make sure your device’s MTU is set to 1460. For elucidation, we will discuss the process for editing the DNS settings for a Windows PC.
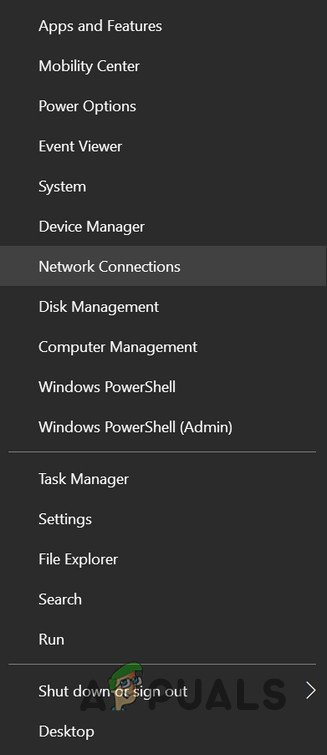
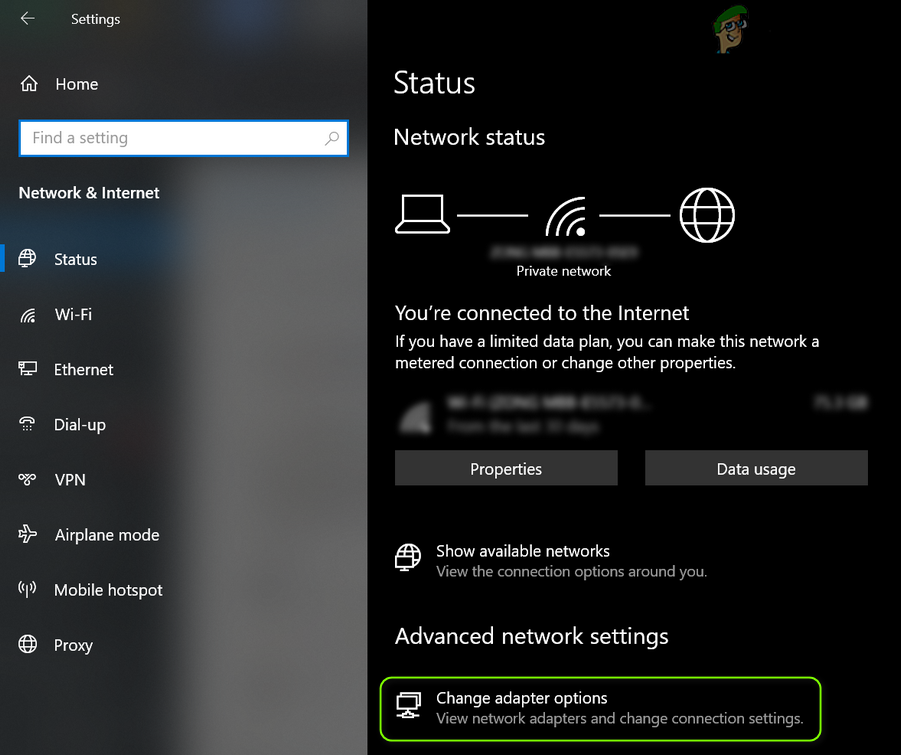
- Right-click Windows and open Network Connections.
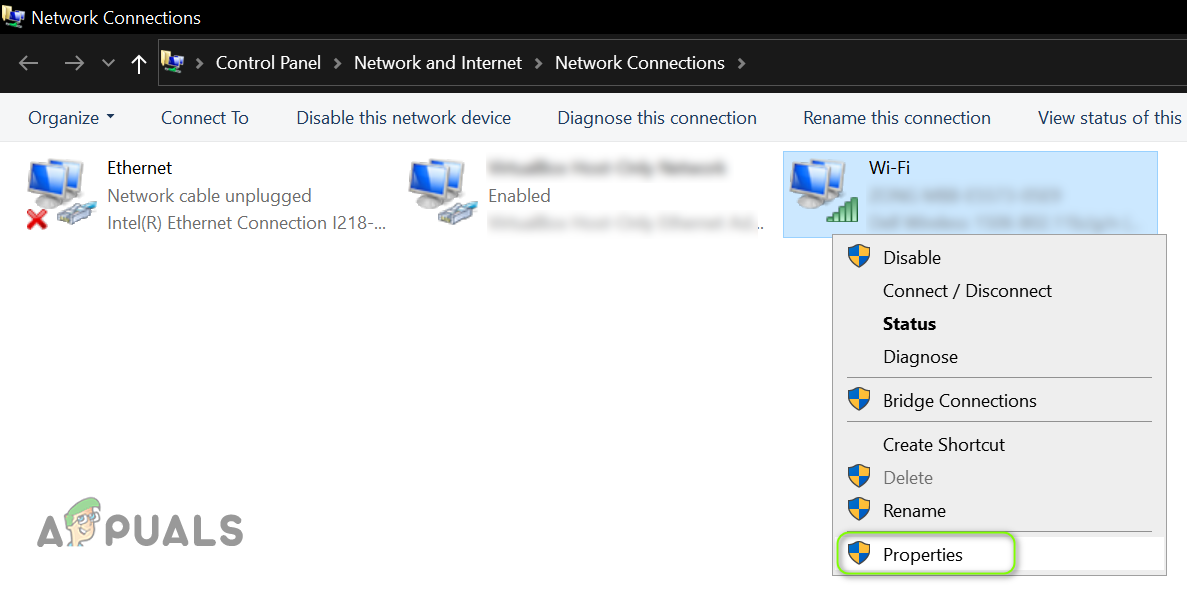
Open Network Connections - Now open Change Adapter Options (under Advanced Network Settings) and right-click on your network connection.
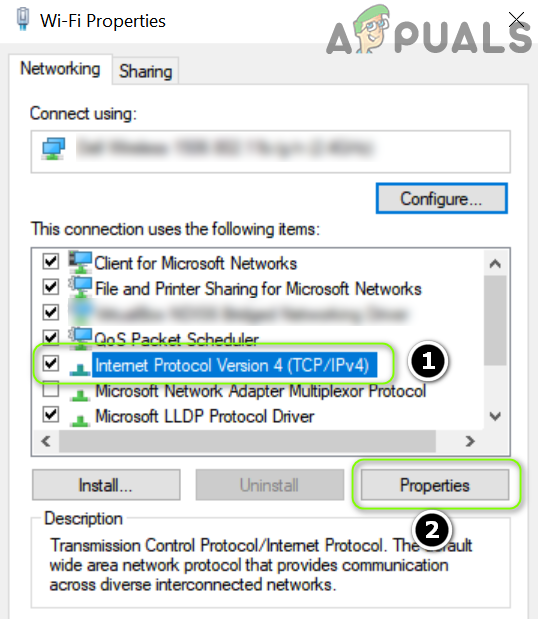
Open Change Adapter Options - Then, in the menu shown, select Properties, and in the network properties window, select TCP/IPv4.
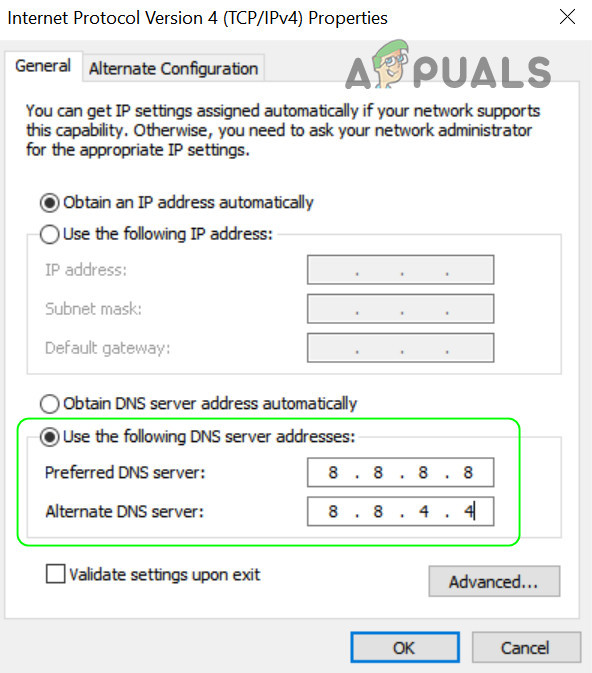
Open Properties of the Network Adapter - Now click on the Properties button and select the radio button of Use the Following DNS Servers.
Open Properties of Internet Protocol Version 4 (TCP IPv4) - Then enter the following values:
Preferred DNS Server: 8.8.8.8

Alternate DNS Server: 8.8.4.4
Change the DNS Server of Your PC - Now apply your changes and reboot your device to check if it is clear of the error code Beaver.
3. Enable the Beta Version of the Steam Client
Technology is evolving at a rapid pace and to keep up with it, Steam and Bungie release new updates regularly and the beta version is usually the first one outside the internal testing ring to get the latest updates. In this context, enabling the Beta version of the Steam client may solve the Destiny issue.
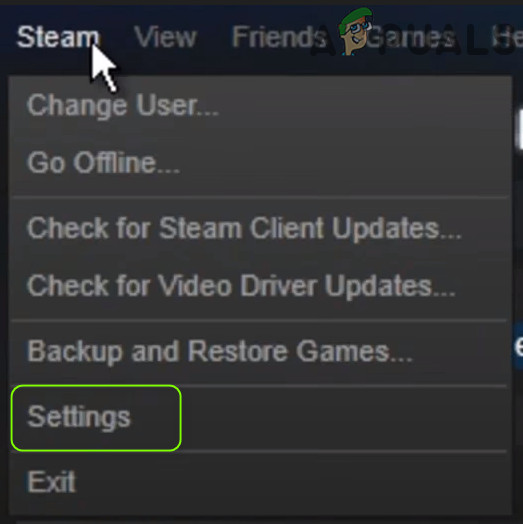
- Launch the Steam client and expand the Steam menu (near the top left).
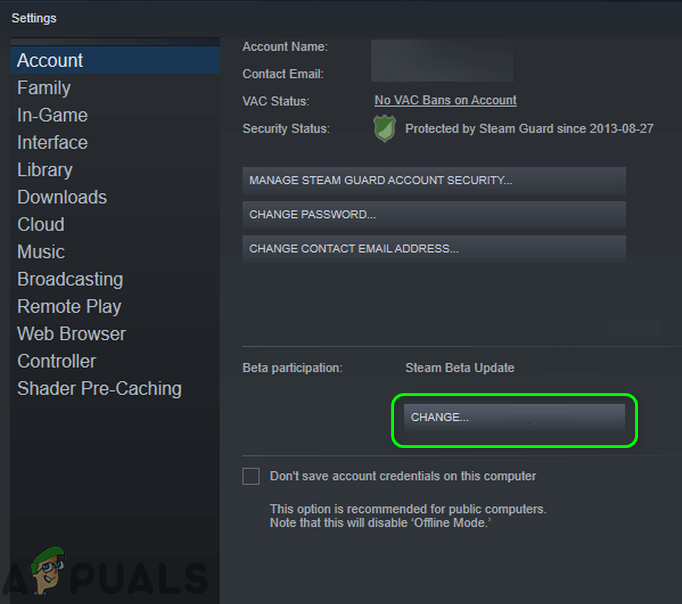
- Now select Settings and click on Change (in the Beta participation section).
Open the Steam Client Settings - Then select Steam Beta Update and click on the OK button to apply your changes.
Click on the Change Button for the Beta Participation of Steam - Now click on Restart Steam and once relaunched, check (you may have to wait a bit for the downloading and installing of the beta updates) if it is clear of the error code Beaver.
4. Try Another Network
Restrictions from your ISP may also cause the error code Beaver in Destiny and trying another network may solve the issue (temporarily).
- Disconnect your device from the current network and connect to another network (like your mobile phone’s hotspot).
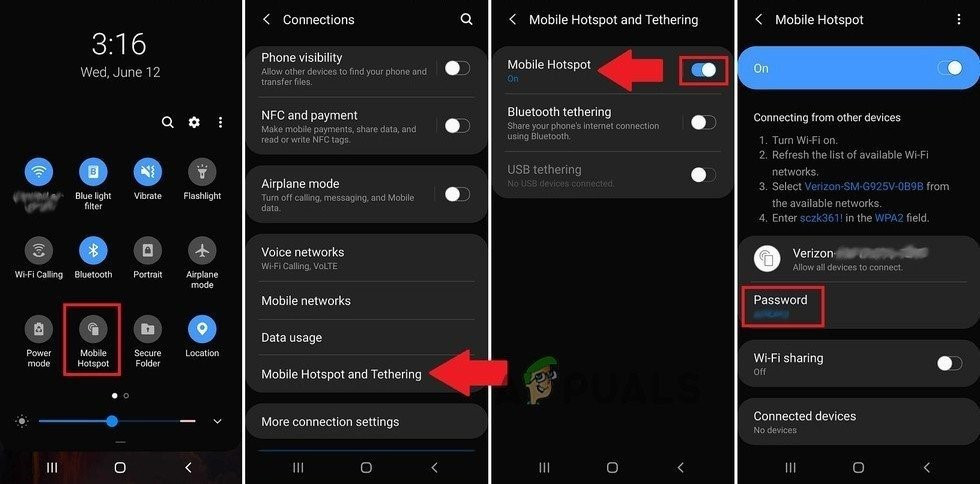
Enable Hotspot of Your Phone - Now launch Destiny and check if it is operating fine.
If so, then the issue is the result of ISP restrictions, misconfiguration of your router (discussed later in this article), or Destiny servers’ blocking your IP address.
5. Edit the Router Settings
Error code Beaver in Destiny could be the result of a misconfiguration of your router settings (like QoS) and properly configuring the router settings (like disabling Flood Protection) may solve the problem. Before moving on, check if switching between the DNS setting of your router from Auto Detect and Google DNS (or any other) sorts out the issue for you. Keep in mind the undermentioned instructions slightly differ for different routers due to their make and model and you may have to dig deeper to make it work for you.
5.1 Enable QoS in the Router Settings
- Firstly, exit Destiny and end its tasks (if any) in the Task Manager of your system.
- Then launch a web browser and steer to the admin portal of your router e.g., 192.168.10.1 (you may have to log in using your credentials).
- Now look for Advanced Network Settings (Setup, or Wireless Settings) and check if QoS Setup is present there.
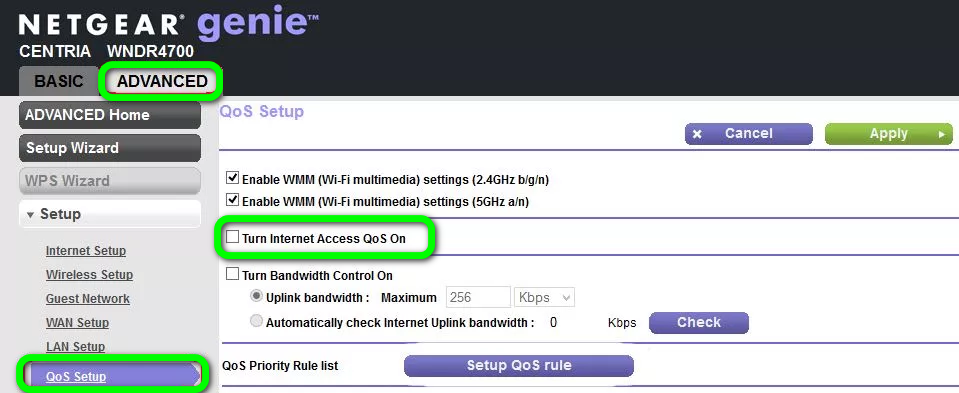
Enable QoS in the Router’s Settings - If so, then enable QoS and set up a QoS rule to prioritize the Destiny traffic.
- Then apply your changes and launch Destiny to check if it is clear of Beaver error.
If that did not do the trick, then check if enabling ICMP proxy (if your router supports it, like Net Duma router) in the router settings sorts out the issue for you.
5.2 Disable the Flood Protection (or DoS Protection) Feature
- Navigate to the admin portal of your router by using a browser and log in using your credentials.
- Now expand Firewall Settings and head to the Flood Protection tab.
- Then uncheck the checkboxes of Enable UDP Flood Protection and Enable ICMP Flood Protection.
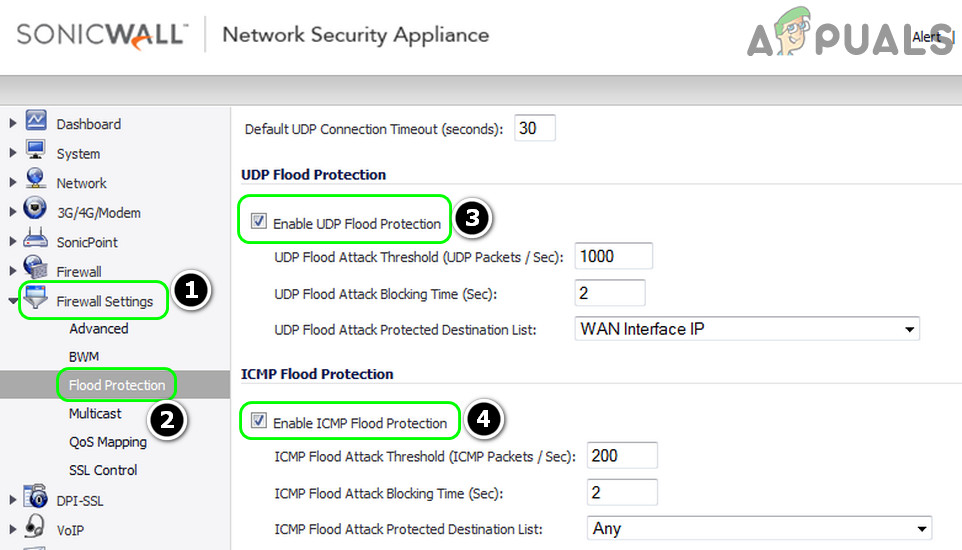
Disable Flood Protection in the Router’s Settings - Now save your changes and launch Destiny to check if the error code Beaver issue is resolved.
If not, then check if enabling/disabling filter mode (like Geo-Filter in Net Duma’s router) solves the Destiny issue.
5.3 Enable UPnP in the Router Settings
- Navigate to the admin portal of your router by using a web browser and log in using your credentials.
- Now expand Security and steer to the UPnP Settings.
- Then Enable UPnP and apply your changes.
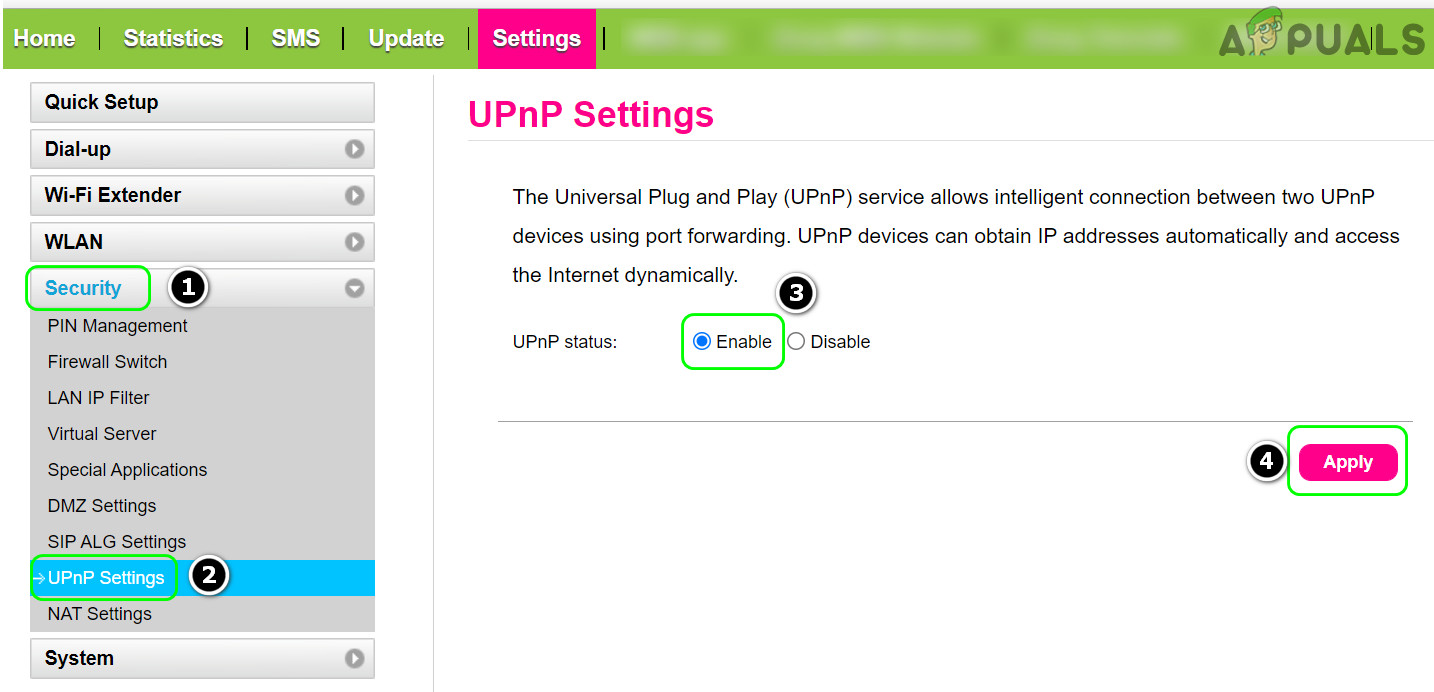
Enable UPnP in the Router Settings - Now open Destiny and check if it is clear of the Beaver error code.
If the issue persists, then check if enabling DMZ and pointing it to your device solves the issue for you. If that did not work, then you may have to forward the ports on the router as per the Bungie instructions.
5.4 Reset Your Router to the Factory Defaults
- Launch a web browser, steer to the router’s admin portal, and log in using your credentials.
- Then expand the System tab (or General tab) and head to the Restore Defaults tab.
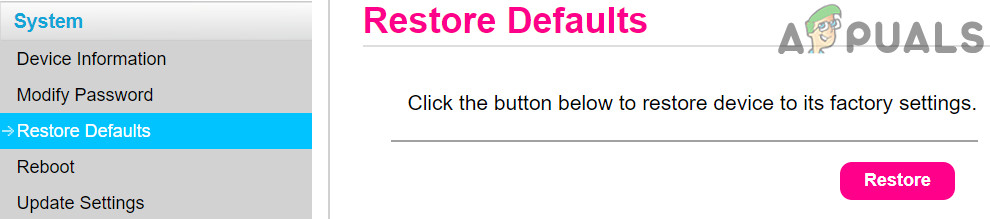
Restore Your Router to Default Settings’ - Now click on the Restore button (in the right pane) and then confirm to restore the router.
- Then launch Destiny and hopefully, Destiny is clear of the Beaver error.
If you are having an issue finding the router reset option in the admin portal, you may use the switch on the router (at the back or bottom of the router) to reset the router.


