How to Fix Error Code 0x9b100041 on Xbox One?
The error code 0x9b100041 appears on Xbox One when some users attempt to launch games like Oblivion or Destiny 2. Most affected users are reporting that the error pops up as soon as they launch the game.
As it turns out, there are several different potential culprits that might end up causing this problem:
- Remnant temporary files – As it turns out, this particular issue can also occur due to some remnant files left behind by a network inconsistency or due to corrupted temporary data. In this case, you should be able to fix the problem by power cycling your Xbox One console.
- Game installation corruption – It’s also possible that the problem was introduced by an unexpected interruption due to the installation of the game or an update/ add-on. In this case, you should be able to fix the problem by reinstalling the game from scratch.
- Corrupted account data – As it turns out, this issue can also occur due to some type of corruption related to some dependencies that were forced into place when you connected your Microsoft account on your Xbox One console. In this case, you should be able to fix the problem by temporarily disconnecting the account to clear the associated data.
- Dirty / Damaged Disk – If you’re only seeing this error while attempting to play a game via a physical disk, it’s likely that the optical block of your console is prevented from reading the information. In this case, go ahead and clean your disk thoroughly to ensure that no lint, dirt, or debris is causing the problem.
- Corrupted Cached Data – Under certain circumstances, this problem can also occur due to the locally saved cache that Xbox One is programmed to create along with your saved games. In this case, you can fix the problem by clearing the game cache along with the save game iterations that you’re currently storing locally.
Method 1: Power Cycling your Xbox One Console
The 0x9b100041 error code typically appears on Xbox One in situations where there’s either a network inconsistency or you’re dealing with some kind of temporary data that ends up affecting the operating system of your console.
If this scenario is applicable, you should be able to fix this problem by performing a simple power cycling procedure on your console. This operation will ensure that the power capacitors are completely drained and that temporary files store in-between normal startups are cleared. Doing this will end up fixing the majority of firmware-related issues that will cause problems when lunching games and applications on Xbox One.
Here’s a quick step-by-step guide on performing a power cycling procedure on Xbox One:
- With your Xbox One console turned on (and not in hibernation mode), press the Xbox button on your console and keep it pressed for 10 seconds or until you see that the front LED stops flashing entirely. Release the button once you see it, then wait patiently until you can hear the back fans turned off.

Power-cycling Xbox One console - Once your console is fully turned off, unplug the power cable of your console from the power outlet and wait for 30 seconds or more to ensure that the power capacitors are completely drained.
- After this time period has passed, plug the power cable back into the power outlet and start your console conventionally. Wait patiently until the next startup is complete and pay attention to the next startup sequence. If you notice the long startup animation, take it as confirmation that the operation was a success.

Xbox One long starting animation - Once the next startup is complete, launch the game that was previously triggering the error code 0x9b100041 and see if the problem is now fixed.
In case the same problem is still occurring, move down to the next potential fix below.
Method 2: Reinstalling the Game
If you’re encountering this problem with Oblivion or Destiny 2, it’s also possible that the problem was introduced with the installation of a bad update (most likely, an unexpected interrupted ended up corruption some data).
If this scenario is applicable, you should be able to fix the problem swiftly by reinstalling the game along with every add-on or expansion. This operation was confirmed to be successful by a lot of affected users.
In case you’re unsure on how to uninstall and then reinstall an Xbox One game, follow the instructions below:
- Press the Xbox button on your console to open up the guide menu. Once it pops up, access the Games & Apps submenu.
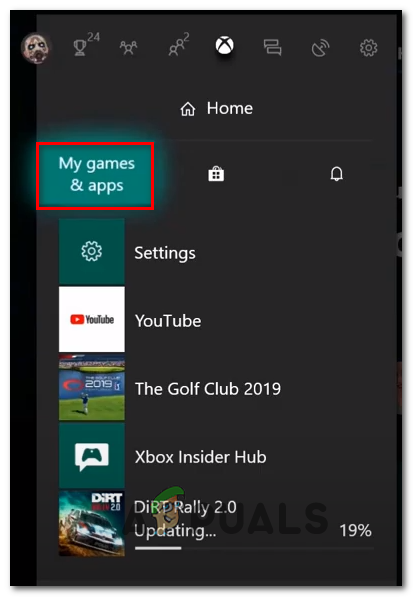
Accessing My games & Apps - Inside the Game & apps menu, scroll down through the list of installed items, highlight it, and then press the Start button on your controller, then choose Manage game.
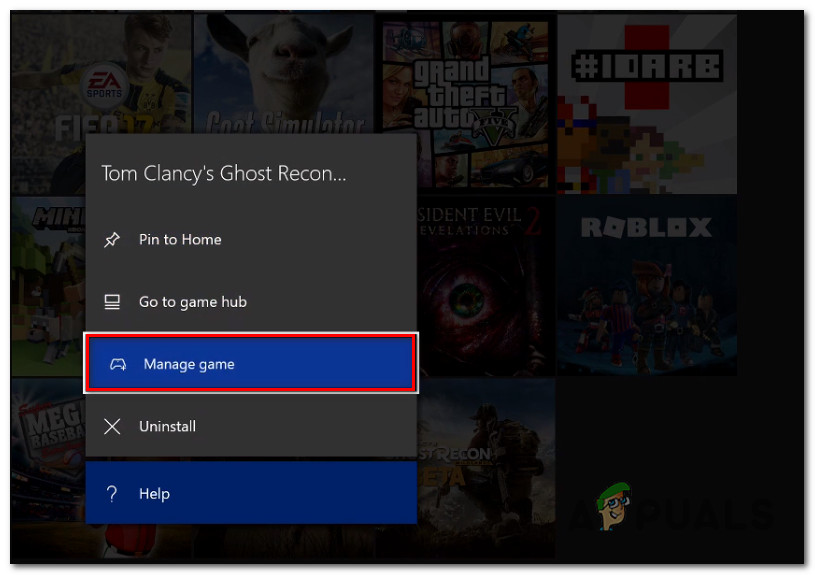
Managing an app/game - Inside the Manage menu that you want to uninstall, use the Uninstall all option on the right pane to ensure that the base game along with every installed update and expansion/add-on is uninstalled.
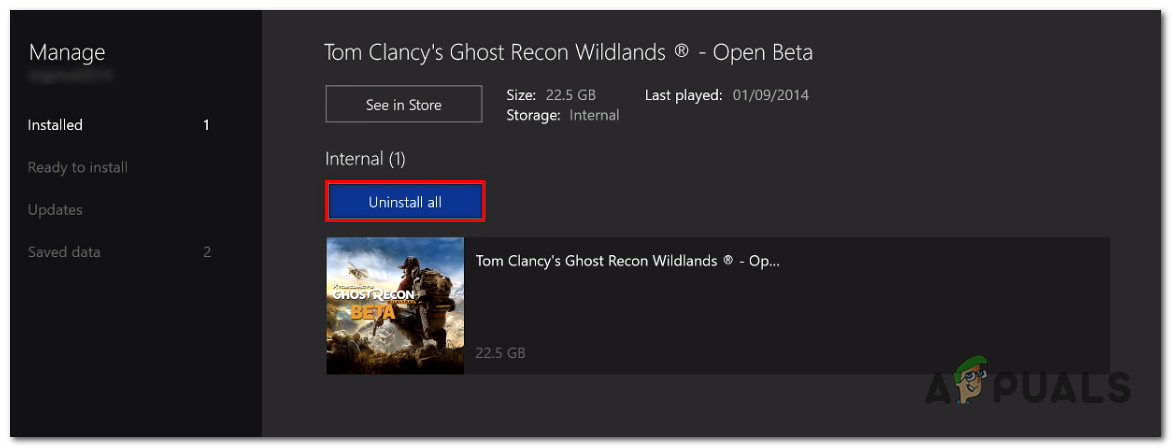
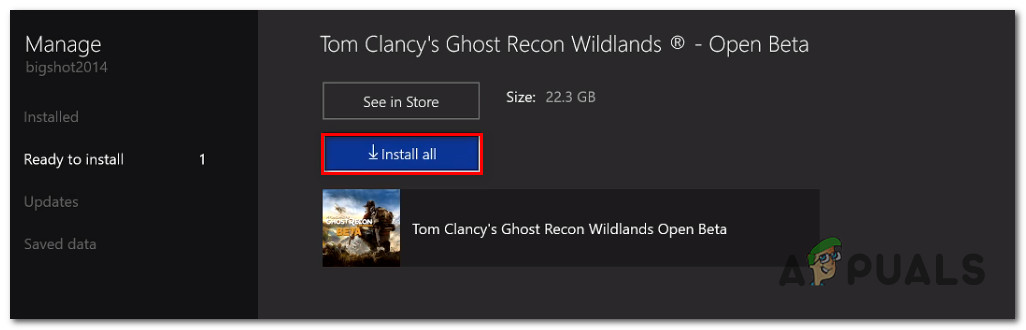
Uninstalling the game - After the process of uninstalling the game is complete, return to the Manage menu (on the left-hand side) and go to the Ready to install section. Next, go to the right pane and click on Install all to force the installation of the game (along with every update and add-on).
Re-installing the game - Once the game is downloaded & install once again, launch it once again and see if the problem is now resolved.
In case you still end up seeing the error code 0x9b100041, move down to the next method below.
Method 3: Removing the Connected Microsoft Account
As it turns out, this problem can also be related to some type of corruption caused by some file dependencies belonging to the Microsoft account that you’re currently connected with.
Some affected users that were previously causing the same problem have reported that they managed to resolve the problem by removing the account that was previously active on the Xbox One console. This will also clean any cached data associated with the account, which might end up resolving the 0x9b100041 error code.
Here’s a quick guide on removing the account & doing a hard restart:
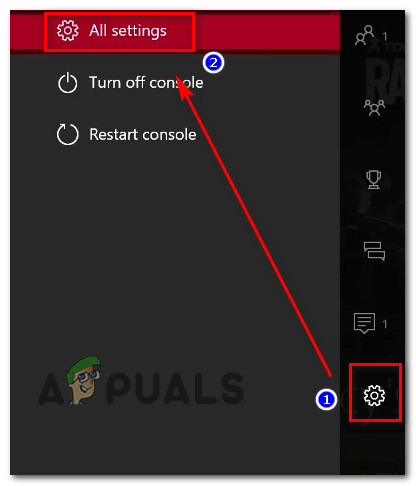
- Press the Xbox button your controller, then select the Settings tab from the newly appeared context menu. Next, scroll all the way down and access the All Settings menu.
Accessing the Settings menu on Xbox One - Once you’re inside the Settings menu, go over to the Accounts tab, then move over to the right-hand side menu and choose the Remove accounts menu.
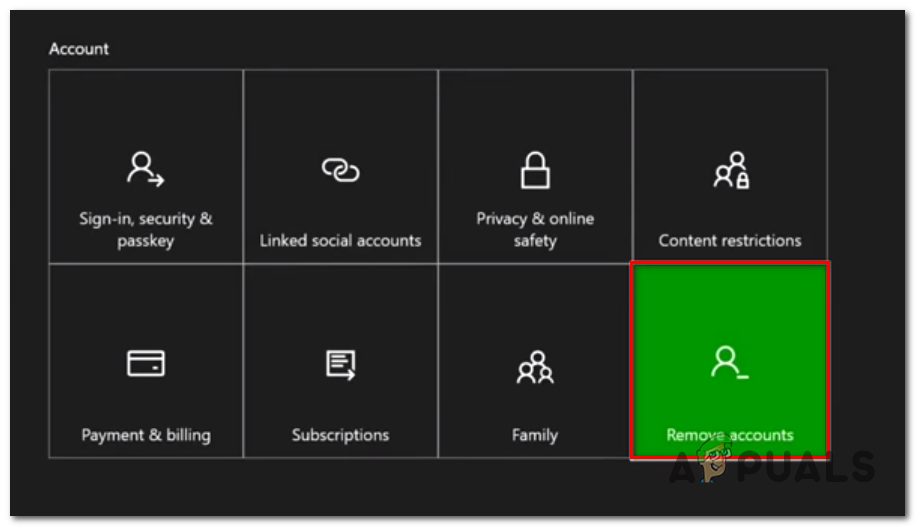
Accessing the Remove accounts menu - Once you get to the next menu, go ahead and select the account that you want to remove, then confirm your choice. This operation will clear your cache, but will not erase any sensitive data, so don’t worry about saving games or any custom preferences that you have previously established.
- After you do this, restart your console and launch the same game again (the one that was previously failing) to see if the problem is now resolved.
In case the same problem is still occurring, move down to the next method below.
Method 4: Cleaning the Disk (if applicable)
If you’re only encountering the error while attempting to play a game via a physical disk, it’s also possible that the optical block is prevented from reading information. This typically occurs if the disk is dirty or if certain sectors are damaged.
In case this game is the only one that’s causing the 0x9b100041 error, you should clean it thoroughly by using isopropyl alcohol and a soft cloth. Keep in mind that isopropyl alcohol dries up very fast, so you don’t have to worry about leaving any by-products that will reduce the damage to your optical drive.
Note: Keep in mind that if the issue is caused by a deep scratch, this operation will not be very effective.
If you’re looking for a quick guide on cleaning a Blu-Ray disc of dust and other types of debris, follow the instructions below:
- Start this process by sprinkling isopropyl alcohol on a soft cloth – Don’t use tissues since you will produce even more scratches.
- Use the soft cloth to rub the information side of the disk with a circular movement (from the inside to the outside).

Cleaning the Blu-Ray disk - Once you’ve done this, leave it until it’s fully dry or air dry it for about 0 seconds to speed up the process.
- Next, insert the disk back into your optical drive and launch the game from your Xbox console.
In case the same problem is still occurring, move down to the next potential fix below.
Method 5: Clearing the Game Cache
If none of the instructions above have worked for you, consider clearing your local cached of saved data. This fix was confirmed to work by a lot of affected users.
This will essentially clear any saved data and temporary files associated with them from the console, but it will not remove any saved games that you are currently storing on the cloud.
So to ensure that you are not facing any saved data loss, go to Settings > System > Storage and select Games, then go ahead and select the games that you need to back up to the cloud. To confirm the operation, choose Move, then choose Cloud Saved Games.
Once you have ensured that the game saves are successfully backed onto the cloud storage, follow the instructions below to clear the locally saved game’s cache on your Xbox One console:
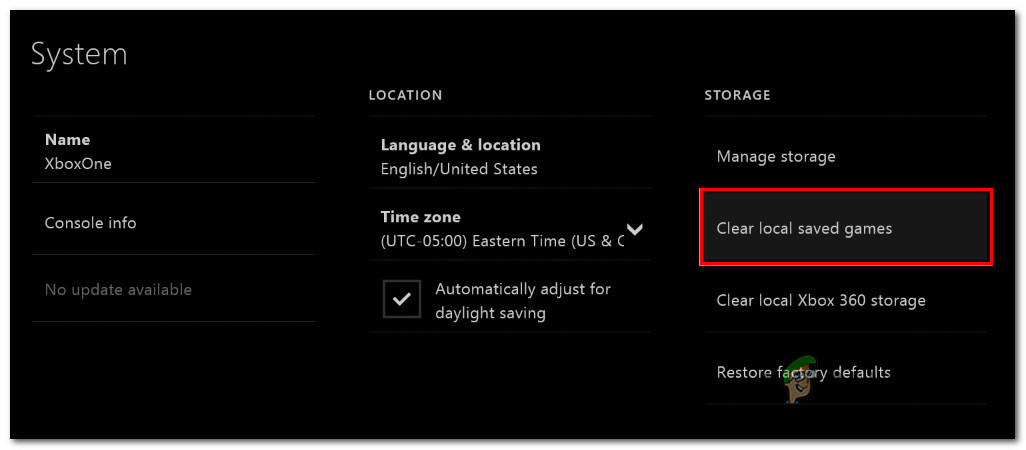
- On the main dashboard of your Xbox One console, go to Settings > System.
Accessing the Settings menu on Xbox One - Once you’re inside the System menu, go to the Storage tab and select Clear local saved games from the list of available options.
Clearing the local saved games cache - Once you start this process wait patiently until the operation is complete, then restart your console.
- After the next startup is complete, launch the game that was previously producing the 0x9b100041 error code and see if the problem is now fixed.
In case the same problem is still occurring, move down to the next potential workaround.
Method 6: Turning off the Internet connection (if applicable)
If you can physically see some scratches on the game disk, you might be able to circumvent the error code by turning off the Internet connection right before you start the game.
This might be effective due to the proprietary Microsoft DRM (Digital Rights Management) engine – If there is no Internet connection, disk integrity is not verified that thoroughly, so if your disk contains bad data, the error code will not show.
You can temporarily disconnect the Internet connection right before you start the game, then wait until you get past the initial loading screen before connecting it again. This method was confirmed to be effective by a lot of affected users that were previously facing the same problem.


