Fix: You Need to Fix Your Microsoft Account
The “You need to fix your Microsoft Account” notification appears when Windows detects a problem syncing your Microsoft account across devices. It may show on Windows 10 PCs and also on devices running Windows Phone OS.
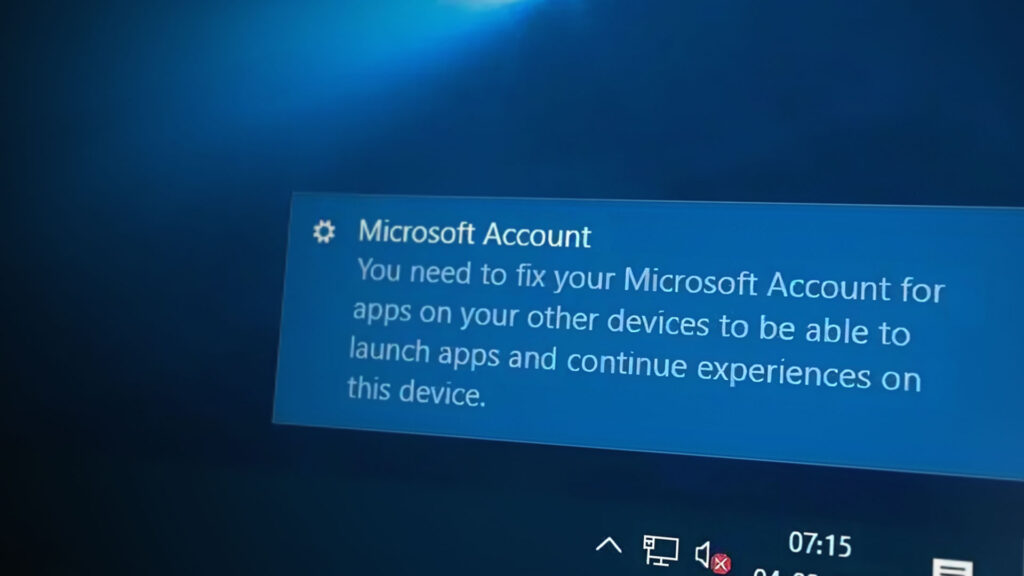
The message usually appears when account credentials cannot be verified, when apps fail to sync properly, or when account settings become inconsistent after updates. In some cases, the notification appears repeatedly even though the account works normally.
The methods below address common causes such as credential sync issues, corrupted account settings, or system notification bugs.
Solution 1: Sign Out and Sign Back In
In many cases, this notification appears because Windows fails to properly validate your Microsoft account session. Signing out refreshes the authentication token and forces Windows to reconnect the account with Microsoft services.
- Click the Start menu and select your Account icon.
- Select Sign out. You can also press Ctrl + Alt + Del and choose Sign out.
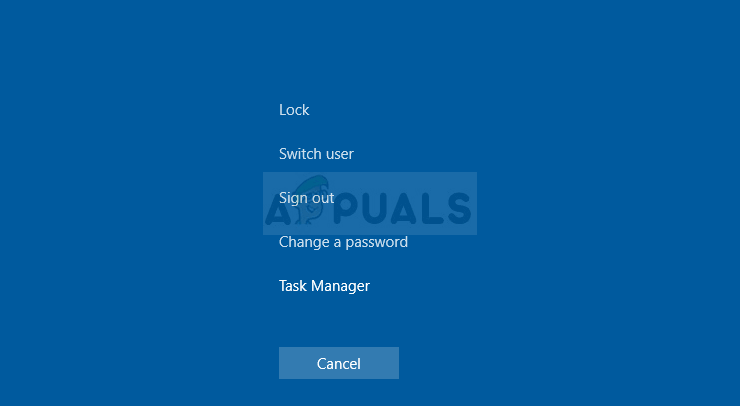
- Sign back in using your Microsoft account email and password.
- Allow Windows to sync your account again.
If the notification was caused by a temporary authentication problem, signing back in will restore normal account synchronization and remove the warning.
Solution 2: Move Apps from SD Card to Phone Storage (Windows Phone)
On Windows Phone devices, this notification often appears when apps stored on an SD card fail to update or sync with your Microsoft account. Moving those apps to internal storage allows the system to update them correctly and resolve the account warning.
- Open Settings on your Windows Phone.
- Go to Storage.
- Select Phone, then open apps + games.
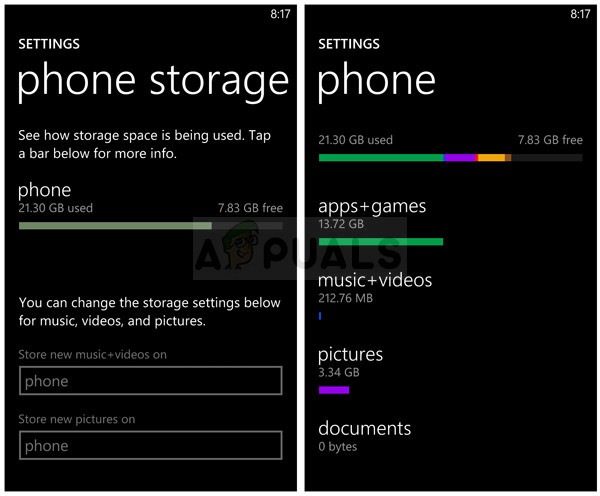
- Select an app that is stored on the SD card.
- Tap Move to phone storage.
- Repeat the process for other apps stored on the SD card.
After moving the apps, allow the phone to complete updates and check if the notification disappears.
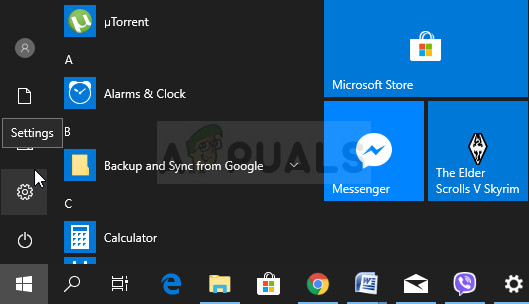
Solution 3: Fix the Account Through Settings
Windows includes a built-in option to repair Microsoft account synchronization issues. This option revalidates account credentials and refreshes the account connection with Microsoft services.
- Open Settings.
- Navigate to Accounts.
- Select Email & app accounts.
- Locate your Microsoft account.
- Click the Fix option if it appears.
- Re-enter your login credentials when prompted.
This process refreshes the account configuration and often removes the notification if it was caused by corrupted account settings.
Solution 4: Disable Toast Notifications via Group Policy
If the notification continues to appear even after fixing the account, it may simply be a persistent system notification. Disabling toast notifications prevents Windows from displaying the message repeatedly.
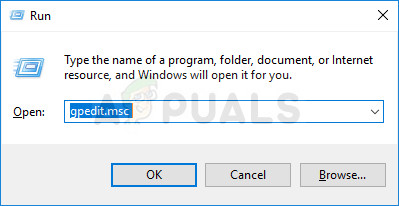
- Press Windows + R to open the Run dialog.
- Type gpedit.msc and press Enter.
- Navigate to:
User Configuration → Administrative Templates → Start Menu and Taskbar → Notifications
- Double-click Turn off toast notifications.
- Select Enabled.
- Click Apply and close the editor.
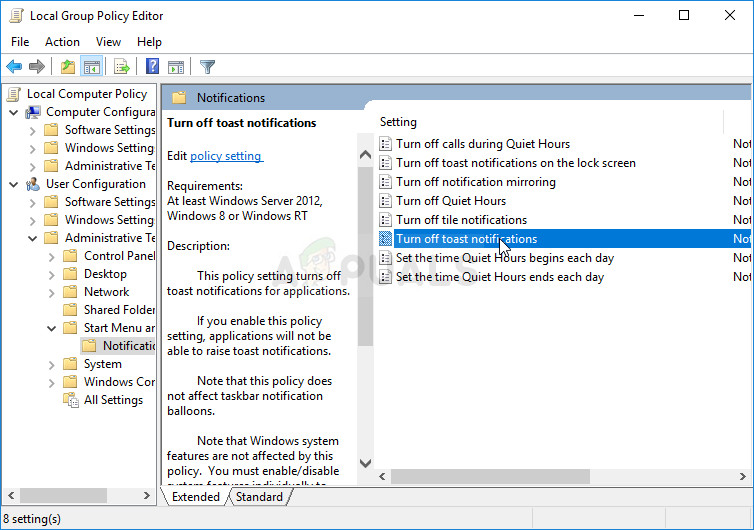
- Restart your computer.
This does not fix the account itself but prevents Windows from repeatedly displaying the notification.
Solution 5: Install the Latest Windows Updates
Microsoft occasionally releases updates that fix account synchronization bugs. Installing the latest updates ensures your system has the latest patches for account and notification issues.
- Right-click the Start menu.
- Select Windows PowerShell (Admin).
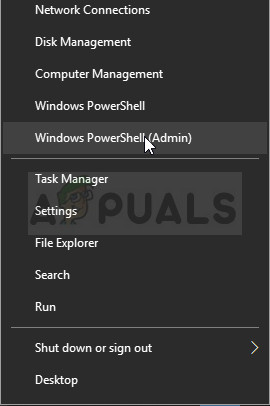
- Type the following command and press Enter:
wuauclt.exe /updatenow
- Allow Windows time to check for and install updates.
If the problem is caused by a known Windows bug, installing updates will usually resolve it automatically.
Alternative Method for Windows 10
- Open Settings from the Start menu.
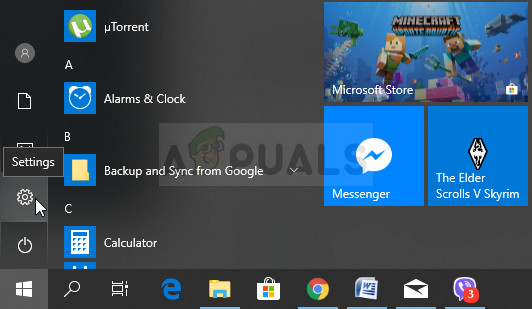
- Go to Update & Security.
- Select Windows Update.
- Click Check for updates.

- Install any available updates and restart your computer.
After updating, Windows should reconnect your Microsoft account and the notification should stop appearing.


