Fix: Enter Network Credentials Popup on Windows 10
Users owning more than one computers often find it handy and easy to access files located in other computer using Windows operating system. This can be easily done by joining the homegroup so all the files can be shared over the network. After the upgrade to Windows 10, many users reported that Windows prompts them to enter network credentials when they want to connect to other machines.
This can prove to be a real menace for most of the people as they don’t know which credentials Windows is referring to. This window also pops up when you try to access some application on your computer.

Don’t worry, we got you covered. We did an intense survey and after experimenting with our machines, we came up with the most effective solutions. Take a look!
Solution 1: Checking file sharing options
We can take a look on your advanced file sharing settings and enable crucial check boxes if they aren’t already enabled.
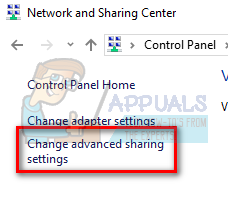
- Press Windows + S button to bring up your start menu’s search. In the dialogue box type “view network status and tasks”. Click on the first applications which return in the search results.
- Now select “Change advanced sharing settings” present at the left side of the window.
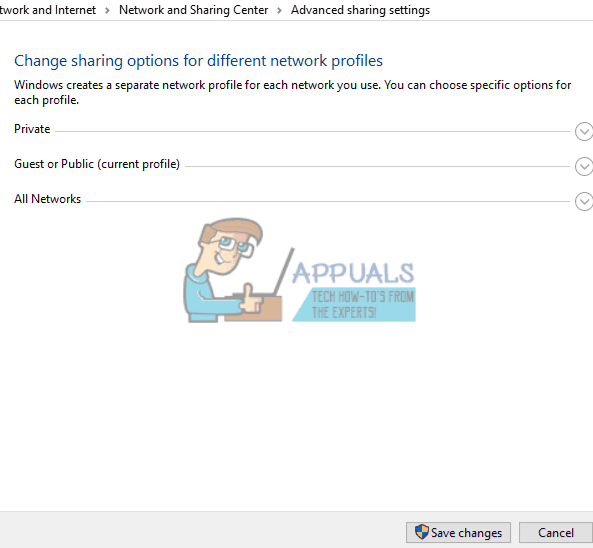
- Once in the advanced settings, search for HomeGroup Make sure that the option “Allow Windows to manage home group connections” is enabled and checked.
- Now scroll down until you find the All Networks Find the tab of password protected sharing and make sure that the option “Turn off password protected sharing” is enabled.
- Another checkbox which you can enable is “Turn on sharing so anyone with network access can read and write files in the Public folder”. This checkbox will also be found in the All Networks section.
Make sure you are implementing these stages to the server machine rather than the client machine.
Solution 2: Setting your connection as Private
As we all know, HomeGroup doesn’t connect if your network is saved as a public network. This is a security protocol by Microsoft to refrain you from sharing your files and folders over public connections. However, if you have labeled your private connection as a public connection, you will get this error indefinitely.
We can try checking if this is the case and label the network as Private.
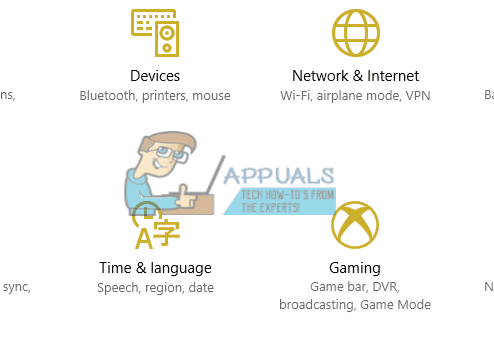
- Press Windows + S. This will launch your start menu’s search bar. Type “Settings” in the dialogue box and click on the first application which returns as a result.
- Once in the Settings, click on “Network and Internet”. Then select HomeGroup.
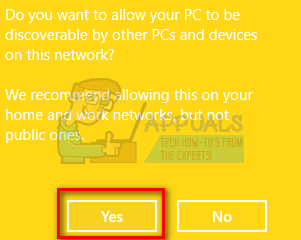
- If you don’t have your network labeled as Private, the following window will be in front of you. We can try changing your network location to Private and try checking the HomeGroup settings again.

- Click on “Change network location” and select “Yes” when the new window comes. This will flag your connection with the network as Private. You can now see if your problem got solved.
Do note that you should make a HomeGroup on the server pc (file hosting computer) first and then try connecting clients over the network. If there will be no HomeGroup present, the clients will have nothing to connect to.
Solution 3: Logging in with your Microsoft account
Windows 10 relies heavily on your Microsoft account as you might have seen after updating to the OS. You might have been prompted to enter your Microsoft account and password when you were first logging into the computer. Each account is more or less associated with a unique Microsoft account.
Try entering the email that you have setup on the user account and password. Try connecting again and hopefully, you won’t get any problems.
Solution 4: Checking IP addresses
If you have NOT assigned your PC’s static IP addresses to have ease of access, we need to check if this is causing the problem and bringing forward the troublesome window.
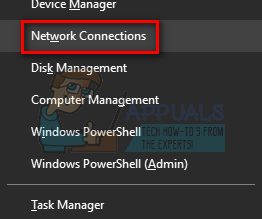
- On the computer you want to connect to, Press Windows + X. Now choose Network Connections from the list of options available.
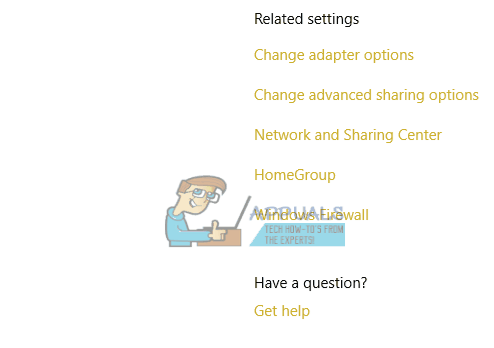
- Now at the rightmost side of the window, select “Change adapter settings”.
- Now select the connection (WiFi or Ethernet) which you are using for your connectivity. Right click it and select Properties.
- Now browse through the modes of connections and select IPv4. Double click it.
- Ensure that automatic allocation for IP addresses is enabled. Save changes and exit.
Solution 5: Checking Guest account
Some users reported that their guest account proved to be a hurdle in their file sharing over the network. Although this case is very rare, it is worth a shot if the earlier methods are not working for you.
Basically, there are four rules to be seen which contribute to error.
- If your Password Protected Sharing is on, the built-in Guest account should be off.
- If your Password Protected Sharing is off, the built-in Guest account should be on.
We will guide you on how to disable or enable your built-in Guest account directly from the command prompt. We don’t need to get into the fuss of accessing the options from the control panel.
Follow the following method to enable your guest account.
- Press Windows + R button to bring up your Run application window. In the dialogue box, type “cmd” to launch your computer’s command prompt. Some PC’s may require administrator access to enable the guest account. If you are prompted, grant it administrator access and move ahead.
- Type “net user Guest /active:yes” in the command prompt and hit Enter. The Guest account will now be active.

You can follow the following steps to disable the Guest account.
- Press Windows + R button to bring up your Run application window. In the dialogue box, type “cmd” to launch your computer’s command prompt. Some PC’s may require administrator access to enable the guest account. If you are prompted, grant it administrator access and move ahead.
- Type “net user Guest /active:no” in the command prompt and hit Enter. The Guest account will now be deactivated.
I solved this problem by going to Control panel,
user accounts->configure advanced user profile properties
Make sure you are entering the same username as mentioned in the dialog box.