Fix: DllUnregisterServer Failed with Error Code 0x80040200
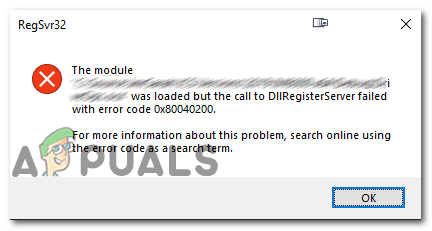
Some Windows users are encountering the ‘DllUnregisterServer failed with error code 0x80040200′ when trying to register or unregister a DLL file or when trying to install an application that tries to register a DLL file automatically. This problem is reported to occur on Windows 7, Windows 8.1, and Windows 10.
The most common cause that will end up producing this particular error is a permission issue. To take care of it, you will need to try and register or unregister the DLL file with admin access.
However, if the problem occurs when trying to install a program, you might need to re-register the file after the installation fails. If you’re encountering the problem with an OCX dependency, try moving the file to the System32 folder before attempting to do the installation again.
Method 1: Unregistering the DLL file with Admin Access
In case you see this error while attempting to unregister a DLL file manually, you likely end up seeing the 0x80040200 because you don’t have sufficient permissions. If this scenario is applicable, you should be able to avoid this error message altogether by using the ‘regsvr32’ command in an elevated command prompt.
If you didn’t already try this, follow the instructions below to attempt to unregister the DLL file manually from an elevated CMD prompt:
- Press Windows key + R to open up a Run dialog box. Next, type ‘cmd’ inside the text box and press Ctrl + Shift + Enter to open up an elevated CMD prompt. When you see the UAC (User Account Control), click Yes to grant administrative privileges.

Running the Command Prompt - Once you’re inside the elevated CMD prompt, type the following command and press Enter to unregister the .DLL file manually:
regsvr32 /u *DLL File*
Note: Keep in mind that *DLL file* is simply a placeholder. You will need to replace it with the name + extension of the DLL file that you are attempting to unregister. For example, we needed to unregister the cdo32.dll file, so we used the regsvr32 /u cdo32.dll command.
- In case the operation completed successfully without the 0x80040200 error code, reboot your machine and then complete the installation that was previously causing the problem.
In case the same problem is still occurring or this operation was not applicable, move down to the next potential fix below.
Method 2: Re-registering the File after Program Installation
If you see this error while trying to install an application, you’re likely seeing this error due to some dependencies that are not being loaded properly. In this case, you will probably be able to work around the issue by running the installer with admin rights and then unregistering and registering the failing dependency manually.
Note: This fix is frequently reported to be effective on Windows 7.
In case this scenario is applicable, follow the instructions below to run the installation with admin access, then re-register the failing dependency:
- Open File Explorer and navigate to the location of the installer that’s ultimately causing the error.
- Right-click on it and choose Run as Administrator from the newly appeared context menu.

Running the installer with admin access - Follow the on-screen instructions to complete the installation. Don’t mind it if you see the same 0x80040200 error – Simply close the error window and move down to the next step.
- Open up a Run dialog box by pressing Windows key + R. Next, type ‘cmd’ inside the text box and press Ctrl + Shift + Enter to open up an elevated CMD prompt.
Running the Command Prompt - Once you’re inside the Command Prompt terminal, type the following commands in order and press Enter after each command to unregister and then re-register the OCX dependency:
spr32x30.ocx /UNREGISTER
spr32x30.ocx /REGSERVER
- Restart your computer and see if the problem is resolved at the next computer startup.
In case the same problem is persisting, move down to the next potential fix below.
Method 3: Running the OCX File from the System32 folder
In case you encounter this particular issue when working with a .ocx file (OLE Control Extension), you’re most likely a permission issue. Several affected users have confirmed that they managed to get this issue fixed by moving the .OCX file to the System32 folder and launching it from there to ensure that is has the necessary access.
IMPORTANT: Only do this if you are 100% sure that the .OCX file doesn’t pose a security risk.
If you’re indeed encountering the 0x80040200 error code with this file type, follow the instructions below to move the file in the System32 folder before opening it:
- Open File Explorer, navigate to the location of the .OCX file, right-click on it and choose Cut from the context menu.
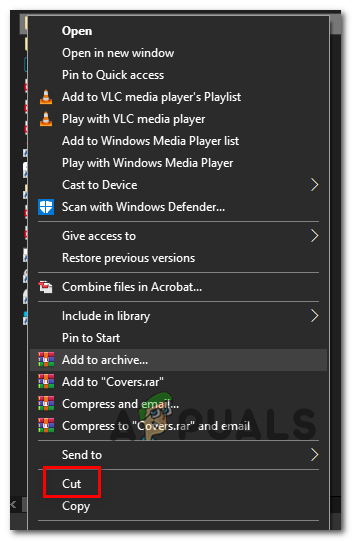
Cutting the file - Next, navigate to C:\Windows\System32 and paste the file that you just copied to your clipboard.
- Once the file resides in the System32 folder, repeat the installation once again and see if you’re still encountering the same 0x80040200 error.


