Disable or Enable Hardware Acceleration in Web Browers (Edge, Chrome and Firefox)
Learn how to easily enable or disable Hardware Acceleration in Google Chrome, Microsoft Edge and Mozilla Firefox
The hardware acceleration is a feature that offloads some of the CPU’s loading tasks to other hardware. This feature boosts browser performance as well as freeing up the CPU to handle some other tasks. The hardware acceleration will be enabled by default in all browsers. However, sometimes some issues can occur due to the hardware acceleration option in the browser. It can also decrease the performance of the browser. In that case, you can simply disable hardware acceleration to check if it fixes the issues. The performance when hardware acceleration is ON or OFF also depends on the computer system.

In this article, you will find methods through which you can disable the hardware acceleration in Mozilla Firefox, Google Chrome, and Microsoft Edge. If it causes a performance issue, then you can also enable it back by using the same methods.
1. Enable or Disable Hardware Acceleration in Microsoft Edge
1.1 Using Microsoft Edge’s Settings to Disable/Enable HA
The most common method would be by using the Microsoft Edge browser’s settings. The option for Hardware Acceleration is already available in the browser settings. You just need to toggle ON or toggle OFF the option. However, as an administrator, if you want to disable this option for standard users, then try using the other methods.
- Open the Microsoft Edge browser by double-clicking on the shortcut or searching it through the Windows search feature.
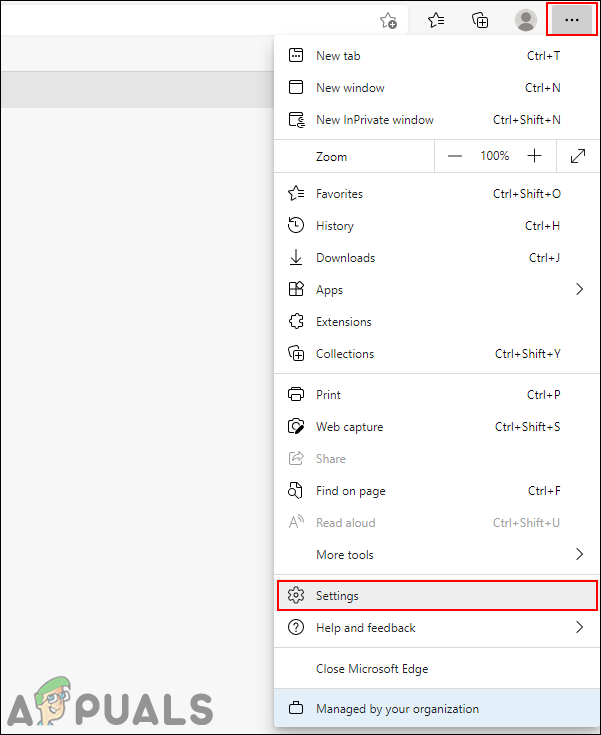
- Click on the Settings and more option at the top right corner and choose the Settings option in the list.
Opening Microsoft Edge settings - Select the System option in the left pane. Now, turn OFF the toggle for the “Use hardware acceleration when available” option.
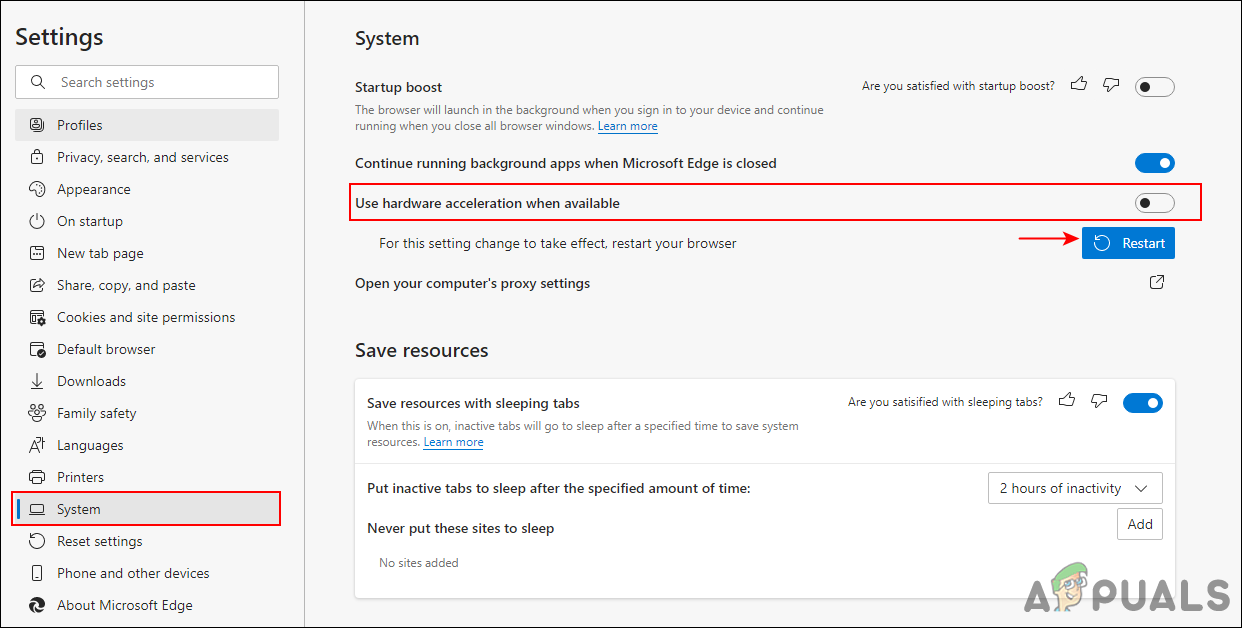
Disabling the hardware acceleration - Click on the Restart button to restart the Microsoft Edge with new changes.
1.2 Using the Registry Editor to Disable/Enable HA in EDGE
This method can help you in force enabling and disabling the hardware acceleration for the Microsoft Edge browser. It will prevent the standards users from changing the option in the future. It will require some technical steps to configure the setting in the Registry. You need to create the value and maybe a key to configure the setting. Follow the below steps and see how it can be done.
The value can be configured in both the Current Machine and Current User hives. The location path for both will be the same, only the hives will be different.
- Open up the Run dialog box by pressing the Windows + R keys together on your keyboard. Now type “regedit” in the box and press the Enter key to open the Registry Editor.
Note: If you get a UAC (User Account Control) prompt, then simply click on the Yes option.
Opening the Registry Editor - You can also create a backup to be safe, by clicking on the File menu and choosing the Export option. Now just provide the name/path and click on the Save button.
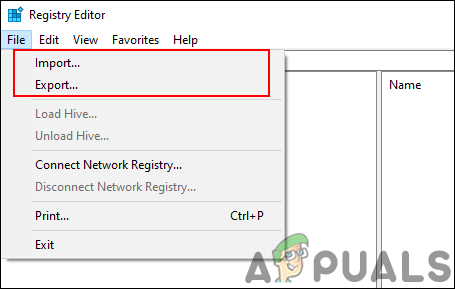
Creating registry backup Note: If you want to restore the backup, simply click on the File menu in the menu bar and choose the Import option.
- In the Registry Editor window, navigate to the following location:
HKEY_LOCAL_MACHINE\Software\Policies\Microsoft\Edge
Note: If the Edge key is missing the path, then right-click on the Microsoft key and choose the New > Key option. Name the key as “Edge” and save it.
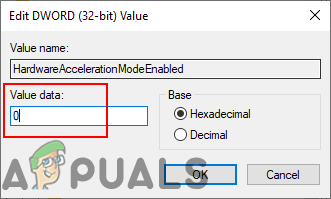
- Right-click on the right pane of the Edge key and choose the New > DWORD (32-bit) Value option. Rename the value as “HardwareAccelerationModeEnabled” and save it.
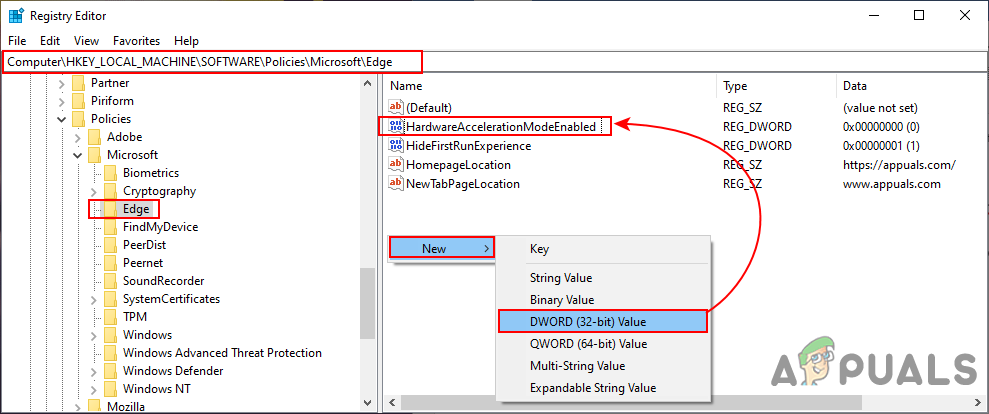
Creating a new value - Now double-click on the HardwareAccelerationModeEnabled value to open the value data dialog. Then change the value data to 0.
Changing the value data - After that, close the Registry Editor window. Make sure you restart the computer to apply these new changes.
- You can always enable it back by changing the value data to 1. Another way to enable this is by removing the value from the Registry Editor.
1.3 Using the Local Group Policy Editor to Disable/Enable HA in Edge
The policy files for the latest Microsoft Edge may not be available on your system. That is why you need to download the latest policy files and add them to your system policy settings folder. It will take few extra steps, but it will provide all the policy settings for the latest Microsoft Edge. The setting can be found under both Computer Configuration and User Configuration categories. Check the below steps to install and configure this specific policy setting for Microsoft Edge.
Note: Skip this method if you are using a Windows 10 Home edition operating system.
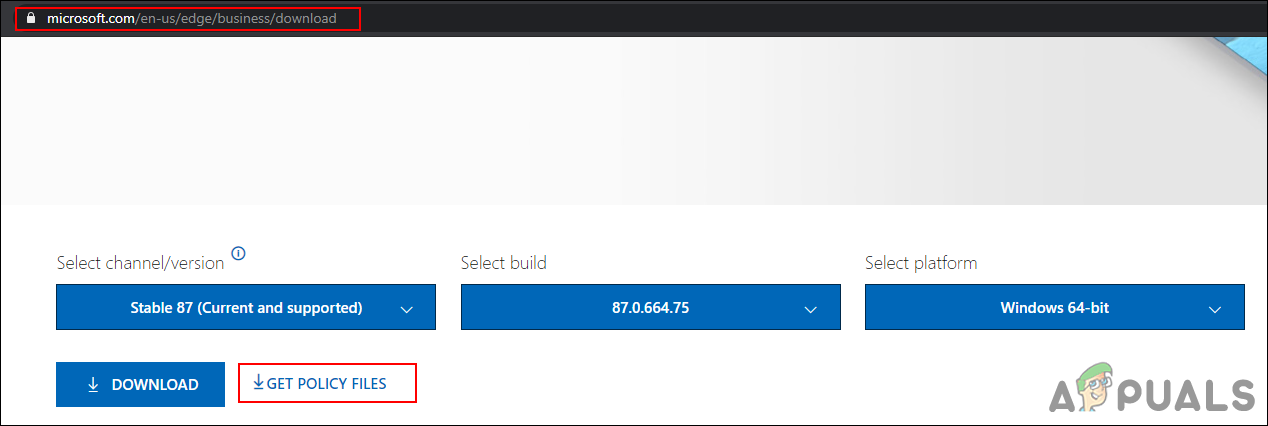
- Open your browser and go to the Microsoft site. Now select the version details of your Microsoft Edge and click on the GET POLICY FILES button.
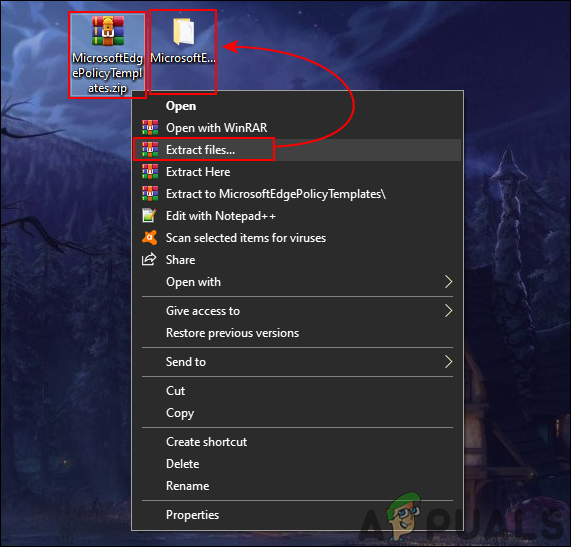
Installing new policy files - Use the WinRAR application to extract the downloaded policy zip file.
Using WinRAR to extract - Open the extracted folder and head over to the “MicrosoftEdgePolicyTemplates\windows\admx” path. You need to copy the “msedge.admx” and “msedge.adml” files and then paste them into “C:\Windows\PolicyDefinitions” folder.
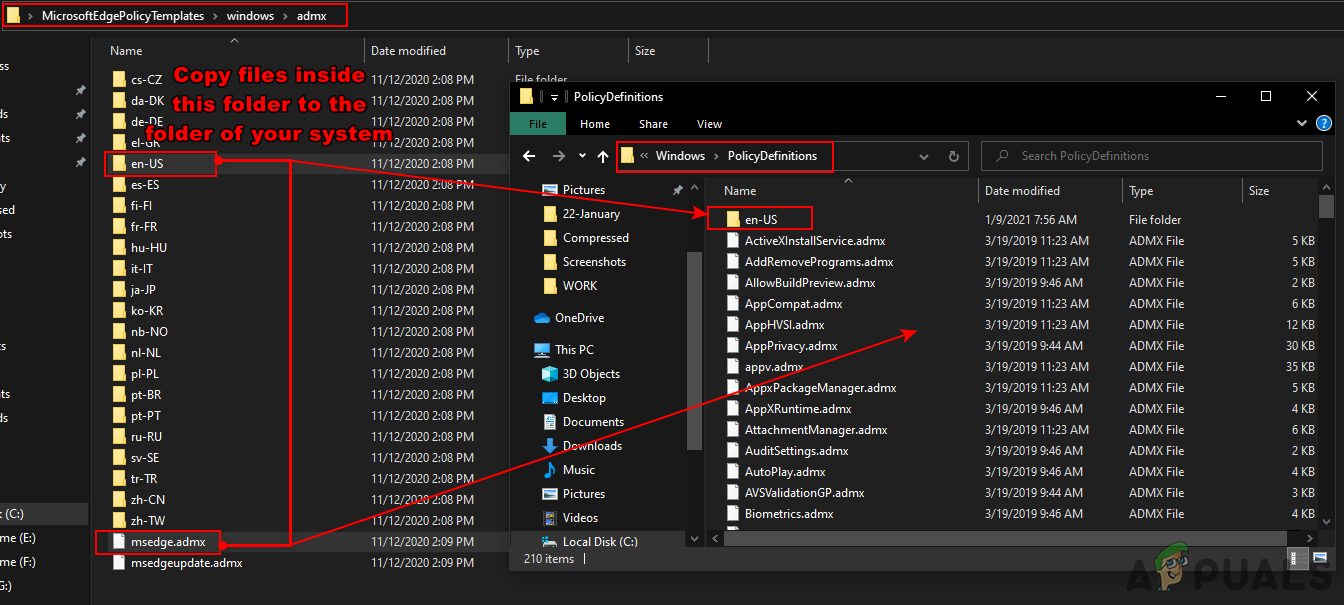
Copy new policy files to the system folder Note: The ADML file can be found in the language folder, so you can copy it from one language folder to another.
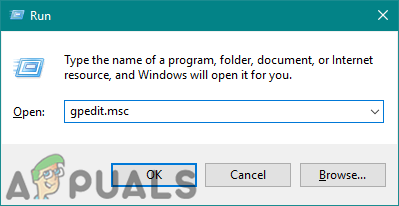
- Open the Run dialog box by pressing the Windows and R keys together. Then just type “gpedit.msc” in the box and press the Enter key to open the Local Group Policy Editor window.
Open the group policy editor - Navigate to the specific setting in the Local Group Policy Editor window:
Computer Configuration\ Administrative Templates\ Microsoft Edge\
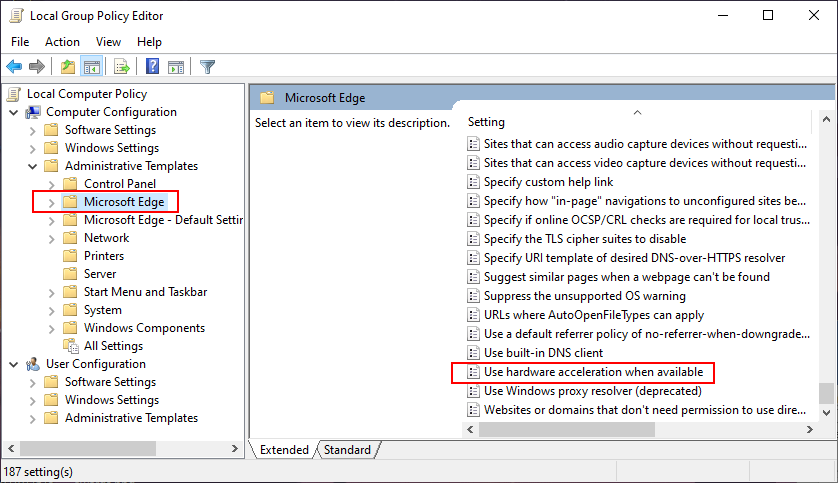
Navigate to the setting - Double-click on the setting named “Use hardware acceleration when available” and it will open up in another window. Now you need to select the Disabled toggle option.
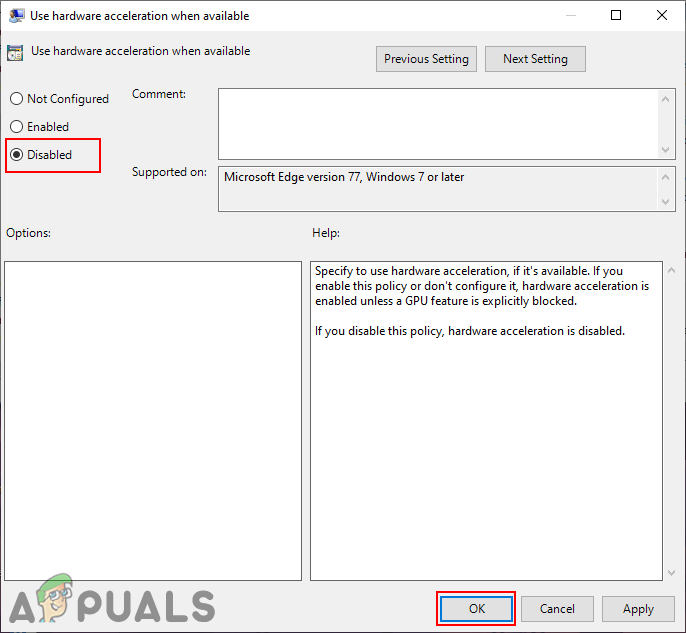
Disabling the hardware acceleration - Click on the Apply/Ok button and close the Local Group Policy Editor window.
- You can always enable it back by changing the toggle option back to Not Configured or Enabled.
2. Enable or Disable Hardware Acceleration in Google Chrome
2.1 Using the Browser Settings to Disable/Enable HA in Chrome
Like all other browsers, Google Chrome also has the hardware acceleration option in the settings. You can navigate to the settings and turn ON or turn OFF the toggle for the hardware acceleration. If the option is grayed out, then check the other methods.
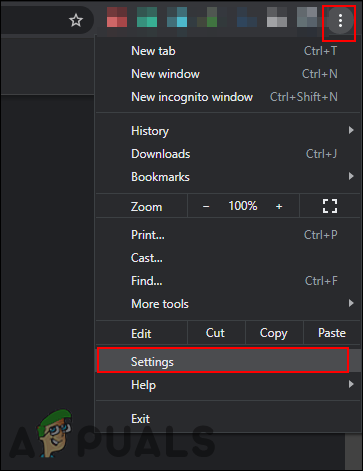
- Open your browser and click on the Three dots menu option at the top right corner. Now select settings in the list.
Opening Chrome settings - In the left pane, click on the Advanced option and then click on System.
- Now you can turn OFF or turn ON the toggle option for the “Use hardware acceleration when available“.
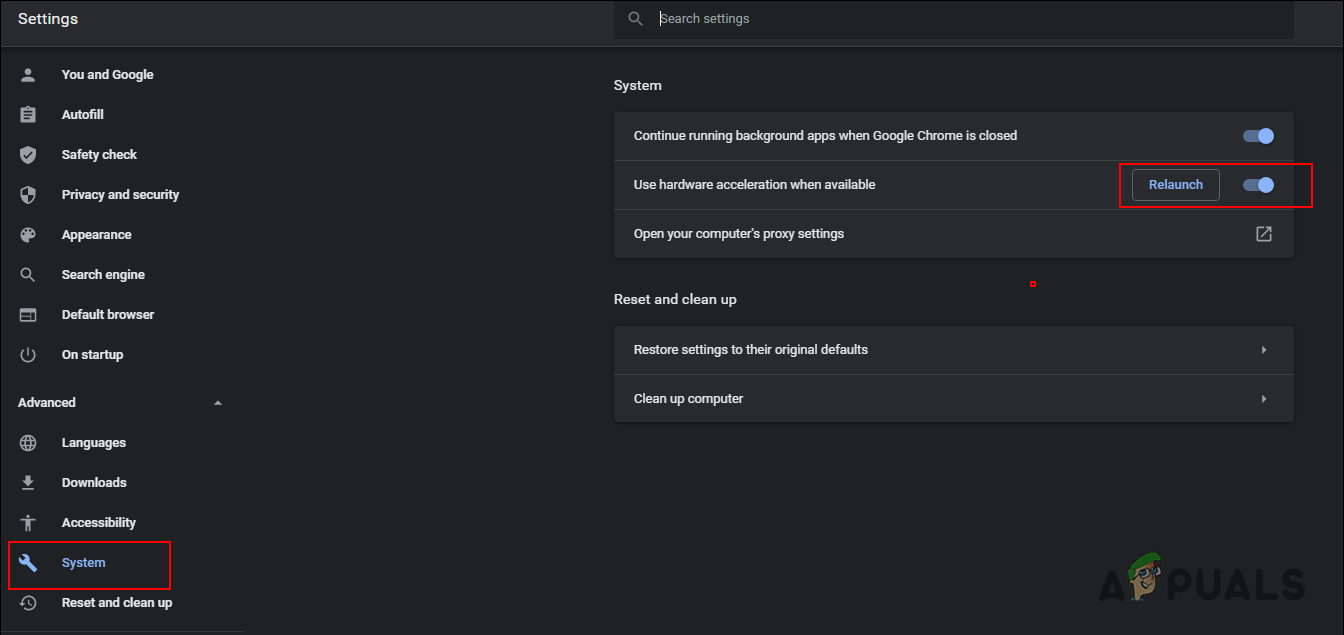
Disabling hardware acceleration in Chrome - Click on the Relaunch button to apply the new changes for hardware acceleration.
2.2 Using the Registry Editor to Enable/Disable HA in Chrome
The hardware acceleration for Google Chrome can also be configured in the Registry. The Google key is located in several locations in the Registry, make sure you follow the correct path. It can also be configured for both the Local Machine and the Current User.
- Press the Windows + R keys together on your keyboard to open Run. Now type “regedit” in the box and press the Enter key to open the Registry Editor.
Note: If you get a UAC (User Account Control) prompt, then simply click on the Yes option.
Opening Registry Editor - You can also create a backup to be safe, by clicking on the File menu and choosing the Export option. Now just provide the name/path and click on the Save button.
Note: If you want to restore the backup, simply click on the File menu in the menu bar and choose the Import option. - In the Registry Editor window, navigate to the following location:
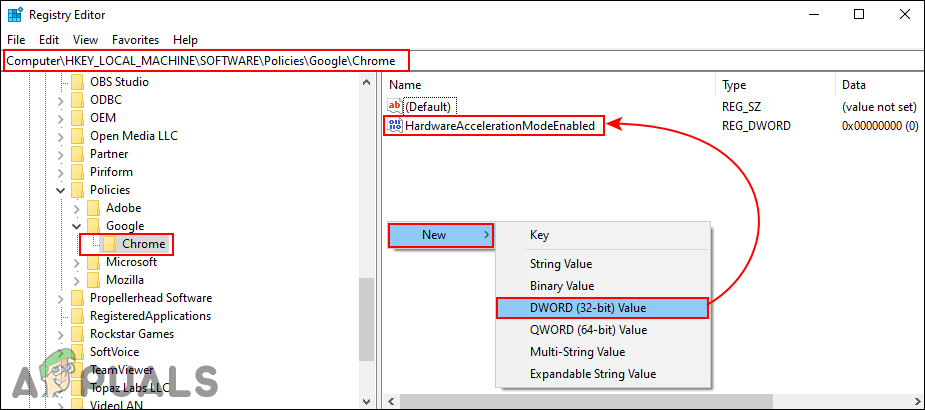
HKEY_LOCAL_MACHINE\Software\Policies\Google\Chrome
Note: If the Google or Chrome key is missing in the path, then right-click on the Policies key and choose the New > Key option.
- Right-click on the right pane of the Chrome key and choose the New > DWORD (32-bit) Value option. Rename the value as “HardwareAccelerationModeEnabled” and save it.
Creating a new value - Now double-click on the HardwareAccelerationModeEnabled value to open the value data dialog. Then change the value data to 0.
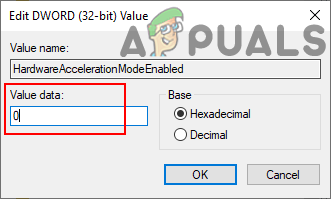
Changing value data - After that, close the Registry Editor window. Make sure you restart the computer to apply these new changes.
- You can always enable it back by changing the value data to 1. Another way to enable this is by removing the value from the Registry Editor.
Note: Value data 1 will force enable the hardware acceleration.
2.3 Using the Local Group Policy Editor to Enable or Disable HA in Chrome
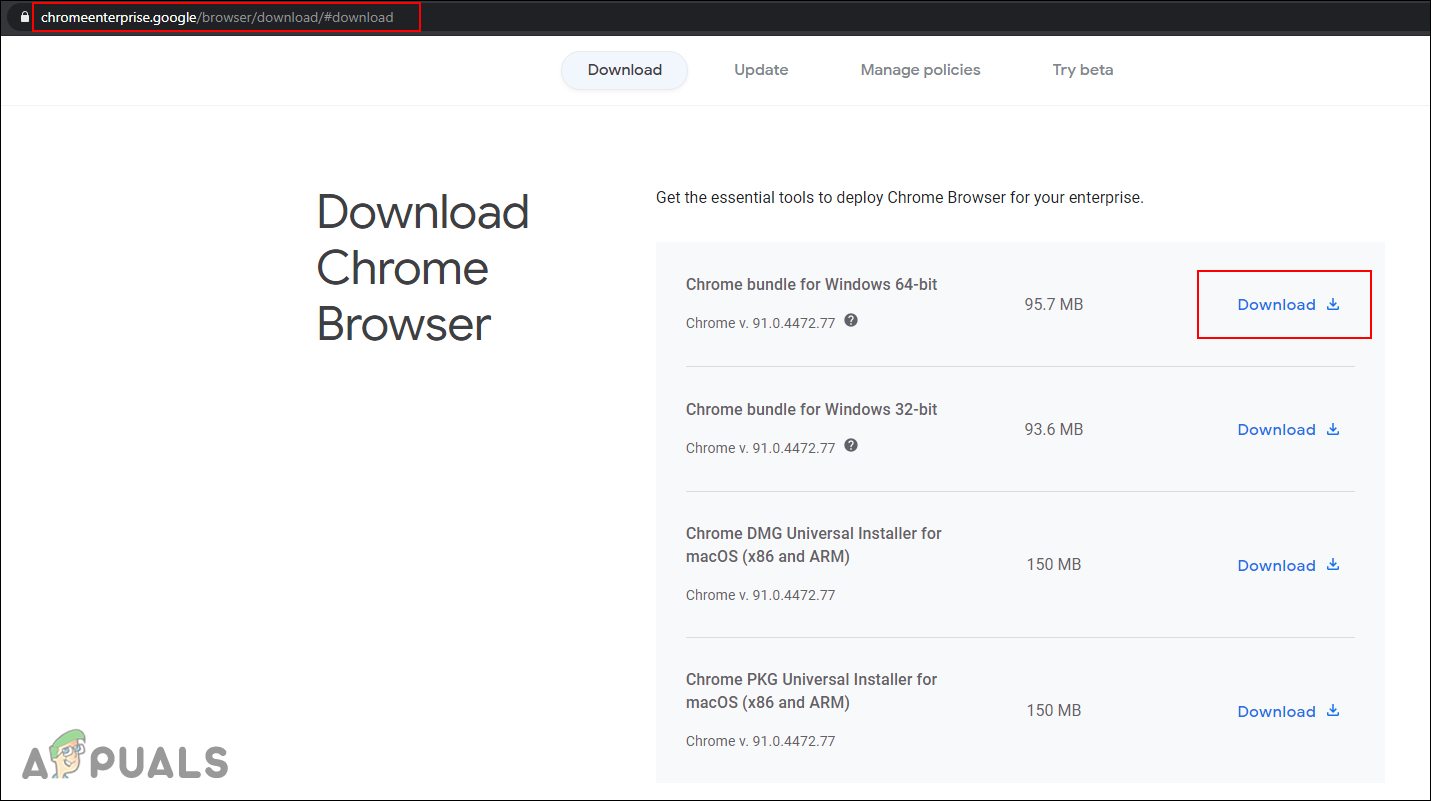
The Google Chrome policies are not available by default in Windows operating system. You need to download it from the Chrome Enterprise site. You can download the files for both 32-bit and 64-bit.
- Open your browser and go to the Google Chrome enterprise bundle page. Now click on the Download button for the operating system that you are using.
Downloading Chrome policy files - Use the WinRAR application to extract the downloaded Chrome bundle zip file.
- Open the extracted folder and head over to the “GoogleChromeEnterpriseBundle64\Configuration\admx” path. You need to copy the “chrome.admx” and “google.admx” files and then paste them into “C:\Windows\PolicyDefinitions” folder.
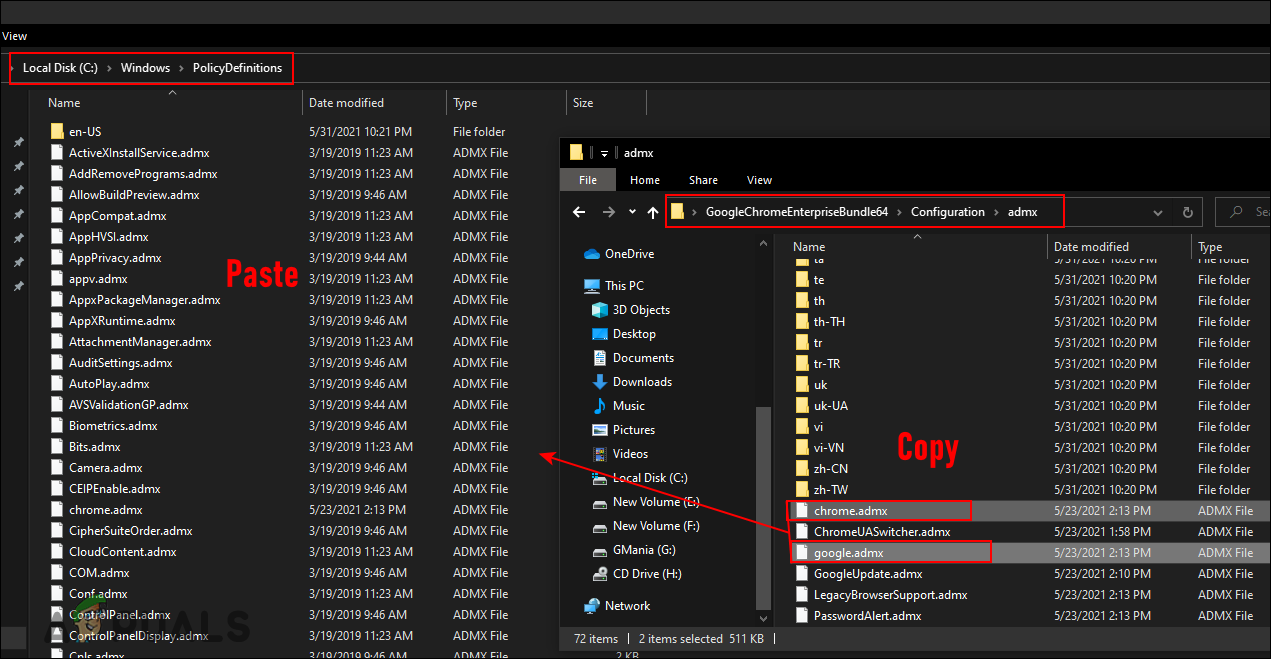
Copying files to system policy folder - Also, copy the “chrome.adml” and “google.adml” from one of the language folders to your own same language folder in the same directory.
Note: In our case, we copied these files from the downloaded “en-US” folder to our “en-US” folder. - Open the Run dialog box by pressing the Windows and R keys together. Then just type “gpedit.msc” in the box and press the Enter key to open the Local Group Policy Editor window.

Opening the Group Policy Editor - Navigate to the specific setting in the Local Group Policy Editor window:
Computer Configuration\ Administrative Templates\ Google Chrome\
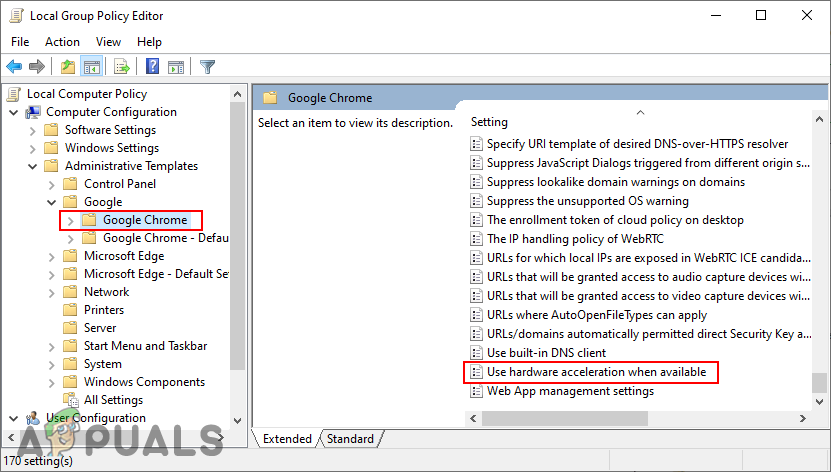
Navigate to settings - Scroll down the list, double-click on the setting named “Use hardware acceleration when available“. Now change the toggle option to Disabled.
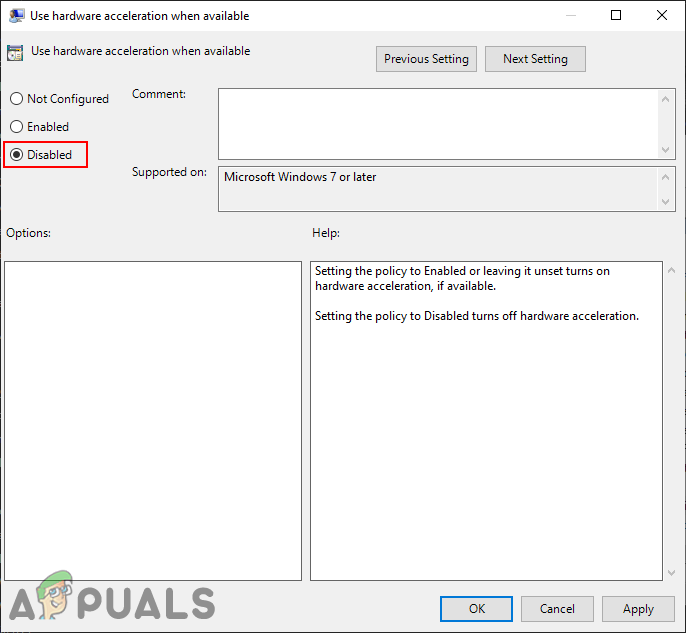
Disabling hardware acceleration in Chrome - Click on the Apply/Ok button and close the Local Group Policy Editor window.
- You can always enable it back by changing the toggle option back to Not Configured or Enabled.
Note: Enabled option will force enable the hardware acceleration.
3. Enable/Disable Hardware Acceleration in Mozilla Firefox
3.1 Using the Browser Settings to Enable or Disable HA in Firefox
You can simply enable and disable the hardware acceleration from Mozilla Firefox by using the browser settings. Both the administrator and standard users can access the option to configure it. The settings interface may change with the updates, but the option will remain the same.
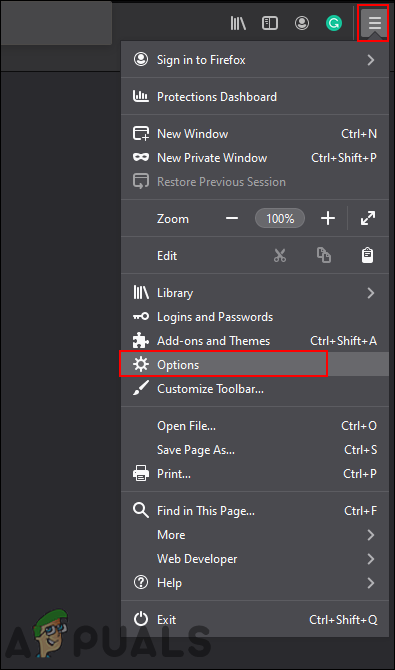
- Open your browser and click on the Application menu at the top right corner. Now choose the Options in the list.
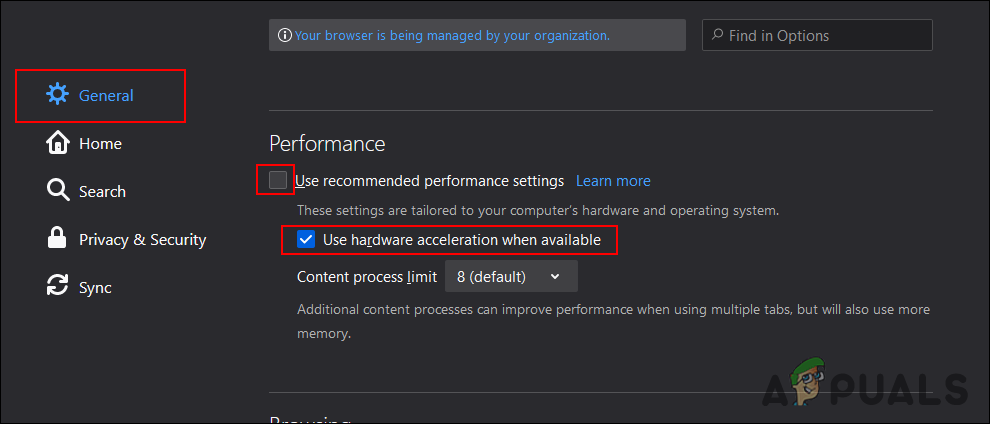
Opening Firefox settings - Select the General option in the left pane and scroll down. Uncheck the “Use recommended performance settings” under the Performance section.
- Now you can uncheck the “Use hardware acceleration when available” to disable it.
- If you want to enable it, then you can check the option to enable the hardware acceleration for your browser.
Disabling the hardware acceleration for Firefox - Make sure to restart the Mozilla Firefox browser after changing the settings.
3.2 Using the Registry Editor to Enable/Disable Hardware Acceleration in Firefox
You can also configure a registry value for the Firefox browser. The value name for the hardware acceleration in Firefox will be a bit different from the other browsers. You can configure it in both Current User and Local Machine hives.
- Open the Run dialog box by pressing the Windows + R keys together on your keyboard. Now type “regedit” in the box and press the Enter key.
Note: Click on the Yes option for UAC prompt.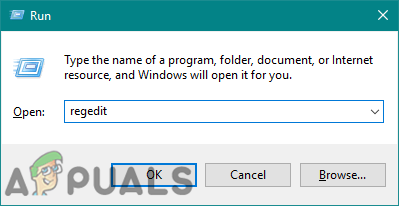
Opening the Registry Editor - You can also create a backup to be safe, by clicking on the File > Export option. Now just provide the name/path and click on the Save button.
Note: If you want to restore the backup, simply click on the File > Import option. - In the Registry Editor window, navigate to the following location:
HKEY_LOCAL_MACHINE\Software\Policies\Mozilla\Firefox
Note: If the Firefox key is missing in the path, then right-click on the Mozilla key and choose the New > Key option. Name the key as “Firefox” and save it.
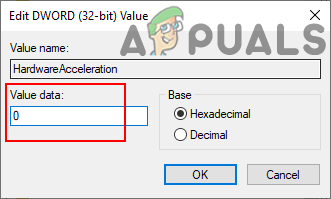
- Right-click on the right pane of the Firefox key and choose the New > DWORD (32-bit) Value option. Rename the value as “HardwareAcceleration“.

Creating a new value - Now double-click on the HardwareAcceleration value to open. Then change the value data to 0.
Changing the value data - Make sure you restart the computer to apply these new changes.
- You can always enable it back by changing the value data to 1 or by removing the value from the Registry Editor.
3.3 Using the Local Group Policy Editor to Disable/Enable Hardware Acceleration in Firefox
You can use Local Group Policy Editor to disable or enable hardware acceleration from Mozilla Firefox. However, the Firefox browser is a third-party application, so the policy files will not be available on your system. You need to download it from their Github page. Make sure you download the latest policy files version. Then you need to copy the files to your system.
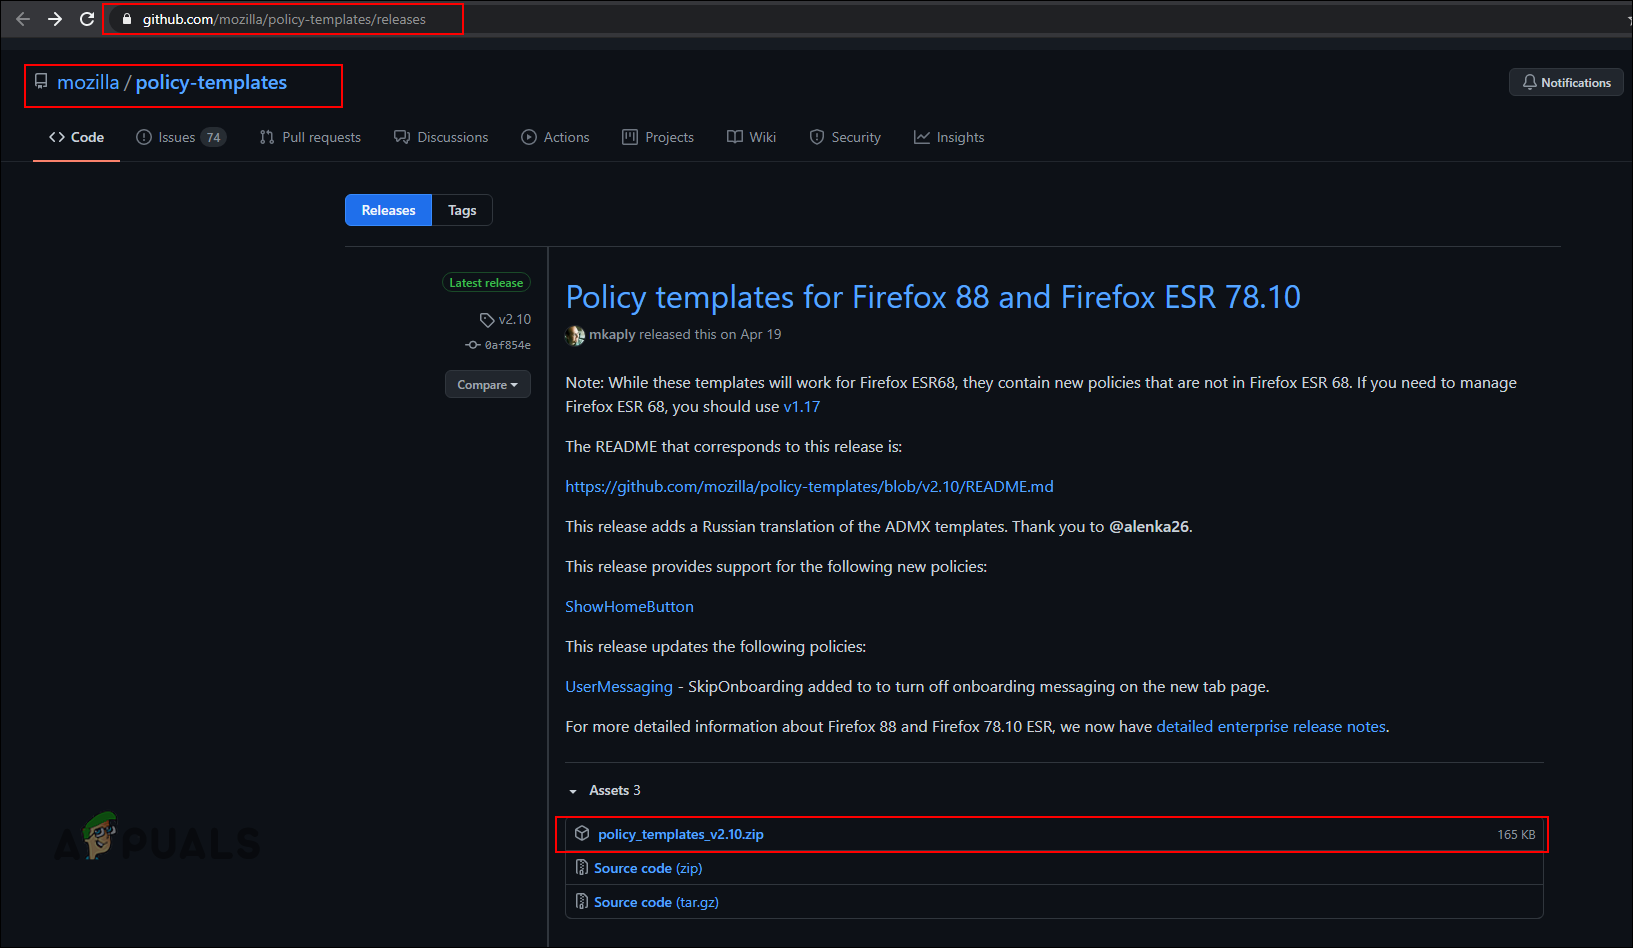
- Open your browser and go to the Firefox Github page. Download the latest policy template zip file.
Downloading Firefox policy files - Use the WinRAR application to extract the downloaded policy template zip file.
- Open the extracted folder and navigate to the “policy_templates_v2.10\windows” path. You need to copy the “firefox.admx” and “mozilla.admx” files and then paste them into “C:\Windows\PolicyDefinitions” folder.
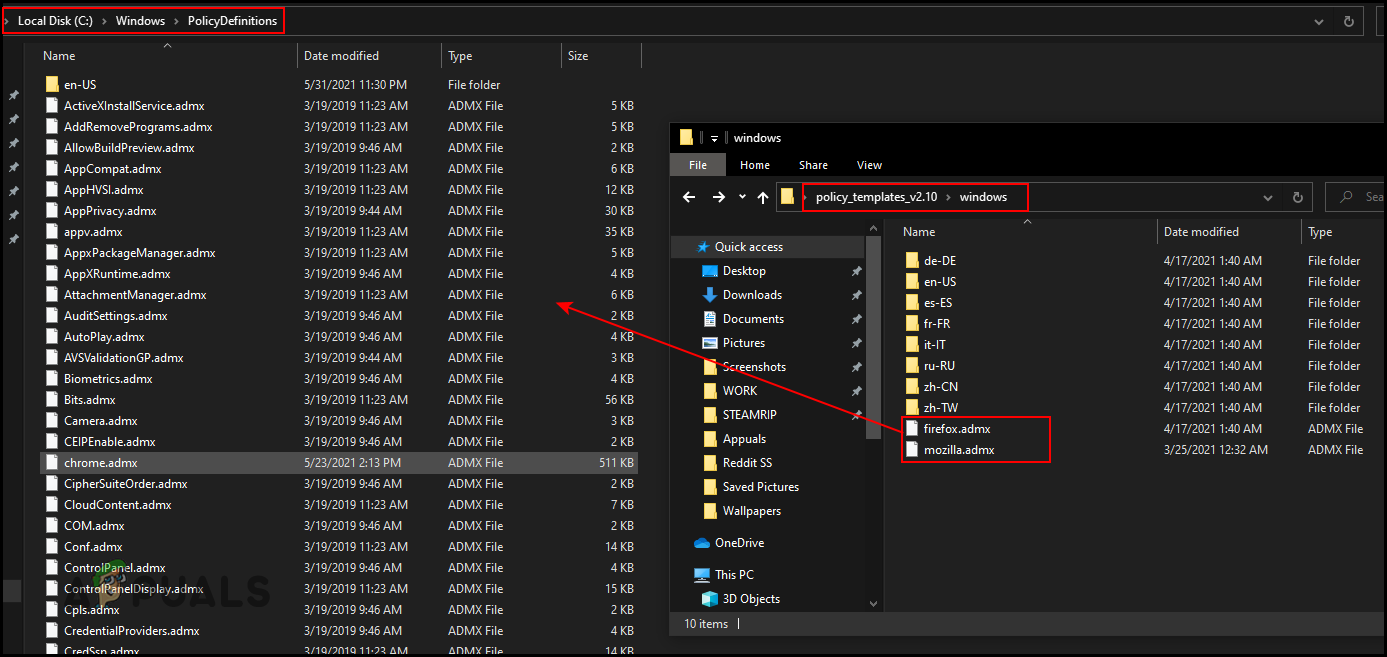
Copying policy files to system policy folder - Also, copy the “firefox.adml” and “mozilla.adml” from one of the language folders to your own same language folder in the same directory.
Note: In our case, we copied these files from one “en-US” folder to another. - Open the Run box by pressing the Windows and R keys together. Then just type “gpedit.msc” in the box and press the Enter key to open the Group Policy Editor window.

Opening Group Policy Editor - Navigate to the specific setting in the Local Group Policy Editor window:
Computer Configuration\ Administrative Templates\ Mozilla\ Firefox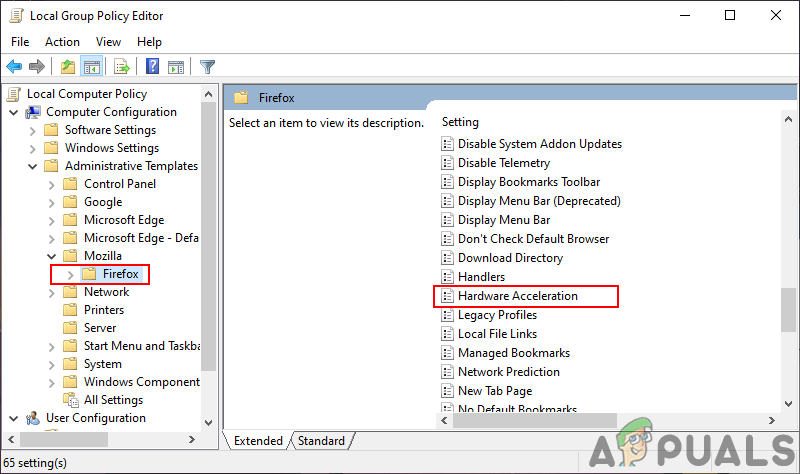
Navigating to the settings - Scroll down the list, double-click on the setting named “Hardware Acceleration“. Now change the toggle option to Disabled.
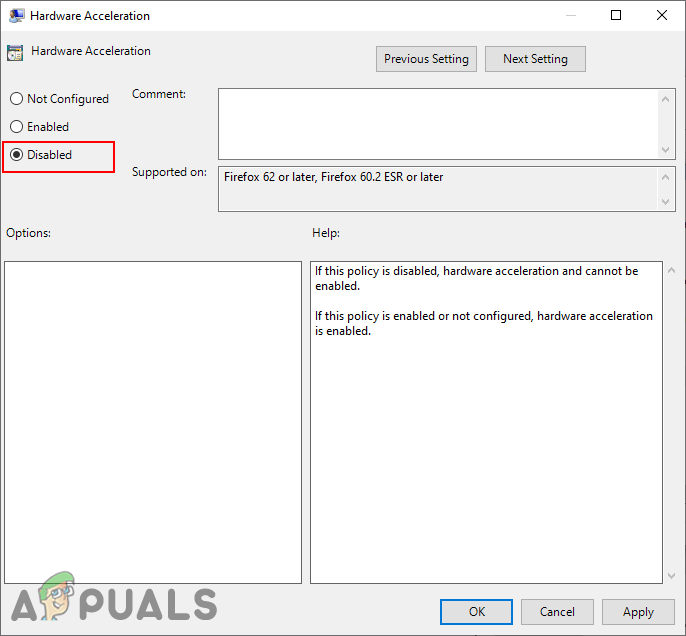
Disabling the hardware acceleration - Click on the Apply/Ok button to save the settings.
- You can always enable it back by changing the toggle option back to Not Configured or Enabled.