Fix: Device Descriptor Request Failed
The Device Descriptor Request Failed error on your device is pretty common among Windows users. Basically, you will see the Unknown USB Device (Device Descriptor Request Failed) in place of your device’s name when you are in the Device Manager. This message isn’t harmful though because you will be able to use the device (in most cases). There are basically three cases for this error.
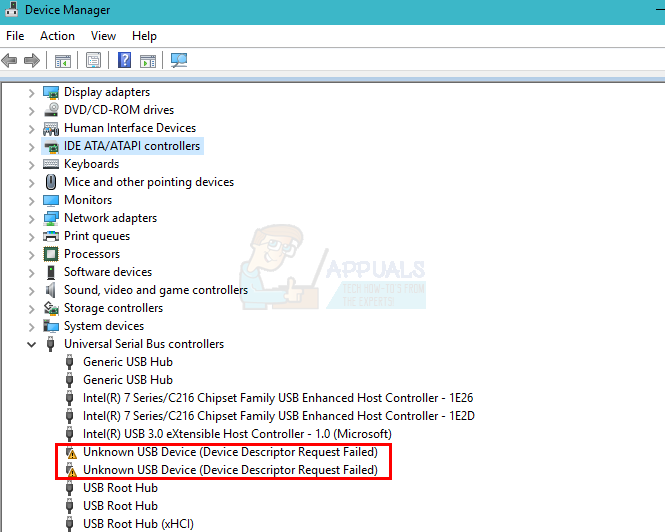
The first one is that the users just see the yellow warning sign along with their device error in the device manager but the device is working fine for them. If you right click on the error message and click Properties, you will be able to see the device status as “working properly”. For these types of users, the error isn’t problematic since it isn’t preventing them from using the device properly.
The second scenario is that your device isn’t working properly. The device of these users won’t appear in the File Explorer so they won’t be able to use it. If you are one of those users, right click the error message from device manager and select Properties. You should see a Code 43 in the description as well.
The last scenario is that your device isn’t working but the status of your device is “working properly”. For these type of users, your device probably won’t show up in the File Explorer and its connecting lights wont turned on. However, if you right click on the error message from the device manger and click Properties, you should see the status of “device working properly”. Your driver will also appear to be up to date if you check for an update.
Why Unknown USB Device (Device Descriptor Request Failed) happens?
This error basically means that the Windows cannot find the description of your device. That is why there is no name mentioned there. The error Code 43 you see basically means that the device cannot communicate properly to the machine. So, in cases where you see the Code 43 then that means there is problem with your device connection. This can probably be because of some hardware problem on the port or an issue with the driver. Back the original warning message, the message means there is no description or name to display. That is why most of the users don’t have any difficulty in using the device itself. For those who can’t even use the device, there are a few ways to get rid of this error message which are listed below.
- Sometimes, the device doesn’t get recognized because of some problem or the fast boot. This can be solved by taking out the plugged in device and insert it back again. This isn’t a solution but a workaround. But, it works for a lot of users so try that if you really have to access the device immediately.
- Try to insert the device in another port to see if the issue isn’t because of the hardware problems in the port.
- Try to insert the device in another PC to check if the issue isn’t with the PC itself.
- Try to remove your power plug from the laptop. Once it is unplugged, restart your computer and insert the device. Now, insert the power plug again and check if it solves the issue.
- Make sure your BIOS is updated to the latest version. You can go to your manufacturer’s website and check if a newer version is available or not.
Method 1: Turn off Fast Boot
For a lot of users, the problem gets solved after turning off the fast boot option on your Windows. This is mainly because the fast boot, well, boots your system very fast which doesn’t give your devices enough time to install properly.
- Hold Windows key and press R
- Type powercfg.cpl and press enter

- Select Choose what the power buttons do

- Select Change settings that are currently unavailable

- Uncheck the box that says Turn on fast startup (recommended). It can be found in the Shutdown settings section
- Click Save changes

Reboot your PC to see if the problem is solved or not.
Method 2: Turn off USB Power Saving
You can turn off USB Power Saving features from the Windows to prevent windows from turning of your device. This has worked for a lot of users.
Follow the steps given below to turn off USB Power Savings
- Hold Windows key and press R
- Type devmgmt.msc and press Enter

- Locate your device that is giving the error message. Right click your device and select Properties

- Click on the Power Management tab
- Uncheck the option that says Allow the computer to turn off this device to save power
- Click Ok

Once you are done, perform the steps given below
- Hold Windows key and press R
- Type powercfg.cpl and press enter

- Select Change plan settings. This option should be in front of every plan. Select this option for the plan you are using now i.e. balanced or high performance

- Click Change advanced power settings

- Double click USB settings
- Double click USB selective suspend settings
- Make sure both the On Battery and Plugged in options are disabled. If they are Enabled then click Enable and select Disable from the drop down menu.
- Click Apply then Ok


- Click Save Changes
Now check if the problem is solved or not.
Method 3: EnhancedPowerManagementEnabled via Registry Editor
You can disable the power management for your device via the registry editor as well. This is, although, a little bit complicated but it might be able to solve your problem.
Follow the steps given below.
- Hold Windows key and press R
- Type devmgmt.msc and press enter

- Double click the Universal Serial Bus Controller
- Double click your device

- Click Details tab
- Select Device instance path from the drop down menu
- Right click the value that appears in the Value section and select Copy

- Hold Windows key and press R
- Type regedit.exe and press Enter

- Navigate to this path HKEY_LOCAL_MACHINE\SYSTEM\CurrentControlSet\Enum\<Device Instance Path>\Device Parameters. Note: <Device Instance Path> is the path that you copied in steps 7 above. If you don’t know how to navigate to this path then follow the steps given below
- Locate and double click HKEY_LOCAL_MACHINE from the left pane
- Locate and double click SYSTEM from the left pane
- Locate and double click CurrentControlSet from the left pane
- Locate and double click Enum from the left pane

- Locate and double click <Device Instance Path> from the left pane. Note: <Device Instance Path> is the path that you copied in steps 7 above. The device instance path won’t be a single number but rather a complete path like USB\Some_Number\More_Numbers. Make sure you follow the correct path.

- Locate and select Device Parameters
- Right click in an empty space (in the right pane) and select New
- Select DWORD (32-bit) Value

- Name the value EnhancedPowerManagementEnabled

- Double click EnhancedPowerManagementEnabled and enter 0 as its value. Click Ok

Now, restart your computer and plug your device again to see if it works.
Method 4: Update/Uninstall Drivers
If the above two methods didn’t work then it is time to do deal with the drivers. There are a couple of things that you can do to make sure you have the right drivers. So, follow all the sections in this method to make sure that you have the right set of drivers for your device.
Uninstall the Drivers
Since the current drivers are causing the problems with your device, it is pretty clear that these aren’t the right drivers for your device. So, you should uninstall them and let the Windows install the most compatible drivers for your device.
- Hold Windows key and press R
- Type devmgmt.msc and press enter

- Double click Universal Serial Bus Controller
- Locate your device, right click it and select Uninstall. Follow any additional on-screen instructions

- Now, take out your device and insert it back
- Right click Universal Serial Bus Controller and select Scan for Hardware changes

Check if it solves the problem.
If the problem isn’t solved then repeat the steps 1-3 (to make sure the driver is uninstalled, if you can’t see the device in the list then no need to repeat the steps) and reboot your computer. On the reboot, your computer should automatically install a generic driver for your device.
Once the system reboots, check if the problem is solved or not.
Updating the drivers will also solve the problem if the problem is because of the outdated driver.
- Hold Windows key and press R
- Type devmgmt.msc and press enter

- Double click the Universal Serial Bus Controller
- Right click your device and select Update Driver Software…

- Select Search automatically for updated driver software

If that doesn’t find anything then go to your device manufacturer’s website and look for the latest driver version. Download the latest driver from the website and keep it somewhere where you can find it easily later on. Once you find the latest drier version then follow the steps given below
- Hold Windows key and press R
- Type devmgmt.msc and press enter

- Double click the Universal Serial Bus Controller
- Double click your device

- Click the Driver tab
- Look at the driver version and check if it is the same as the latest version you downloaded from the manufacturer’s website. If it isn’t then close this device window (you should be back at the device manager screen)

- Locate and double click Universal Serial Bus Controller
- Select your device and right click it. Select Update Driver Software…

- Select Browse my computer for driver software

- Click on Browse and navigate to the location where you downloaded the latest driver. Select the driver and click Open
- Click Next and follow any additional on-screen instructions

Once you are done, check if the problem is solved or if the issue is still there. If the issue still persists then move to the next method.
Method 5: Troubleshoot
Using the Windows own troubleshooting system is a great way to handle the error. It will detect and automatically solve the issue without you having to do anything.
Follow the steps given below to troubleshoot the hardware
- Insert your device
- Hold Windows key and press R
- Type control.exe /name Microsoft.Troubleshooting and press Enter

- Select Configure a device. It should be under the Hardware and Sound section

- Click Advanced and check the option Apply repairs automatically

- Click Next

Follow any additional on-screen instructions. Now the Windows will try to find any problems and fix them automatically. If Windows does find some problems then it is a good sign since the Windows will solve the issue that was causing this error. Once done, check if the problem is solved or not.
For Method 3, am I selecting the good USB driver itself (ie, on mine its USB Root Hub, or 2 USB Composite Device)? Or the USB driver that says “unknown usb device descriptor request failed” and adding that to the registry?