The Ultimate Guide to Designing and Printing Your Own T-Shirt at Home
 Reviewed by Huzaifa Haroon
Printing your own T-shirt at home is not only a fun and creative project but also a great way to express yourself and showcase your unique style. With the right materials and a bit of guidance, you can easily create a personalized T-shirt that perfectly fits your preferences. Imagine the satisfaction of seeing your own designs or slogans come to life on a shirt that you can wear and show off to the world.
Not to mention the countless possibilities of designing shirts for special events, gifts for loved ones, or even starting your own small business. With the help of a comprehensive guide and some practice, you’ll be on your way to creating a wardrobe that’s truly one-of-a-kind.
Table of Contents
The Definitive Guide to T-Shirt Printing
Step 1: Creating a Design
Designing With a Software
Designing by Hand
Hiring a Graphic Designer
Step 2: Transfer Your Design on Transfer Paper
Types of Transfer Paper
Step 3: Prepare Your Shirt
Step 4: Transfer Your Design on Shirt
Step 5: Final Touch
Useful Tips and Tricks
Conclusion
The Definitive Guide to T-Shirt Printing

Printing your own T-shirts at home is an excellent way to express your creativity and showcase your personal style. Whether you want to create a custom design for yourself or print shirts for your small business, it’s fun and affordable to do so using the following step-by-step guide.
Step 1: Creating a Design
Creating the right design is the first step in creating a great T-shirt. Your design should reflect your personality or brand, and it should be eye-catching and memorable. There are several ways to create your own design, including using graphic design software such as Photoshop, drawing your own design by hand, or hiring a professional designer.
Designing With a Software
If you’re new to graphic design, there are several online resources that can help you create a professional-looking design. Canva is a popular design platform that offers a range of design templates and graphics that you can use to create your own unique T-shirt design. It is the easiest tool one can use and is highly recommended for beginners.
Adobe Illustrator is another powerful design program that is commonly used in the industry. However, it is recommended for those that are far more professional and experts in photo editing.
Designing by Hand

If you’re more comfortable drawing your own designs by hand, there are a few things to keep in mind. First, make sure your design is simple and easy to reproduce. Intricate designs may be difficult to transfer onto your shirt, and they may not be as visually appealing as simpler designs.
Second, choose colors that will stand out against the color of your shirt. For example, if you’re using a black shirt, consider using bright colors like white, red, or yellow for your design.
After creating your t-shirt design, you can use various scanning applications like CamScanner (yes, it can do more than just scan documents) on your phone to capture it and transfer it to your computer. Unlike the regular camera, these apps offer more advanced features such as precise bordering and shape orientation, ensuring your design is properly aligned and in the correct format.
Hiring a Graphic Designer
If you’re not confident in your design skills, consider hiring a professional designer to create your T-shirt design.
Freelance graphic designers can be found on platforms like Fiverr and Upwork, and they can create a custom design that perfectly reflects your personality or brand. However, this option can cost you somewhere between $10 – $100 depending upon your requirements and complexity of the design.
Step 2: Transfer Your Design on Transfer Paper

Transferring your design onto transfer paper is the next step in the process of printing your own T-shirts at home. You will need a Transfer paper for this purpose. This is a type of paper that is specially designed to transfer your design onto fabric.
Types of Transfer Paper
There are different types of transfer paper available in the market, and it’s essential to choose the right one for your specific needs.
- Light-colored fabric transfer paper: This type of transfer paper is used on light-colored fabrics such as white or pastel shades. These transfer papers work by transferring the design onto the fabric through a heat transfer process.
- Dark-colored fabric transfer paper: This type of transfer paper is used on dark-colored fabrics such as black or dark blue. These transfer papers have a white background that allows the design to be visible on dark fabrics.
- Inkjet transfer paper: This type of transfer paper is designed to be used with an inkjet printer. It works by transferring the design onto the fabric through a heat transfer process.
- Laser transfer paper: This type of transfer paper is used with a laser printer and works similarly to the inkjet printer.
- Glitter transfer paper: This type of transfer paper is designed to add glitter to your design. It is available in both light-colored and dark-colored fabric options.
- Stretchable transfer paper: This type of transfer paper is used on stretchable fabrics such as spandex or lycra. It allows the design to stretch with the fabric without cracking or peeling.
Once you have your transfer paper, it’s time to transfer your design onto it. Start by resizing your design to fit the size of your T-shirt. Use a graphic design program like Adobe Illustrator or Canva to resize your design to the correct dimensions. Then, print your design onto the transfer paper, making sure to print it in a mirror image.
After printing, carefully cut out your design, leaving a small margin around the edges. This margin will help prevent any unwanted transfer of ink onto your shirt. Make sure to remove any excess paper around the design.
Step 3: Prepare Your Shirt
Preparing your shirt is an essential step to ensure that your T-shirt design looks professional and lasts for a long time. Before transferring your design onto your shirt, you must ensure that your shirt is clean and free of any wrinkles. Any dirt or debris on your shirt can affect the transfer process, so it’s crucial to clean your shirt thoroughly before printing your design.
Wash your shirt in cold water and dry it in the dryer or air dry it to remove any dust or debris. Make sure to iron your shirt to remove any wrinkles or creases before transferring your design. A flat and smooth surface is essential for the transfer process to work correctly, so ironing your shirt is a crucial step.
Additionally, it’s important to consider the color of your shirt when preparing it for printing. If you’re using transfer paper for light-colored fabrics, make sure that your shirt is also a light color.
For dark-colored shirts, you’ll need to use transfer paper that is designed specifically for dark-colored fabrics.
Step 4: Transfer Your Design on Shirt
After preparing your shirt, it’s time to transfer your design onto it. This step involves carefully placing the transfer paper with your design onto the shirt and using heat to transfer the design onto the fabric.
When transferring your design onto your T-shirt, ensure that your shirt is clean and dry. Place the transfer paper face down onto the shirt, with the design facing the fabric.
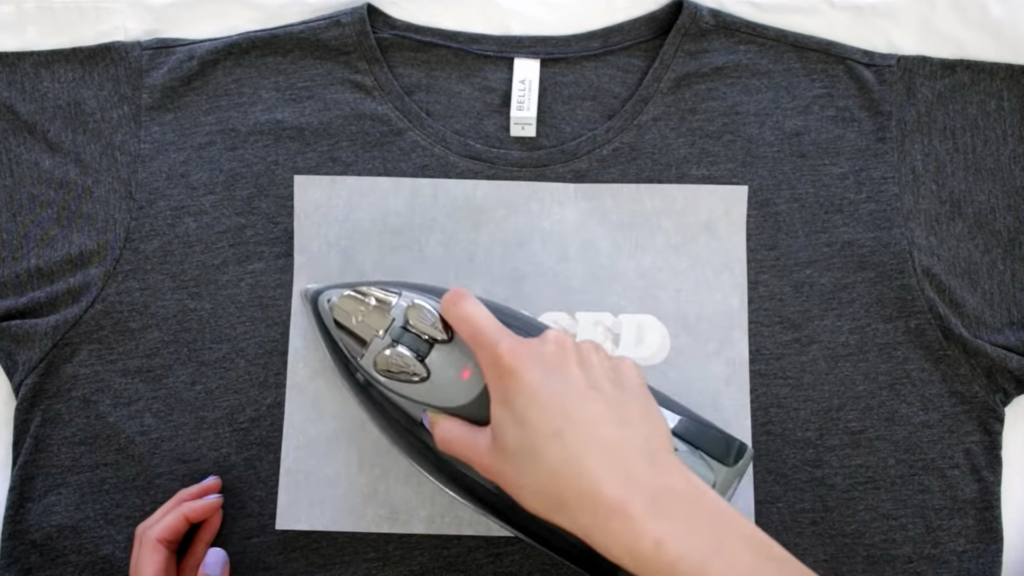
Use a hot iron to transfer the design onto your shirt. It’s crucial to follow the instructions on the transfer paper packaging for the correct temperature and duration. Be sure to apply even pressure with the iron to ensure that the design transfers evenly.
Start by placing your shirt on a flat and even surface. Then, carefully peel the backing paper off the transfer paper and position the design onto the shirt. Make sure that the design is centered and aligned correctly on the shirt. Once the design is in place, use a hot iron to transfer the design onto the fabric.
It’s important to follow the instructions on the transfer paper packaging for the correct temperature and duration to transfer the design onto the fabric correctly. Typically, the transfer process involves applying heat and pressure to the design for several seconds and then allowing it to cool before carefully peeling off the transfer paper.
If you’re using a heat press machine, follow the manufacturer’s instructions for the correct temperature, pressure, and duration to transfer the design onto your shirt correctly. A heat press machine can help to ensure that the design is evenly transferred onto the fabric and can be a more efficient method if you’re printing a large number of T-shirts.
Once you’ve transferred your design onto your shirt, allow your shirt to cool for a few minutes, then carefully peel off the transfer paper. If any parts of your design didn’t transfer correctly, you can touch them up with a fabric marker.
Step 5: Final Touch
Finally, wash and dry your shirt according to the transfer paper instructions to set the design. You may want to turn your shirt inside out to protect the design during washing.
Useful Tips and Tricks
Printing a T-shirt at home can be challenging, but it’s doable if you have the know-how. Here are a few tips and tricks to help you get the best results when printing your own T-shirts at home:
- Use high-quality transfer paper for best results.
- Test your design on a scrap piece of fabric before transferring it onto your shirt.
- Avoid using too much heat when transferring your design, as this can cause the design to crack or fade over time.
- Use a lint roller to remove any stray fibers or debris from your shirt before transferring your design.
- Use a hard surface, like an ironing board or countertop, when transferring your design to ensure even pressure.
Conclusion
Printing your own T-shirts at home is a fun and easy way to express your creativity and showcase your personal style. With just a few supplies and a little bit of know-how, you can create custom T-shirts for yourself or your small business. So why not give it a try? With a little practice, you’ll be printing professional-looking T-shirts in no time!
Reviewed by Huzaifa Haroon


