SOLVED: Deleted Favorites Keep Coming Back on Internet Explorer
Many Windows users have reported an issue with Internet Explorer where the Favorites – Internet Explorer’s version of bookmarked websites – that a user affected by this issue has deleted in the past reappear and, when deleted again, continue to reappear after a few seconds.
This problem doesn’t seem to be bound by the version of the Windows Operating System you use or the version of Internet Explorer that you have as it has been seen on Windows 8, 8.1 and even 10 and has affected all versions of Internet Explorer upwards of IE 10. Thankfully, the cause of this problem has been identified, and it is iCloud – almost all Windows users who use Apple devices along with their Windows computers have the iCloud application, and a feature of the iCloud application that is designed to sync Favorites from Internet Explorer on Windows is what causes this issue.
Since the cause of this issue has been identified, it has become entirely possible for users affected by this issue to become free of its grasp. The following are the two methods that can be used to resolve this problem:
Solution 1: Uninstall and then reinstall Internet Explorer
One of the most effective methods that can be used to fix this problem is to uninstall and then reinstall Internet Explorer. However, before you can uninstall and then reinstall Internet Explorer, you need to manually uninstall all of your unwanted Favorites. In order to do so, you need to:
Hold down the Windows Logo key, and while doing so, press E to launch the File Explorer.
Navigate to the following directory, replacing X with the drive letter corresponding to the partition or your computer’s HDD/SSD that Windows is installed on:
X:\Users\[the name of your user account]\Favorites
Locate and delete all of the previously deleted Favorites that have reappeared.
Close the File Explorer.
Once you’ve manually deleted any and all unwanted Favorites, you can proceed with the uninstallation of Internet Explorer. As soon as you have uninstalled IE, you can reinstall it and you should no longer be suffering from the problem.
Solution 2: Disable iCloud’s Favorites syncing feature
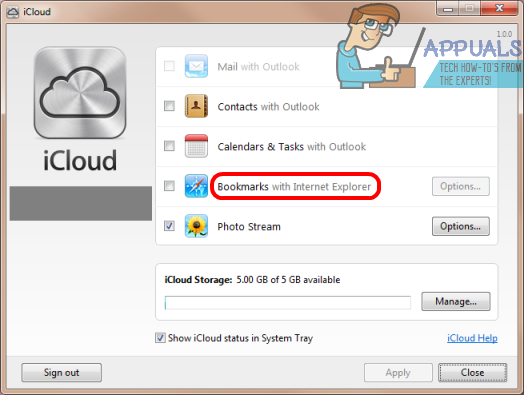
If Solution 1 doesn’t work for you or if you would simply prefer resolving this issue without having to uninstall Internet Explorer, you can resolve this issue by disabling iCloud’s Favorites syncing feature which is basically the root of all this mayhem. In order to do so, you need to:
Open the Start Menu.
Search for “iCloud”.
Click on the search result titled iCloud to launch the application
Under Bookmarks – Options, locate and uncheck Internet Explorer. This will disable the syncing of Favorites from Internet Explorer.

Click on Apply.
Click on OK.
Launch Internet Explorer and delete all of the Favorites that previously reappeared and are of no actual value to you. This time, when you do so, they will not reappear after a few seconds and will instead stay deleted for good.
Restart your computer.
Once the issue has been resolved, you are free to enable iCloud’s Favorites syncing feature, which will now work as it is supposed to and won’t cause more harm than good. In order to do so, simply launch the iCloud app, check Internet Explorer under Bookmarks – Options, click on Apply and click on OK.
It goes without saying that this solution should only be used by users affected by this problem who actually have the iCloud application installed on their computers. If you are affected by this problem but don’t have the iCloud app on your computer, you are going to be better off trying to fix this issue using Solution 1.
Solution 3: Disable iCloud’s Favorites syncing feature
In some cases, where iCloud isn’t the cause of sync, then it is usually the Windows 8/10 built-in settings, that is set to Sync your Favorites between two computers, such as two home computers, or between a home and a office computer. To turn this sync off, On one computer, Go to Settings – Accounts – Sync your settings and TURN OFF Internet Explorer Settings. Then reboot and delete the offending favorites. Then do the same on the second computer.