How to Delete Backup Files in Windows 10?
Windows allows users to save backups of their important files. The backup can be the previous version of Windows 10 or any other user’s files. These backup files can also be removed by users to free up space on their system drive. In this article, we will show you all the possible methods through which you can easily remove backup files in Windows 10.
1. Using Disk Cleanup Tool
The default Windows disk cleanup tool is the best utility to free up space for the system drive. It allows users to select any of the unnecessary files and remove them. System files are also separated from the other temporary and non-system files.
- Hold the Windows key and press R to open a Run dialog box. Now type “cleanmgr” in it and press the Enter key to open the Disk Cleanup Manager. Select the System drive and click the Ok button.
Note: You can also simply type Disk Cleanup in the Windows search feature to open it. Another method is to open the properties of the system drive and click on the Disk Cleanup button in the General tab.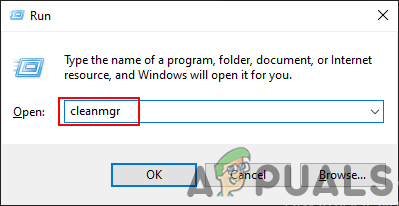
Opening Disk Cleanup - Now click on the Clean up system files button. This will open another window where you can find the backup of the old Windows installation.
- Tick the Previous Windows Installation(s) option, also any other option that you want to remove, and click on the Ok button.
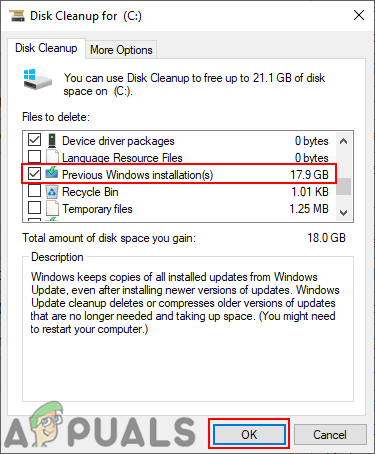
Removing old Windows files - It will remove all the backup files of old Windows installation and free space on the system drive.
- You can also simply click on the More Options tab in Disk Cleanup. Then, click on the Clean Up button for System Restore and Shadow Copies.
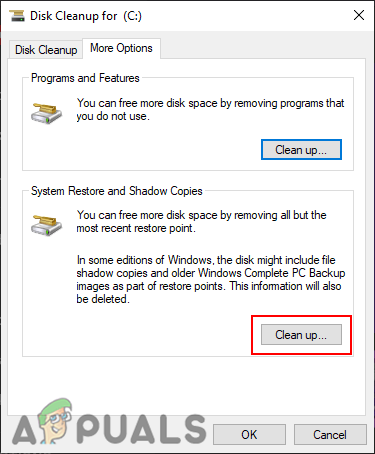
Removing shadow copies and older Windows files
2. Using the System Properties
System Properties is a place where you can configure or edit the operating system settings. In the System Protection tab, you can find the restore points for the system drive. You can delete the backup of system restore points to free up space for your system drive. Check the below steps and see how you can do it:
- Hold the Windows key and press R to open a Run dialog box. Now type “SystemPropertiesProtection” and press the Enter key to open System Properties.
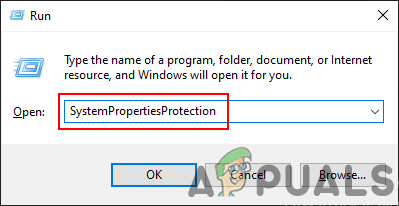
Opening System Properties - Select the system drive and click on the Configure button. A new window will open up.
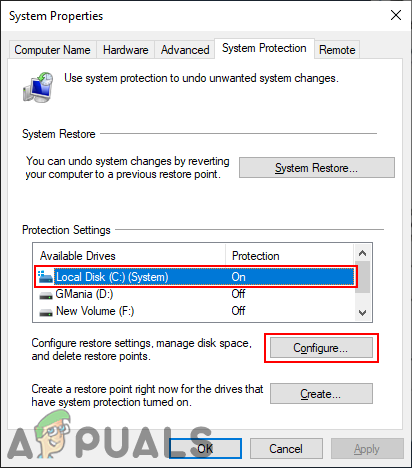
Configuring System Drive - Now you can see the Current Usage of space that is used by restore points on your system. You can click the Delete button and then click the Continue button to confirm.
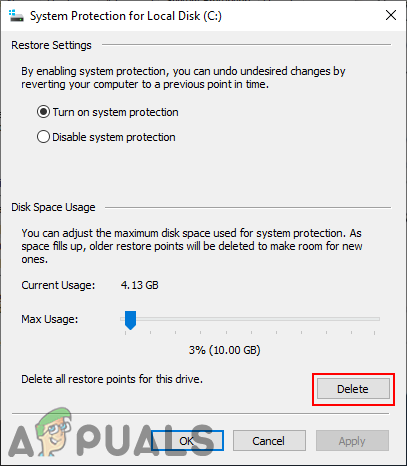
Removing Backup Restore Points - Click on the Apply button, then click Ok to save changes.
3. Using the Control Panel and Command Prompt
File History is another place where you can find the backup file in Windows 10. It may contain different files that are selected by default or that you selected manually. The backups will be saved in a specific drive selected in File History. You can also enable and disable the File History option on your system. To remove the backups on File History, follow the below steps:
- Search for the Control Panel through the Windows search feature and open it. Now click on the File History option.
Note: Make sure the view by option is selected as small icons. - Click on the Advanced Settings on the left pane of the File History.
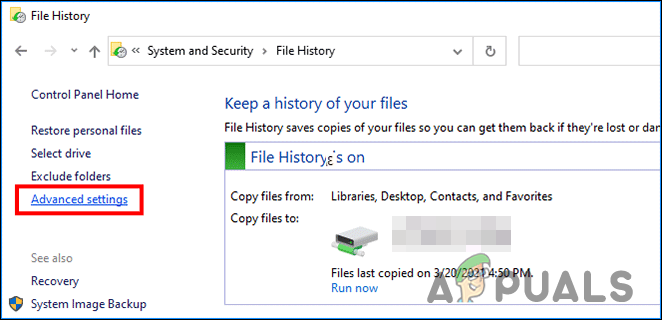
Opening advanced settings for File History - Now click on the Clean up versions button in the Versions section. It will provide several different options that you can choose and then click on the Clean up one last time to start removing files.
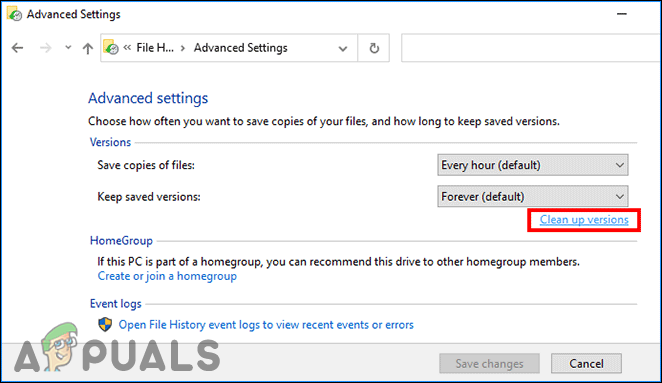
Cleaning up backups in File History - You can also do this through the Command Prompt. Search for Command Prompt through the Windows search feature and open it.
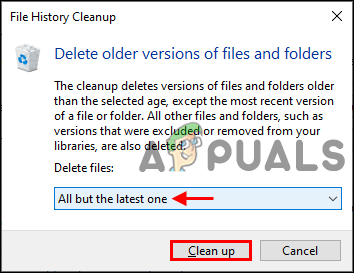
Removing backups - Now type the following command press the Enter key to run it.
fhmanagew.exe -cleanup 0
Note: The 0 in the command is for days and it will remove all backups without recent ones. If you want to remove older backup versions, you can change 0 to 30, 90, or 120.

Removing File History backup through CMD - It will remove the File History backups and show a successfully removed message.


