How to Increase your FPS in CS:GO? Complete Guide [Launch Options + Tweaks]
A lot of CS: GO players are frequently complaining about the low FPS that they experience while playing. This is a common problem in the CS:GO community that has annoyed many players regardless of their PC configuration. While they are playing, they are also having FPS drops that make the gameplay impossible. This is only encountered on PC.
We’ve decided to take a deeper look into this low FPS problem to see what are the causes for this. Here’s a shortlist of all the potential reasons that might trigger this:
- Settings too high – The principal cause for this issue to happen is the graphics settings that are set too high for your PC. The graphics settings are an important factor when talking about the FPS, so you have to make sure that the graphics settings are in balance with your PC to handle. If you think that this is the cause of your low FPS problem, make sure to lower the settings as much as you need to remove this problem.
- Steam settings – Another cause might be some Steam settings that are making your game not work as it should. The Low Bandwith Mode and Low Performance Mode options are related to the network connection of the game and its capabilities. This can affect your game if they are turned off, so all you have to do is to make sure that they are enabled.
- Improper Steam launch options – If you previously modified the standard launch options that Steam uses when Counter Strike: Global Offensive is launched, you might need to establish a new launch option rule. You can do this from the Properties screen of CS: GO.
- The Animated Avatars and Animated Avatar Frames – In case you are using animated avatars and animated avatar frames, your game could be affected by them because some are of a high quality that your PC can’t handle properly. In case you feel like this is the cause, disable the animated avatars and animated avatar frames that you are currently using.
- Compatibility issues – Depending on your monitor type, your GPU model, and your Windows model, there’s also a possibility that you will be forced to configure the launch of CS: GO to happen in a controlled environment using compatibility mode without full-screen optimization and with custom high DPI settings.
- 3D Audio processing is disabled – As it turns out, one unlikely in-game setting that is likely causing this type of issue is a scenario in which an audio setting (Advanced 3D Audio Processing) is actually causing a lot of FPS drawbacks (particularly with low and medium-tier GPUs). To fix this issue, go to the Audio tab and disable the Advanced 3D Audio Processing.
- DrawTraces are enabled – When it comes to hidden graphical settings that can affect your in-game performance in Counter-Strike: Global Offensive, Draw Trace is the number one cause. If you’re still struggling with your FPS count while playing the game, there are a few optimizations you can do via the in-game console to disable the effects of draw trace.
- Game Mode and Xbox Game Bar – Another possible cause for this issue is the Game Mode being disabled, and the Xbox Game Bar enable. The Game Mode improves the performance of your PC when playing, while the Xbox Game Bar is used for capturing videos and screenshots while playing. You have to make sure that the Game Mode is enabled. In case you are not actively using the Xbox Game Bar, make sure to disable it.
- Outdated GPU driver – This CS:GO problem could be also caused by the missing of some GPU drivers. This can happen because you have missed the installation of them or the updates are waiting for you to install. If that is the case, this is significantly reducing the performance of your PC. To fix this and to fix the low FPS problem as well, all you have to do is to use the Device Manager to search for updates, or to use the GPU manufacturer property tool to open the search and install the updates.
Now that you are aware of the causes, here is a list of all the methods that will help you fix the low FPS problem:
1. Check the Library settings in Steam
If you’re working with a low-end PC or a limited bandwidth, the first thing you should do if you’re just starting to troubleshoot the issue is to make sure that Low Bandwidth Mode and Low Performance Mode are both enabled.
Essentially, what you need to do is to make sure that all the settings inside the Library section on Steam are checked. Those settings are related to the network connection of the game and if the settings are not enabled, this might cause the low FPS problem.
All you have to do is to go to the Steam settings and access the Library section, and there you have to check if the settings are enabled.
In case you don’t know how to do this, here are the steps you need to follow:
- You need to start by opening the Steam application.
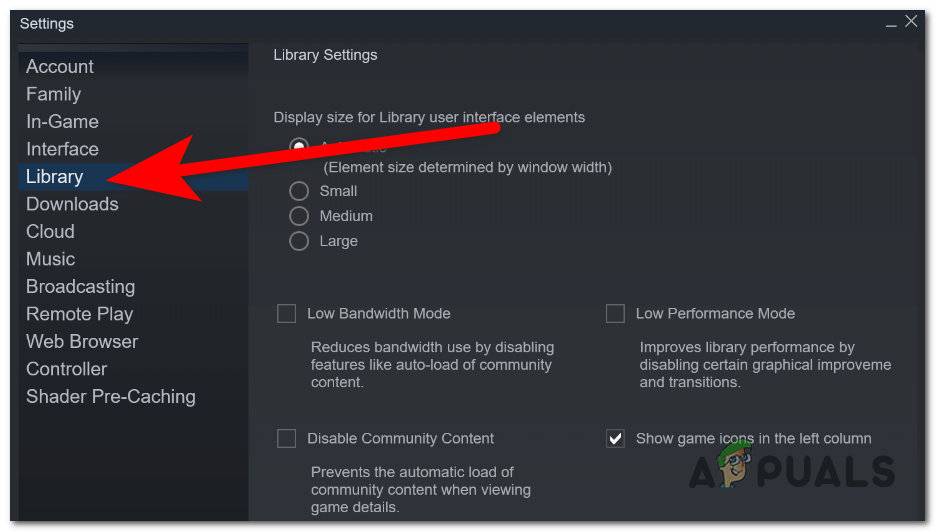
- Once you are inside the Steam app, click on the Steam button on the top left side and click on Settings to open the settings menu.

Accessing the settings of the Steam app - After that, click on Library located on the left side menu.
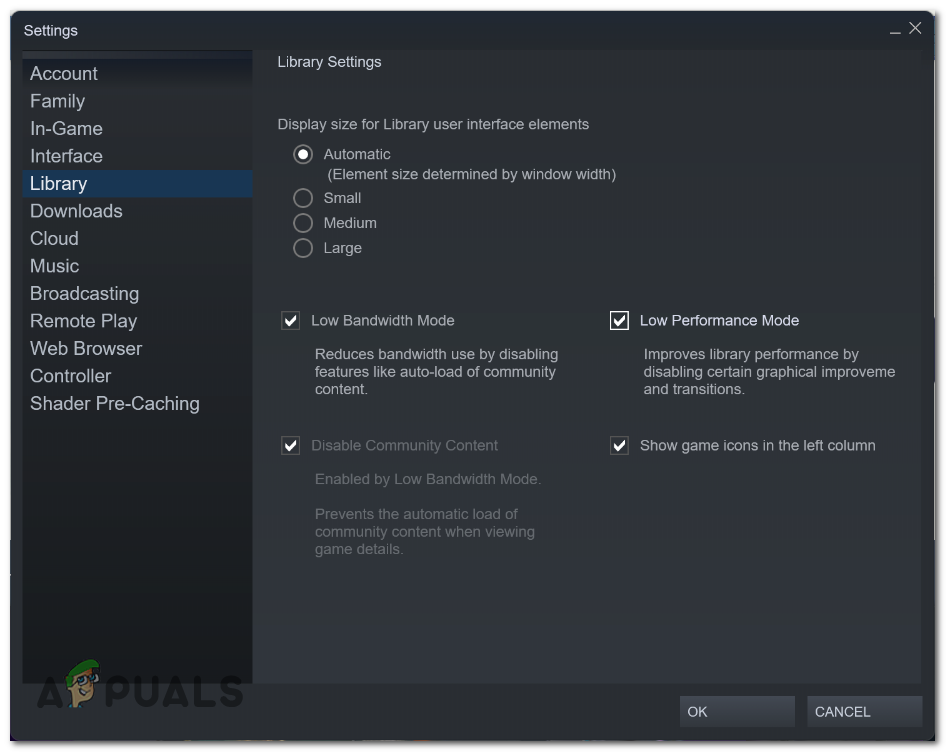
Access the Library section inside the Steam app - Now you have to make sure that you check the box next to where it says Low Bandwith Mode and Low Performance Mode. The Disable Community Content option will automatically turn on as well. After that, click on OK to confirm the changes.
Enabling the Low Bandwidth Mode and Low Performance Mode settings - When you are done with that, close the settings and test the game to see if the FPS is still low.
In case your CS:GO low FPS problem is still occurring, check below the next one.
2. Disable the Animated Avatars and Animated Avatar Frames
Players suggest that another useful thing that you can also try is to disable the Animated Avatars & Animated Avatar Frames. You can find this setting inside the Steam Friends List and Chat.
Note: This setting could be causing the low FPS problem because the animated avatars and animated avatar frames are of higher quality and might not be supported on some PCs.
Here is the guide you need to follow in case you don’t know how to do this:
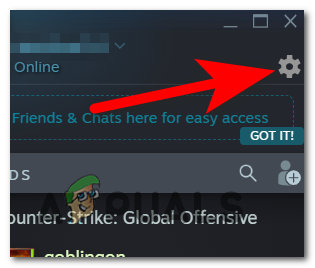
- While you are inside the Steam application, click on the Friends & chat button on the bottom part of the screen

Opening the Friends & chat menu - Once you’ve done that, you need to find the gear icon and click on it to open the Friend list settings.
Opening the friend list settings - After that, you have to go to the last setting that appears on your screen, right where it says Enable Animated Avatars & Animated Avatar Frames in your Friends List and Chat. Now make sure to turn the option OFF.
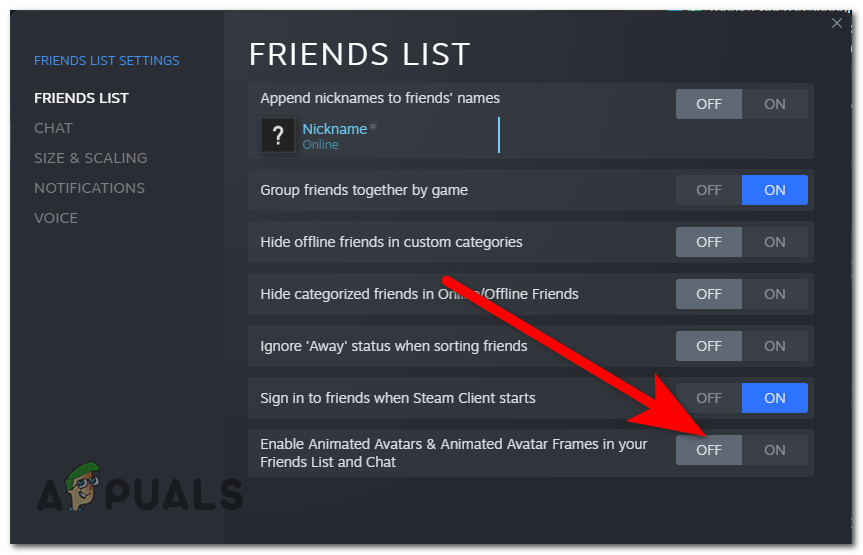
Turning off the Enable Animated Avatars & Animated Avatar Frames in your Friends List and Chat option - Once you’ve done that, you can close the settings and open the game to see if the low FPS are still present.
In case CS:GO is still showing the same problem, go to the following method.
3. Delete the current launch option and paste a new one
You can try to change the launch option command that you are having there for some time. Probably some of the commands are not even available anymore because they are outdated, and that could be the cause for the low FPS as well.
Note: This scenario is likely applicable if you previously modified the launch option of Counter Strike: Global Offensive. Recently, the game suffered some structural changes that deprecated some launch commands that some people were using.
You can simply do this by accessing the Properties of CS:GO and using the launch options.
In case you don’t know how to delete and rewrite a launch option command, here are the steps you need to follow:
- The first thing you need to do is to open the Steam application and go to the Library.
- Inside the Library, find CS:GO and right-click on it, then open the Properties.
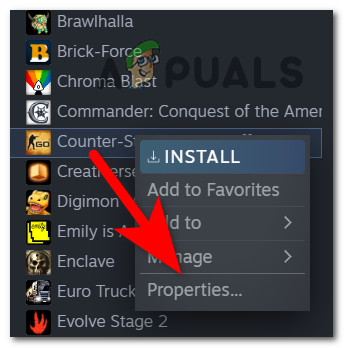
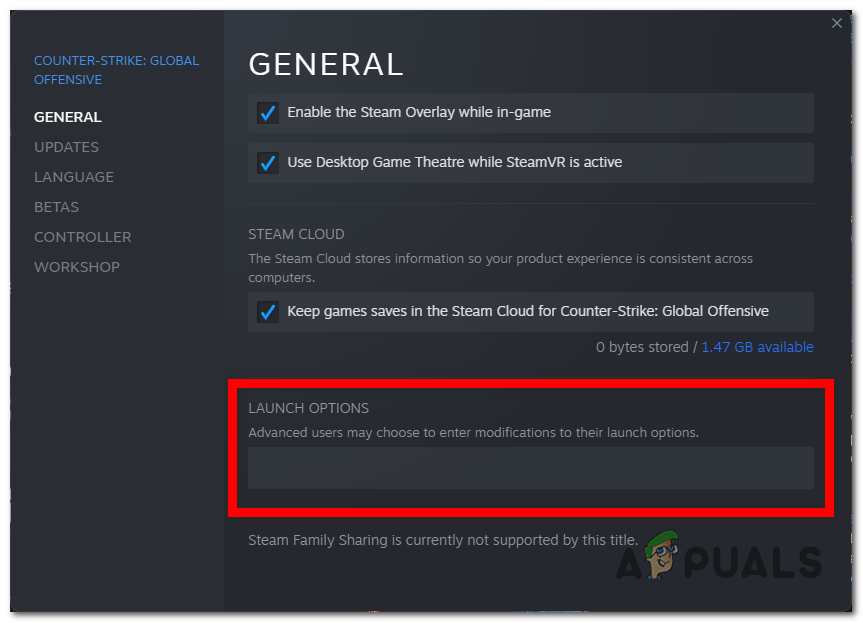
Opening the Properties of CS:GO - When you are inside the properties of the game, go to Launch options and in case you have some commands there that you have been using, make sure to erase them.
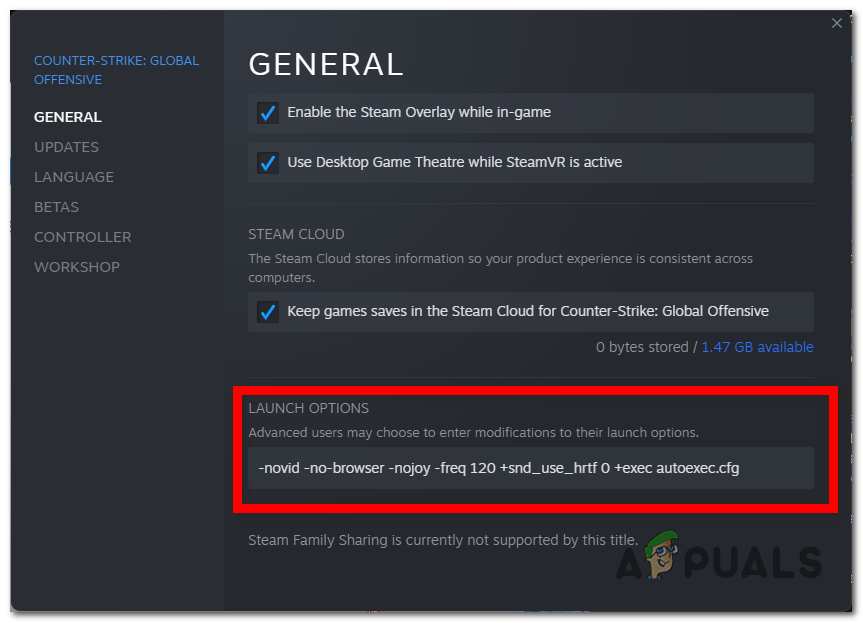
Deleting all the commands from Launch options - Now you have to insert the following command inside the Launch options:
-novid -no-browser -nojoy -freq 240 +snd_use_hrtf 0 +exec autoexec.cfg
Note: Right after freq, you have to match the number with your monitor refresh rate. For example, if you have 120Hz, you need to type freq 120.
Changing the Launch option - After that, close the Properties and launch the game to see if now it will work properly.
If your game still has low FPS, try the next method below.
4. Change the Compatibility properties
Another thing that you can try in order to fix this CS:GO low FPS problem is to change the Compatibility to optimize the game. All you have to do is to disable the full-screen optimizations and enable override high DPI.
Note: This method is typically effective in improving the FPS if you’re using a dual GPU setup or you’re using a display monitor with a variable refresh rate.
You can simply do this from the Compatibility tab located in the Properties of CS:GO. In case you don’t know how to do this, here are the steps you need to follow:
- Firstly you have to access the Properties of CS:GO. Go to the Library and right-click on CS:GO to open the Properties.
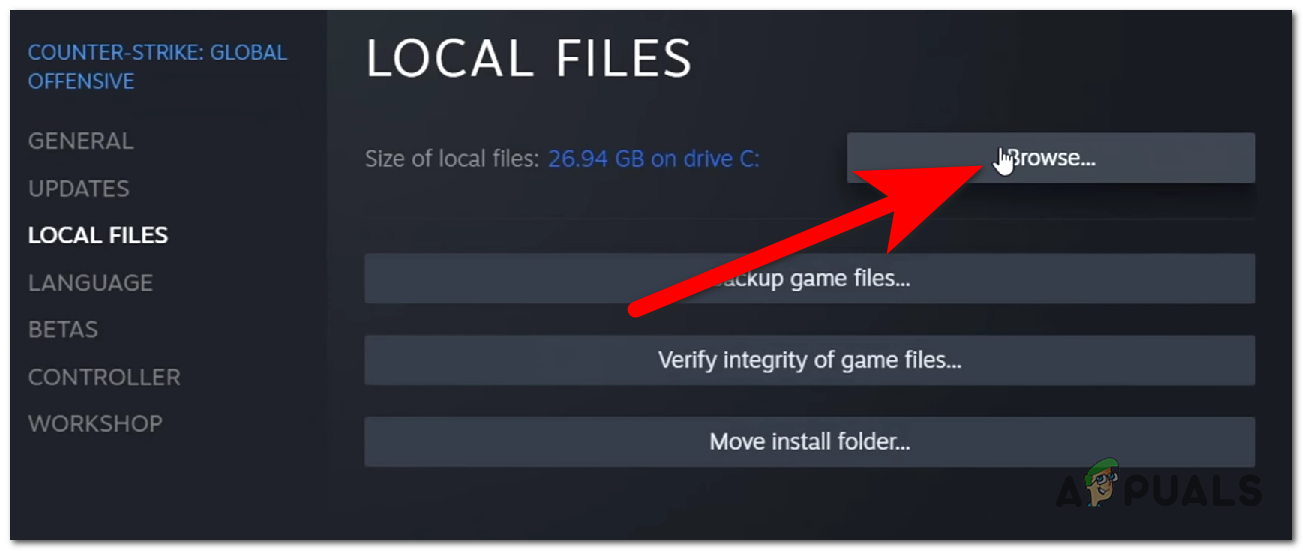
Opening the Properties menu of CS:GO - After you are inside the Properties menu, click on Local files and click on Browse to open the folder of the game.
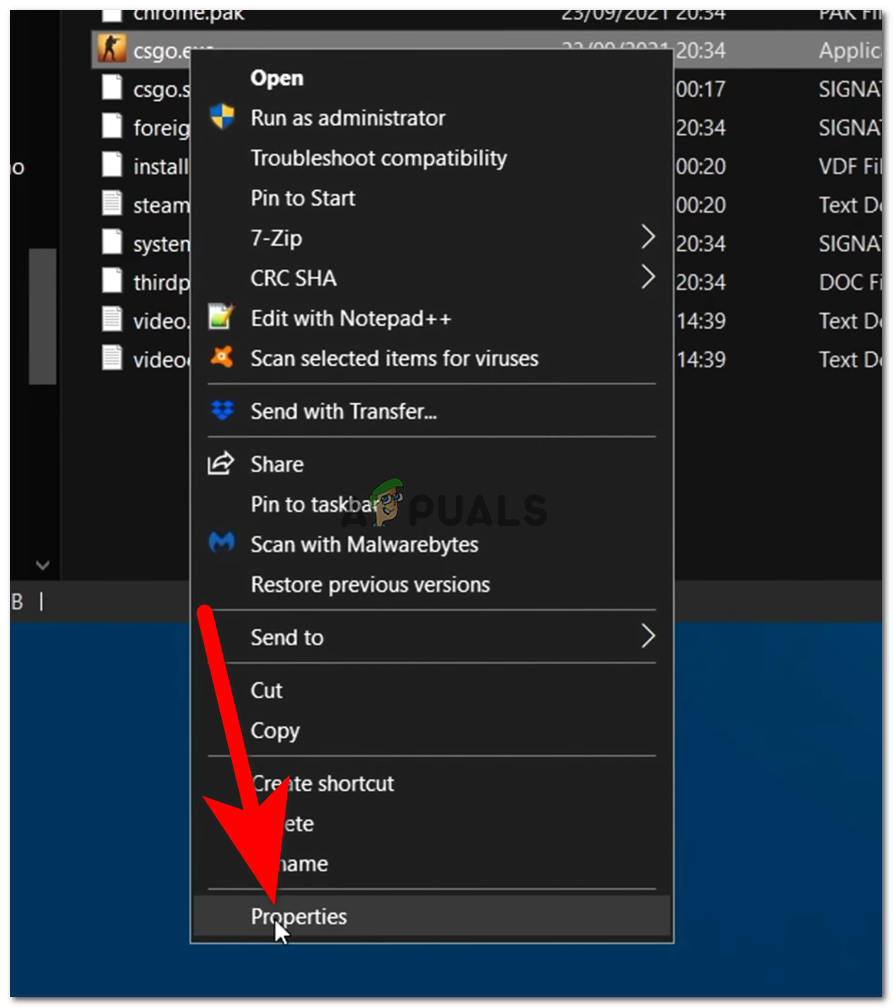
Opening the folder where CS:GO is located - Once the folder of the game appears on your screen, right-click on the game’s executable named csgo.exe and click on Properties to open the Properties menu.
Opening the Properties menu of CS:GO - When the Properties appear on your screen, you need to click on the Compatibility section and make sure to check the box next to where it says Disable full-screen optimizations to enable this option.
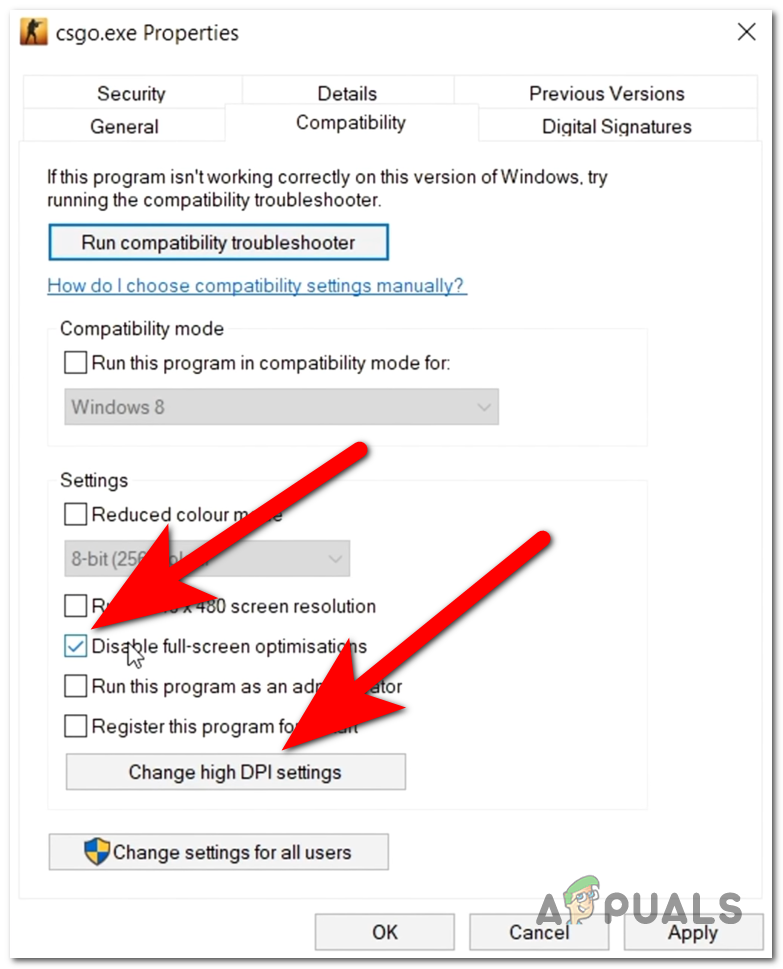
Enabling the Disable full-screen optimizations option and opening the Change high DPI settings menu - Once the other Properties menu appears on your screen, make sure to check the box next to where it says Override high DPI scaling behavior to enable the option.
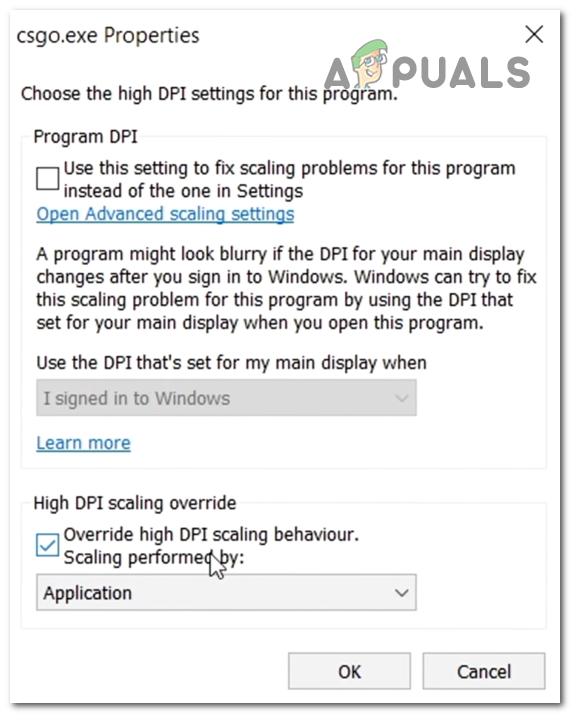
Enabling the Override high DPI scaling behavior - Now press OK, then Apply to save the changes you’ve made.
- After that, you can close the Properties and launch CS:GO to see if the low FPS problem has been remediated.
In case the game still has low FPS and is unplayable, check the next possible fix below.
5. Change in-game settings
A very important factor that determines your FPS is the in-game settings. The low FPS problem on CS:GO could happen due to an audio feature that is simply too resource-demanding for your PC to handle or due to a series of video settings. A lot of players have come to the conclusion that the audio settings & videosettings were the cause of this FPS issue.
If that is the case for you, you can simply fix this by going to the in-game settings of CS:GO and lowering the advanced video settings. Lower them as much as it needs to make your game playable again and to not encounter problems like this one.
Note: This method is only confirmed to be effective for people using integrated audio card solutions. Dedicated equivalents aren’t reported to cause this type of problem.
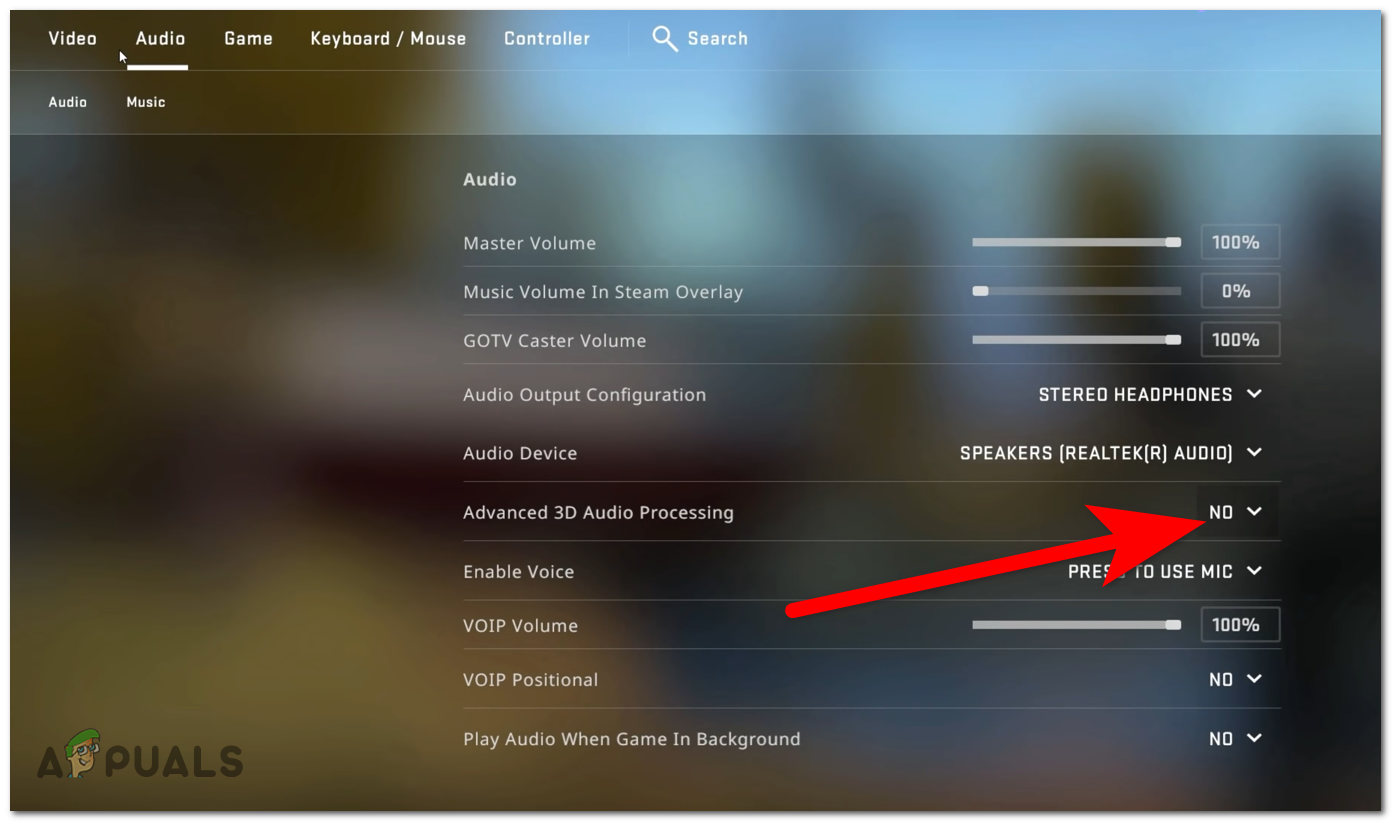
You can also go to Audio, then go to the Advanced 3D Audio Processing option and disable it because this option seems to lower some FPS as well.
After you have changed the Advanced Video settings, try to enter a match to see if you will still encounter the low FPS problem. If you see some improvements but still not enough, lower the settings some more until you manage to fix it.
In case this still doesn’t fix your low FPS problems on CS:GO, go and try the next method below.
6. Use the console to change some advanced commands
A few affected users have reported that they were able to remediate the low FPS issue by using some advanced commands that can be helpful. There are some in-game settings that can be changed using the console inside the game.
In case you want to change the commands, here’s a list of the commands that can help you fix your low FPS problem in CS:GO:
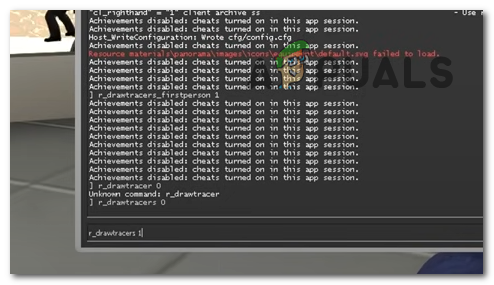
The first command is r_drawtraces. After disabling this command, all the bullet traces from your enemy’s guns will be disabled. This will improve the performance of the game, but it is not recommended for high-level players because you won’t be able to see the direction of the bullets that are coming toward you.
If you choose the performance option and want to disable the bullet traces, press the ` key to open the console while you are inside the game, then type ‘r_drawtraces 0‘ and press Enter to submit the command.
Note: The default key that you need to press to open the console is `, but in case you have changed it use the key that you prefer.
In case you decide that you want to change back the setting and want to enable the bullet traces again, open the console and type ‘r_drawtraces 1‘, then press Enter to submit the command.
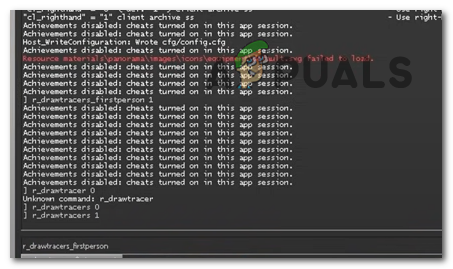
The second command is _drawtraces_firstperson. If turned off, this command will disable the bullet traces of your own guns. It will improve the performance of the game and fix the low FPS problem. But if the option is enabled, your bullet traces will be visible and you risk to encounter low FPS and stuttering issues.
If you decide that you want to disable this setting, while you are inside the game open the console and type ‘_drawtraces_firstperson 0‘, then press Enter to submit the command.
If you want to enable the command, open the console, then type ‘_drawtraces_firstperson 1‘ and press Enter to submit the change.
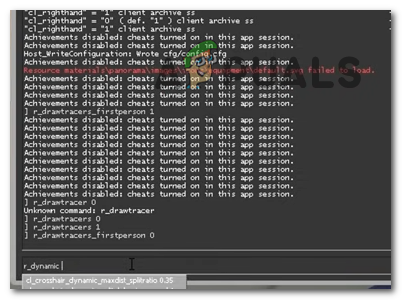
The third and last command that you have to submit is r_dynamic. If this command is turned off, the advanced lighting effects will be disabled. This will produce a major impact on your FPS, fixing the low FPS and improving the performance of your game significantly.
The choice you make depends only on your preferences but in case you don’t really care about the advanced lighting effects, we recommend you disable this command for performance improvements.
To disable this option, all you have to do is to open the console while playing the game and type ‘r_dynamic 0‘, then press Enter to confirm the command. If you want to enable the setting, open the console, then type ‘r_dynamic 1‘ and press Enter to submit the command.
Now after you have changed the settings after your preferences, all you have to do in order to save the changes is to exit the game that you have entered. When you will enter the next match, the changes should be made and you should be able to see the improvement of the FPS.
In case you have changed every command here and still have low FPS in CS:GO, check the other possible method below.
7. Make sure the Game Mode is enabled and Xbox Game Bar disabled
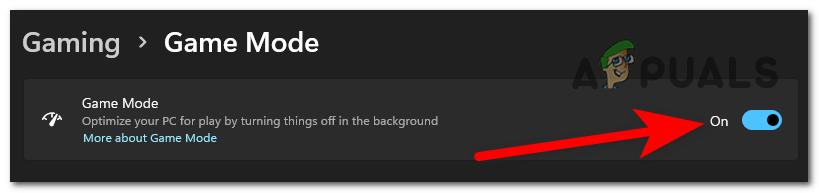
Windows has an option named Game Mode that will optimize your PC when playing gaming, so it will help the game to perform better. When using it while you play CS:GO, this can fix the low FPS and improve the performance of the game.
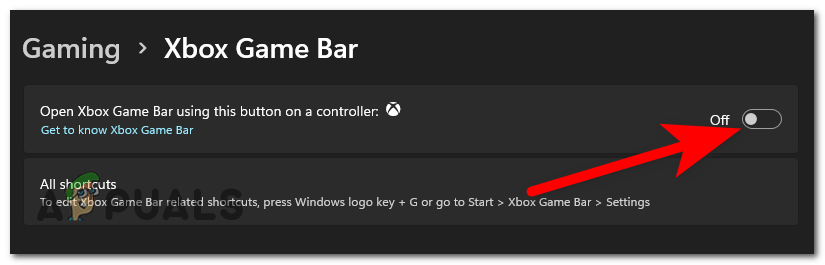
The other option that can improve the game performance is the Xbox Game Bar. The Xbox Game Bar is an application built into Windows that you can use to capture videos and screenshots while playing games. But if you don’t use it, there’s no point in having it enabled since it reduces the game performance and causes low FPS problems.
To fix this, all you have to do is to go to the Windows Settings and enable the Game Mode, then go and disable the Xbox Game Bar.
In case you don’t know how to do this, here are the steps you need to follow:
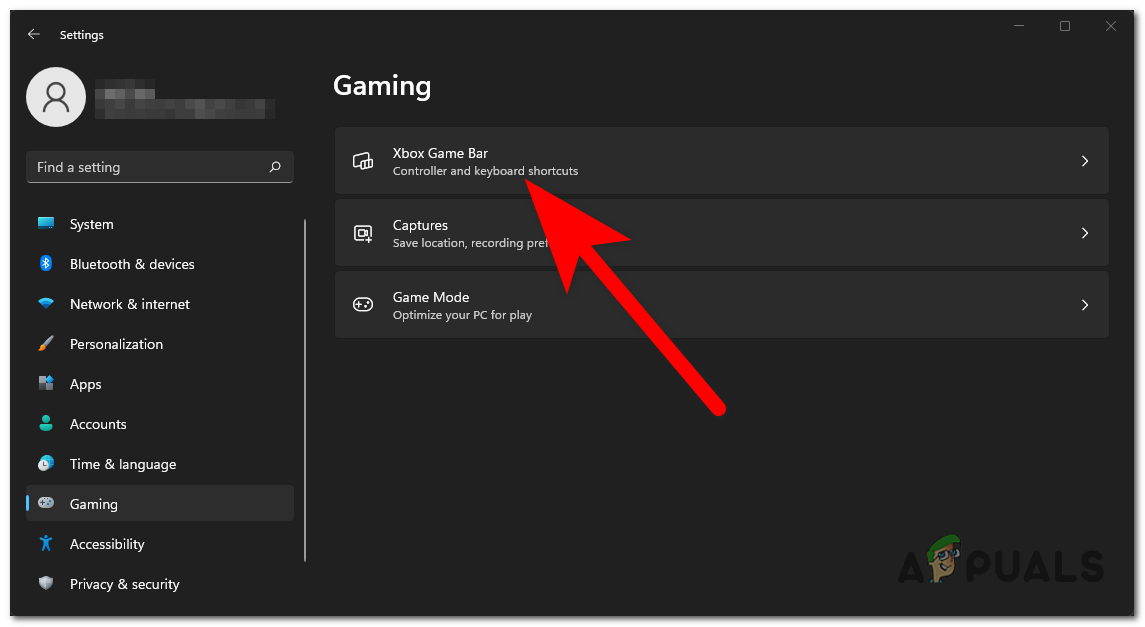
- The first thing you have to do is to open the Windows Settings. You can do this by using the taskbar and searching for Settings, then pressing Enter to open them. The other way is to open a Run dialog box by pressing the Windows key + R, then type ‘ms-settings:‘ and press Enter to open the Settings.

Opening the Windows Settings using a Run dialog box - Once you are inside the Settings, navigate to the Gaming section and click on Xbox Game Bar to open the section.
Accessing the Xbox Game Bar section from the Windows Settings - After that you are inside the Xbox Game Bar, make sure to turn off the toggle next to Xbox Game Bar. The toggle should be grey instead of blue.
Disabling the Xbox Game Bar from the Windows Settings - Once you’ve done that, go back to the Gaming section and click on Game Mode to navigate there.

Navigating to the Game Mode section inside the Windows Settings - Now you have to make sure that the Game Mode option is enabled, so the toggle is blue.
Turning on the Game Mode option from the Windows Settings - After you’ve done that, close the Settings and launch CS:GO to see if you still encounter the low FPS problem.
In case neither of these methods has managed to fix your low FPS in CS:GO, check the last method below.
8. Update your GPU driver to the latest version
The last thing that you can try is to update your graphics card to the latest available version. This could be a cause for the low FPS because the system can’t work properly without the necessary updates. This can be happening if you have a pending update or if you have missed an update and didn’t install it.
You can fix this by forcing the system to search for available updates for your GPU, and if it finds any you can install them.
In case you don’t know how to do this, here are the steps that you need to follow:
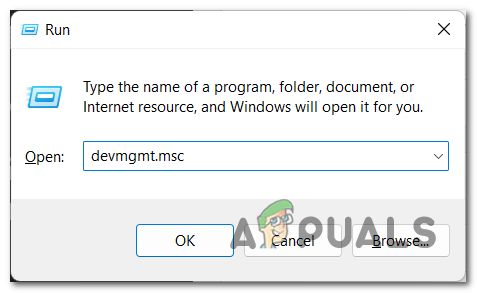
- Open a Run dialog box by pressing the Windows key + R and type inside the search bar ‘devmgmt.msc‘, then press Enter to open the Device Manager.
Opening the Device Manager using a Run dialog box - After you are inside the Device Manager, search for the Display Adapters and expand the drop-down menu once you find it.
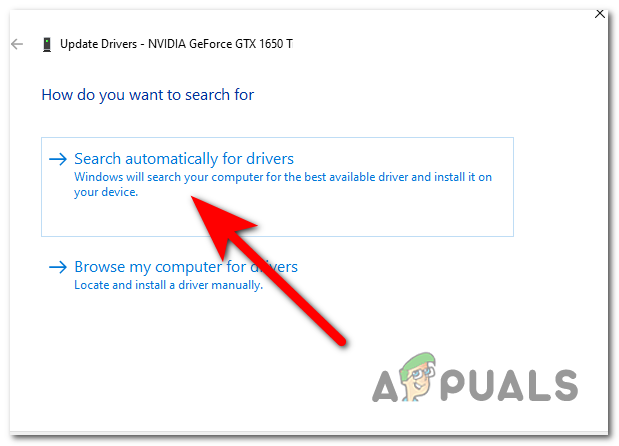
- Now you need to right-click on the dedicated GPU that you are using, then click on Update driver.

Updating your graphics card from the Device Manager - Once you’ve done that, you have to click on Search automatically for drivers and wait until the scan is complete to see if there are updates available to install.
Scanning for available GPU drivers - In case the scan finds any available updates for your graphics card, follow the instructions that appear on your screen to complete the installation of them.
- When you are done with that, launch CS:GO and play the game to see if the low FPS problem is still present.
Note: In case the Device Manager hasn’t been able to find any available GPU updates, you should also consider using your GPU manufacturer’s proprietary tool to see if it will manage to find any missing updates for your specific graphics card model:
GeForce Experience – Nvidia
Adrenaline – AMD
Intel Driver – Intel


