How to Fix Code42 CrashPlan ‘cannot connect to background service’ error
The “Cannot Connect to Background Service” Error is displayed sometimes while starting the Code 42 app and it indicates an issue with port availability or interruption between the functionality of the application. This error might also be triggered due to blockage from the AntiVirus.

What Causes the “Cannot Connect to Background Service” Error on Code 42?
We found the underlying causes to be:
- Glitched Application: In some cases, the app might be glitched due to which the error might be triggered. Small bugs and glitches are occasionally seen in the digital world and they often fix themselves after a simple restart.
- Memory Shortage: Often companies have a large amount of data that has to be backed up constantly and that process requires a lot of resources. You have to allocate a certain amount of memory to the Code 42 app and this memory can sometimes run out. Therefore, if the memory runs out, the error might be triggered.
- Previous Installations: If the Code 42 app has been installed on your system more than once, it usually leaves behind a residue file that needs to be deleted before a new installation can be completed. This file is located in the users’ personal files and there might be multiple files if there are multiple users.
- Port Conflicts: Sometimes, the Antivirus or the Firewall might block the application from using certain ports due to which this error might be triggered. It is also possible, that there might be certain ports that are already in use by other applications and the Code 42 app is trying to use them which is creating a conflict.
- Disabled Service: In some cases, the Code 42 Service might have been disabled due to which the error is being triggered. This service can sometimes be disabled by optimization apps that limit the background services.
Solution 1: Restarting the Application
If the application has been glitched, the simplest troubleshooting step is to restart the app and check if the glitch is fixed. Since this error is triggered mostly while signing in to the account, we will be able to access the console. For that:
- Start the Code 42 app.
- Press the following button combination for your relevant device.
Windows: Ctrl+Shift+C
Mac: Option+Command+C
Linux: Ctrl+Shift+C
- Type in the following command and press “Enter”.
Restart
- Once the app is restarted, sign in and check to see if the issue persists.
Solution 2: Allocating More Memory
If the memory allocated for the application has run out, it is recommended that you dedicate more memory towards the app or select a smaller backup. You can find the guide online to help dedicate more memory depending upon your device.
Solution 3: Removing Previous Files
If there are residues left from previous installation files, the error might be triggered. Therefore, in this step, we will be deleting the previously installed files. For that:
- Navigate to the following addresses depending upon your devices.
Windows Vista, 7, 8, and 10: C:\Users\<username>\AppData\<Local or Roaming>\CrashPlan
Windows XP: C:\Documents and Settings\<username>\Application Data\CrashPlan
Mac: /Users/<username>/Library/Application Support/CrashPlan
- Delete the “.ui_info” file in the folder and restart the Code 42 application.
- Check to see if the issue persists.
Solution 4: Starting Service (Windows Only)
If the Code 42 service has been stopped, the error might be triggered because it is crucial in starting the application. To start the service:
- Press “Windows” + “R” to open the Run prompt.
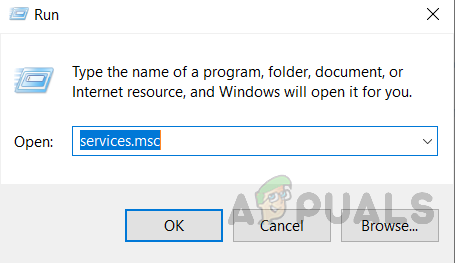
- Type in “services.msc” and press “Enter”.

Opening services by typing “services.msc” in the Run command. - Double click on the “Code 42 CrashPlan Backup Service” and select the “Start” button.
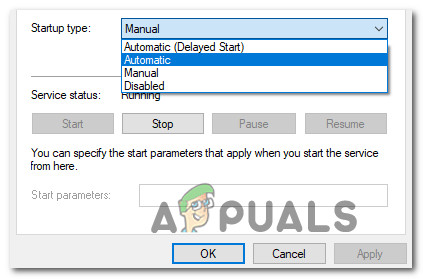
- Click on the “Startup Type” Dropdown and select “Automatic”.

Changing the startup type - Click on “Apply” and select “Ok”.
- Restart the app and check to see if the issue persists.
Note: Disable all Firewall and Antivirus software and check if that has an effect on the functionality of the application. Also, contact your ISP to forward the ports that the app is using. It can also help to reinstall the application completely after uninstalling if the above guide didn’t help.


