[FIX] Can’t Change Diagnostic Data to ‘Full’ in Windows 10
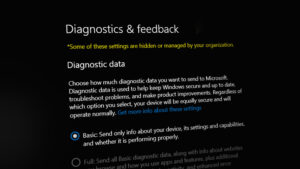
Diagnostic Data can stay locked to “Basic” with the “Full” option grayed out on the Diagnostics & Feedback page, showing the message “some settings are hidden or managed by your organization.” This means Windows data collection is limited and the system is not allowed to send the most detailed diagnostic data because of a policy or registry setting.
The most common cause is the “AllowTelemetry” registry value being set to a low level, with other causes including the Connected User Experiences service being turned off or privacy tools causing conflicts.
Before moving on, check if you can log in to the Windows Insider website with your credentials. Also, make sure your Windows is up to date.
1. Enable Connected User Experience Service
The Connected User Experiences and Telemetry service is required for diagnostic data to work. If it’s not running or is disabled, you can run into this problem. Enabling and starting the service should help.
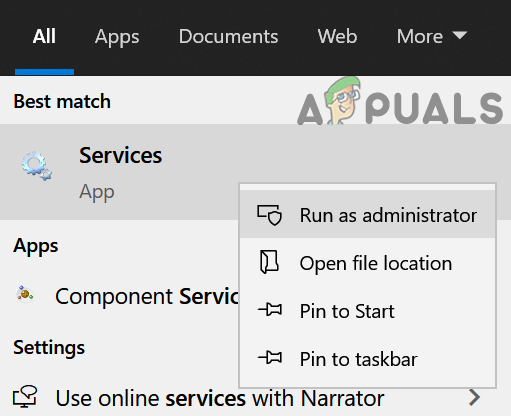
- Press the Windows key and type: Services. In the results, right-click Services and choose Run as Administrator.
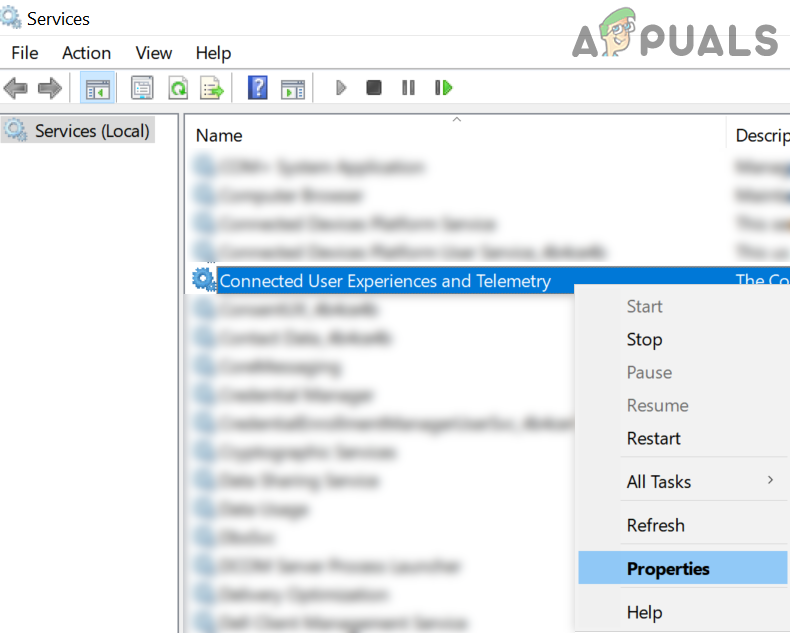
Open Services as Administrator - Right-click Connected User Experiences and Telemetry and choose Properties.
Open Properties of the Connected User Experiences and Telemetry - Set Startup type to Automatic.
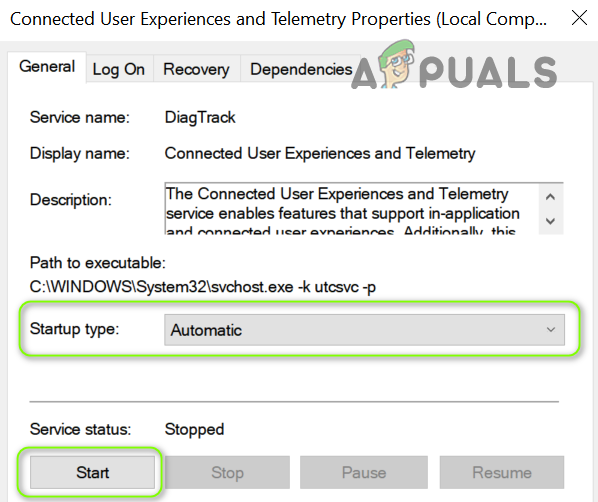
Connected User Experiences and Telemetry - Click Start and Apply. If it’s already running, restart the service.
- Reboot your PC and check if you can now set Diagnostic data to Full.
- If not, set the Startup type of Device Management Wireless Application Protocol (WAP) Push Message Routing Service (dmwappushsvc) to Automatic and start/restart it.
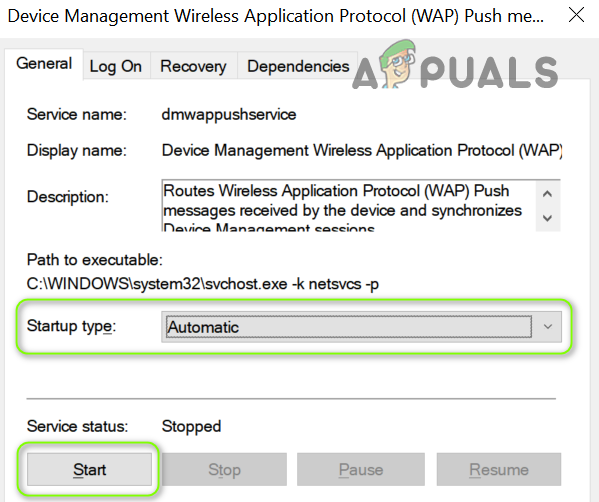
Change the Startup Type of Device Management Wireless Application Protocol (WAP) Push Message Routing Service and Start it - If the issue persists, enable and start the Windows Insider Service as well.
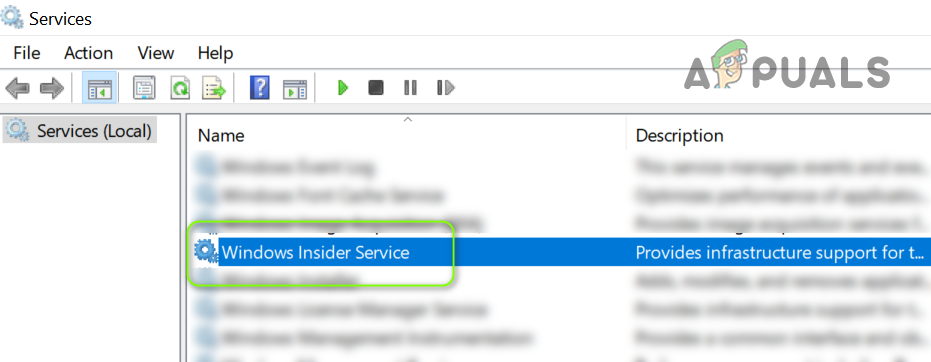
Enable and Start Windows Insider Service
2. Remove the Conflicting Applications
You may not be able to set Diagnostic data to Full if a privacy tool (such as Spybot Anti-Beacon, O&O ShutUp10, or System Mechanic) blocks telemetry. Adjusting the app’s settings or uninstalling it usually fixes the issue. First, check the Apps list in Windows Settings to find any such tools.
- Press the Windows key and open Settings.
- Select Apps and locate Spybot Anti-Beacon, System Mechanic, or similar.
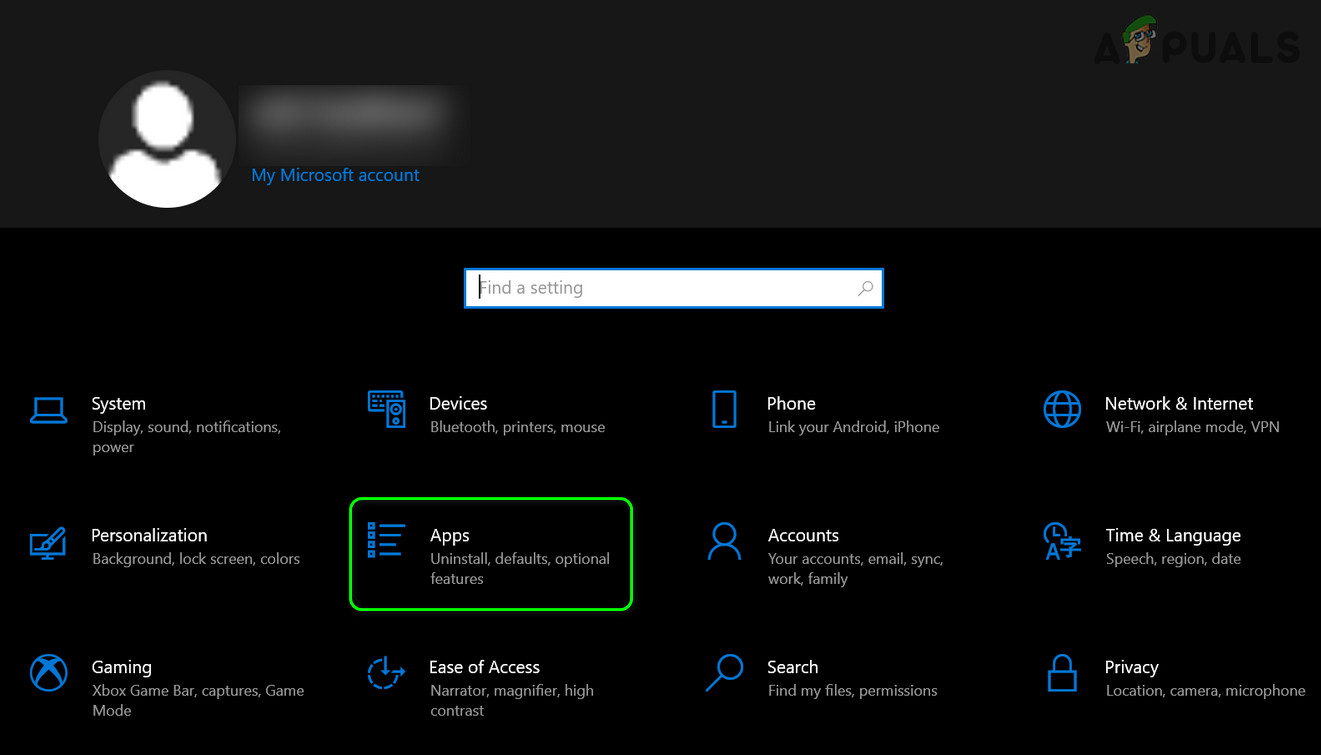
Open Apps in the Windows Settings - Click Uninstall and confirm.
- Reboot your PC and check if you can set Diagnostic data to Full.
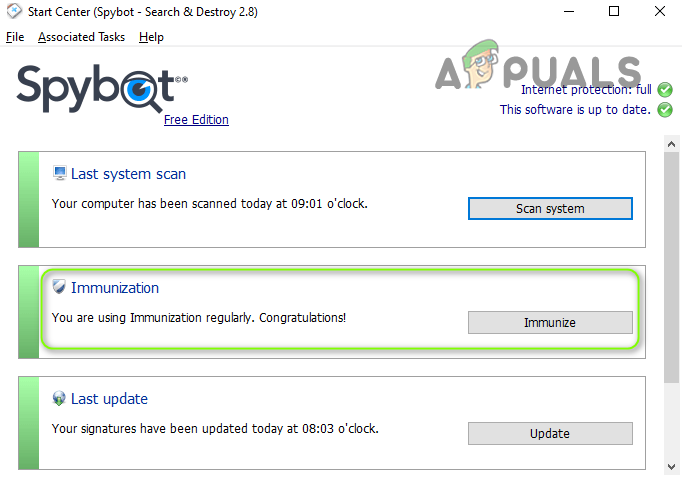
If you use Spybot, disabling its Immunization feature may resolve the issue.
If you use System Mechanic, try enabling Personal Data Collection and Sharing (Toolbox > Protect > Privacy Shield).

3. Enable Other Diagnostic & Feedback Options
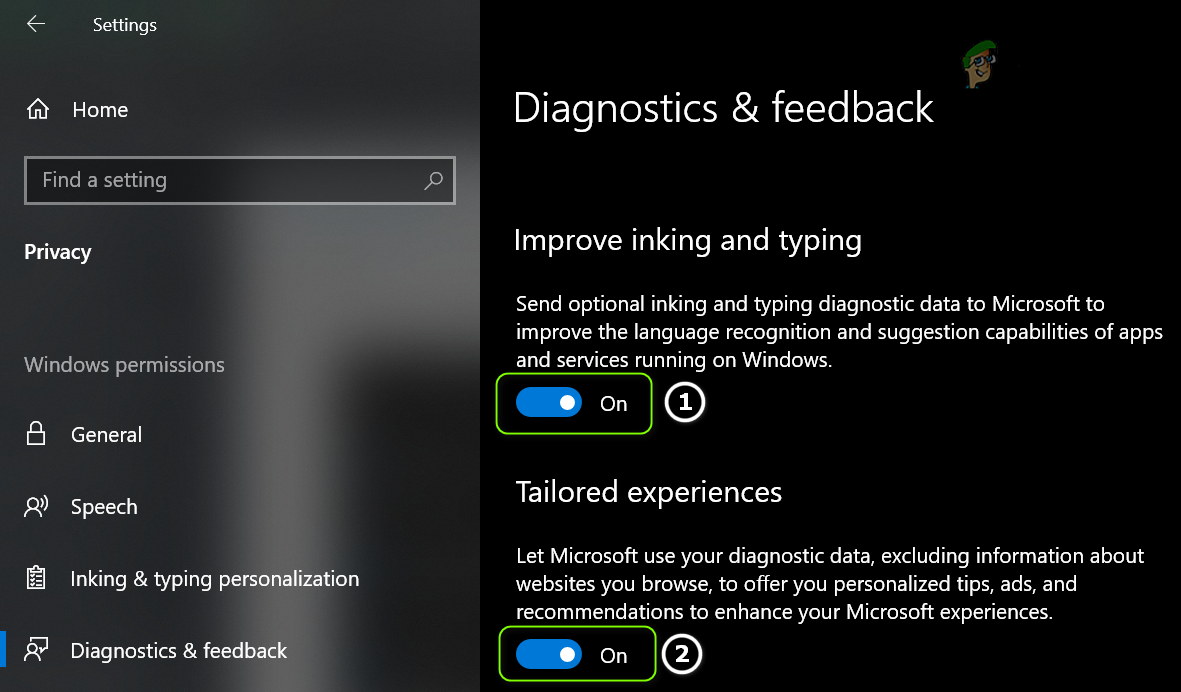
This issue can occur if related Diagnostic & Feedback options (like Inking and Typing) are turned off. Turning them on can help.
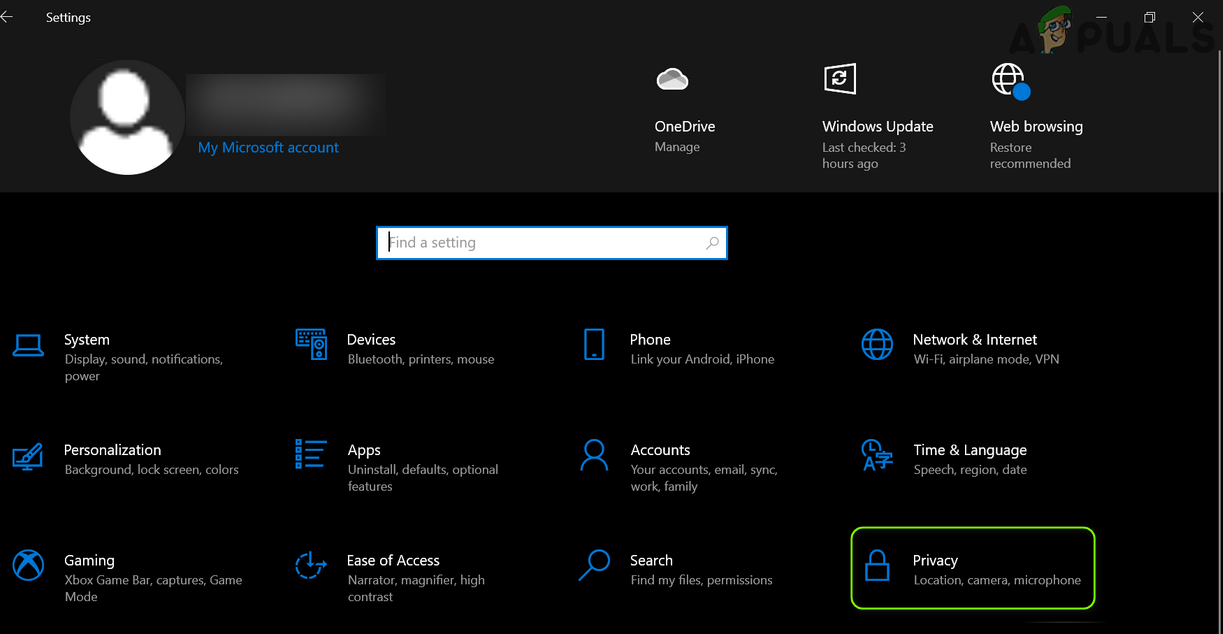
- Press the Windows key and open Settings.
- Open Privacy and, in the left pane, go to Diagnostics & Feedback.
Open Privacy in the Windows Settings - Enable Improve Inking and Typing and Tailored experiences by toggling their switches to On.
Enable Improve Inking and Typing and Tailored Experience in the Diagnostics & Feedback - Set Feedback frequency to Automatically (Recommended).
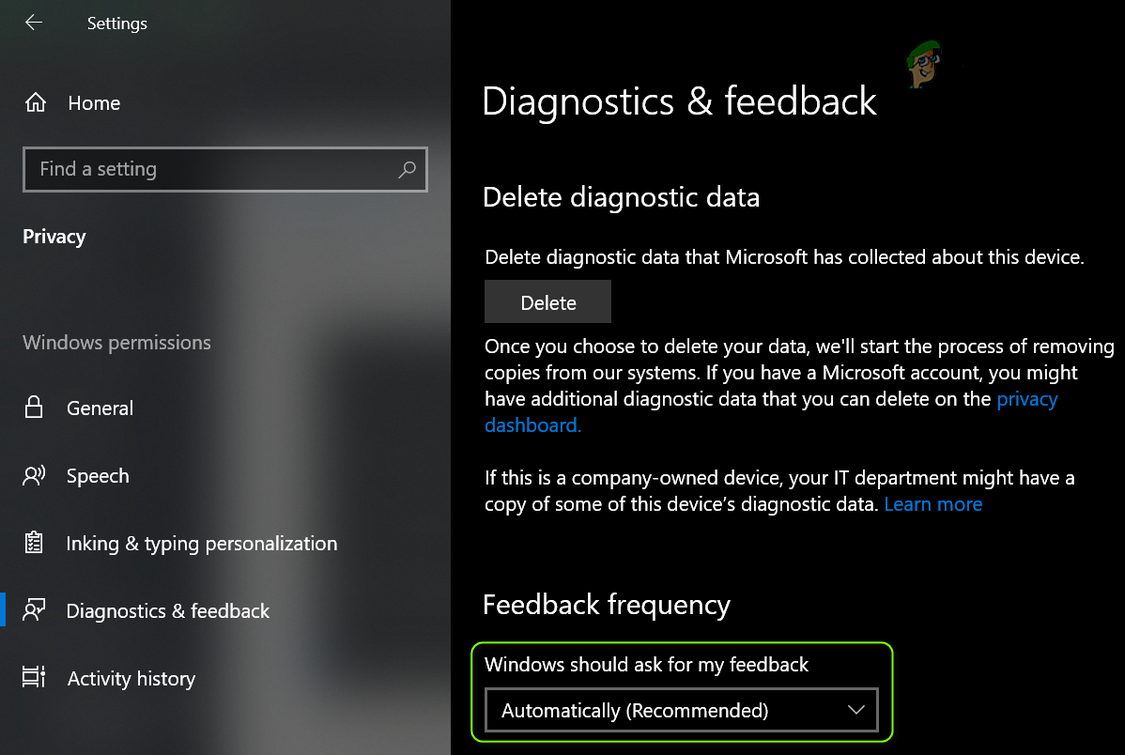
Feedback Frequency and select Automatically (Recommended) - Reboot your PC and check if the issue is resolved.
4. Edit the Group Policy to Allow Telemetry
Telemetry is required for diagnostic data collection. If it’s disabled or misconfigured in Group Policy, you’ll see this problem. Enabling it in Group Policy should help.
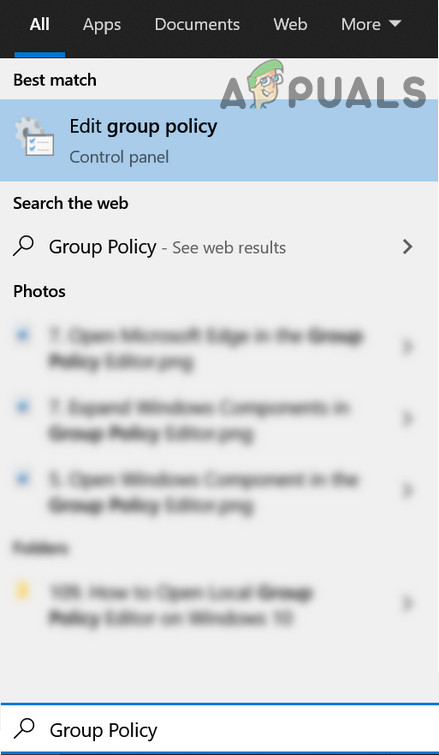
If you use Windows 10 Home, you may need to install the Group Policy Editor.
- Press the Windows key and type: Group Policy Editor. Open Edit Group Policy.
Open Group Policy Editor - In the left pane, navigate to:
Computer Configuration > Administrative Templates > Windows Components > Data Collection and Preview Builds
- In the right pane, double-click Allow Telemetry and set it to Enabled.
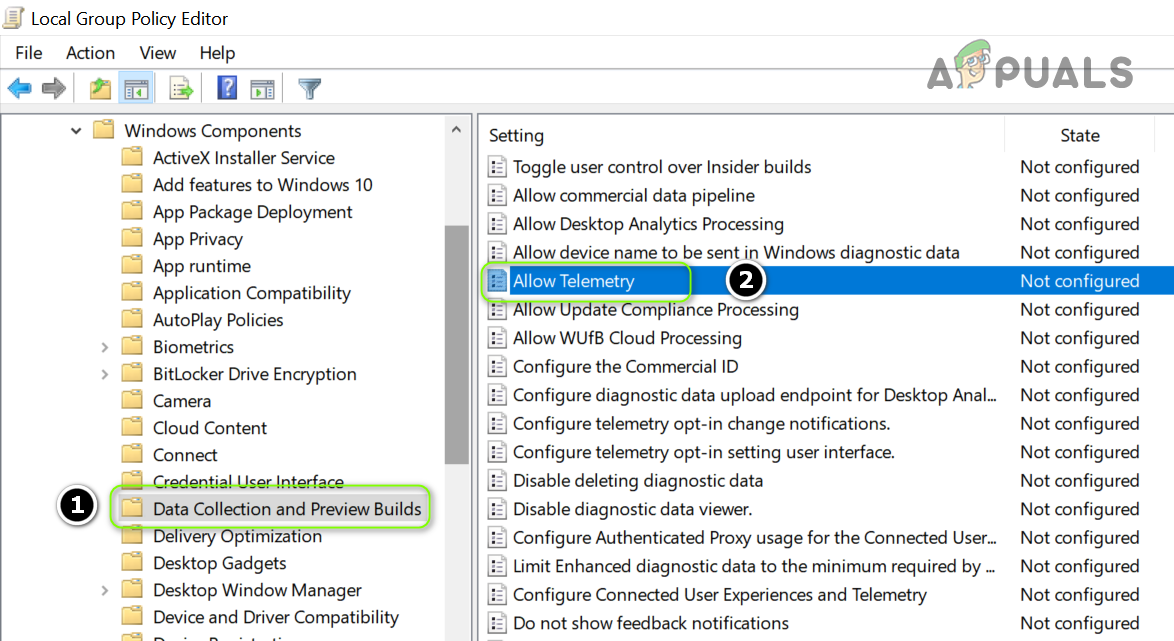
Open ‘Allow Telemetry’ in the Group Policy of Data Collection and Preview Builds - Under Options, set the value to 3 – Optional and Apply.
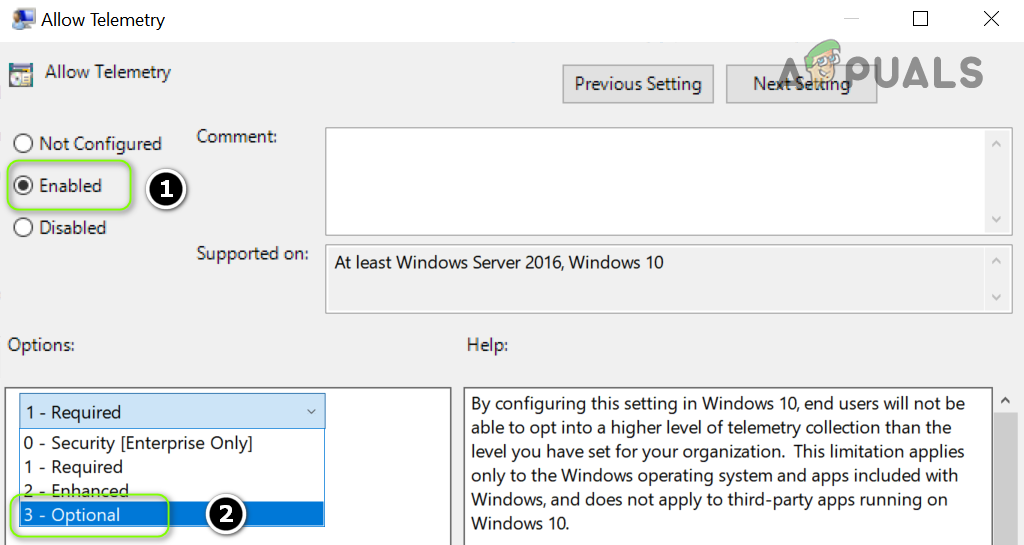
Enable Allow Telemetry and Set its Value to 3- Optional - Reboot your PC and check if the issue is resolved.
5. Delete Tasks in Task Scheduler and Edit the Hosts File
A scheduled task (often from a privacy tool) can block telemetry changes, and entries in the Hosts file can do the same. Removing those tasks and cleaning the Hosts file can help.
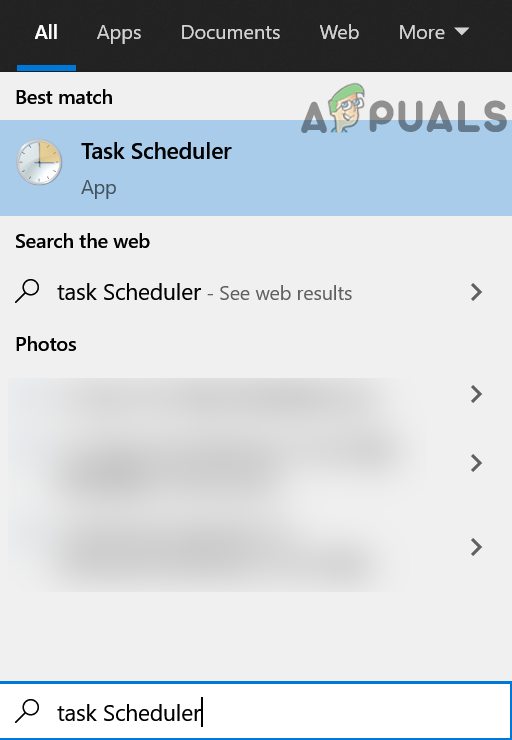
- Press the Windows key and type: Task Scheduler. Open the Task Scheduler.
Open the Task Scheduler - In the left pane, expand Task Scheduler Library and then expand Safer-Networking (if present).
- Right-click Spybot Anti-Beacon and select Delete Folder. (If you want a backup first, export the folder and then delete it.)
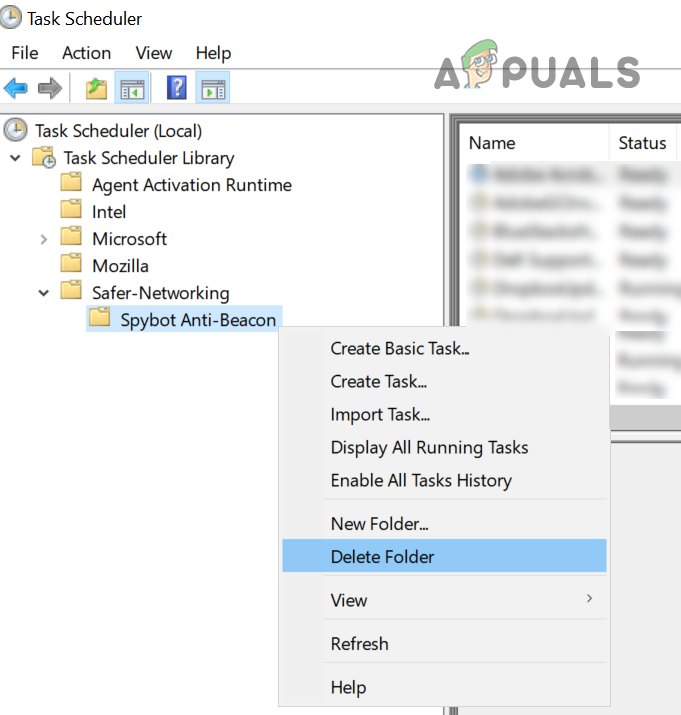
Delete the Spybot Anti-Beacon Folder in the Task Scheduler - Confirm the deletion and close Task Scheduler.
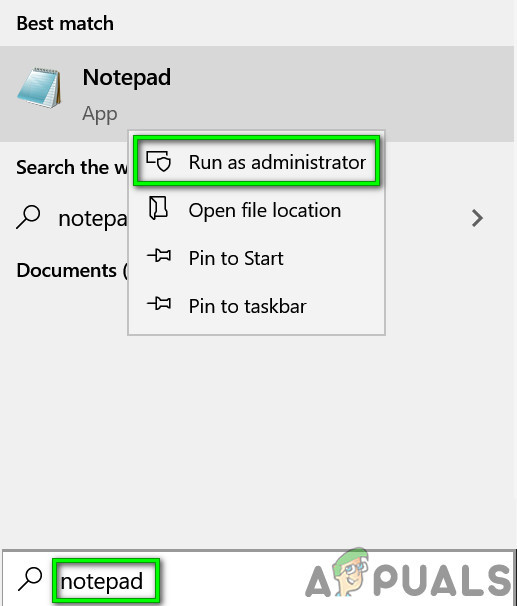
- Press the Windows key, search for Notepad, then right-click Notepad and choose Run as administrator (otherwise, changes to the Hosts file won’t save).
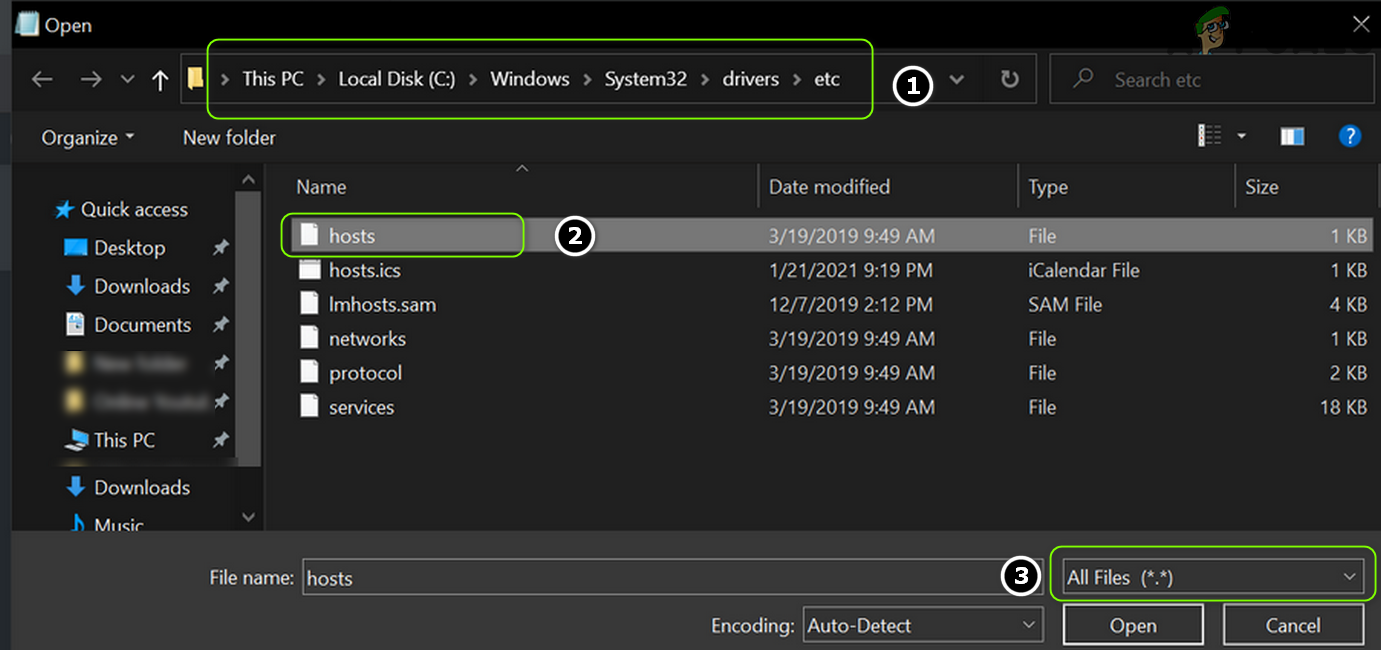
Open Notepad As Administrator - Select File > Open and go to:
C:\Windows\System32\drivers\etc\
- Change File type to All Files and double-click Hosts.
Open the Hosts File in the Notepad - Delete all entries between these two lines (if present):
# Start of entries inserted by Spybot Anti-Beacon for Windows 10

# End of entries inserted by Spybot Anti-Beacon for Windows 10
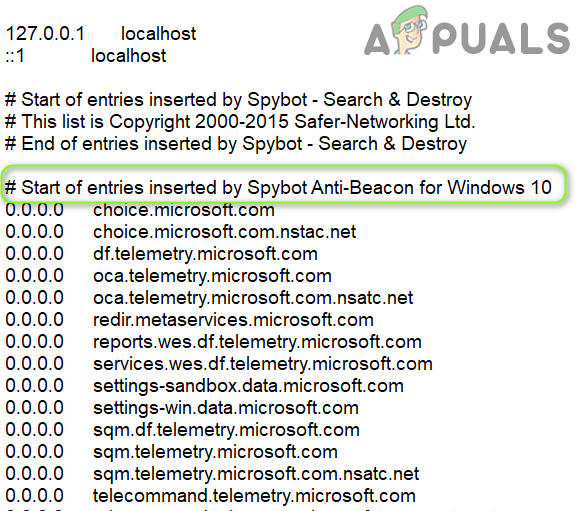
Delete the Spybot-Anti-beacon Entries from the Hosts File - Save the file and close Notepad.
- Reboot your PC and check if the issue is resolved.
6. Edit the Registry Keys
If none of the above worked, you can edit the registry to fix the problem.
Warning: Proceed with care and at your own risk. Editing the registry requires caution; doing it wrong can cause permanent system issues.
Before you start, create a backup of your registry. Also, close all apps and the Windows Settings app.
6.1. Edit the AllowTelemetry Keys
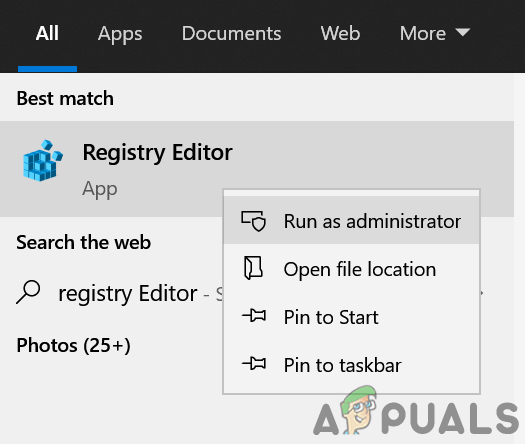
- Press the Windows key and type: Registry Editor. Right-click Registry Editor and choose Run as administrator.
Open Registry Editor as Administrator - Navigate to:
HKEY_LOCAL_MACHINE\SOFTWARE\Microsoft\WindowsSelfHost
- In the left pane, right-click WindowsSelfHost and select Delete.
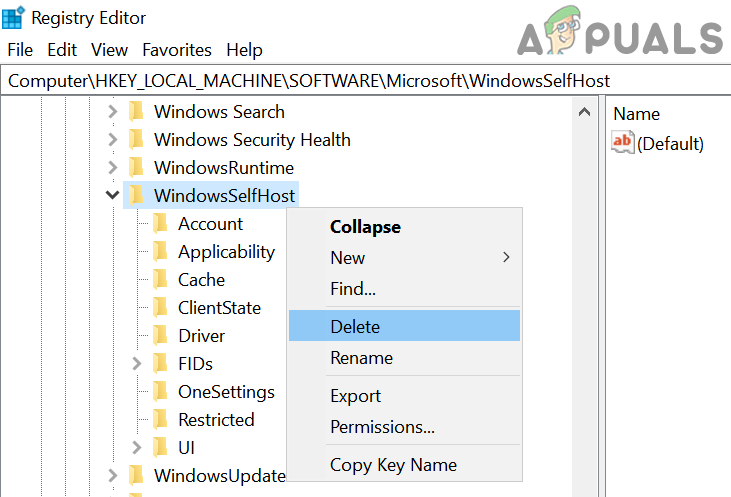
Delete the WindowsSelfHost Registry Key - Confirm, then navigate to:
HKEY_LOCAL_MACHINE\SOFTWARE\Policies\Microsoft\Windows\DataCollection
- In the right pane, check if AllowTelemetry exists.
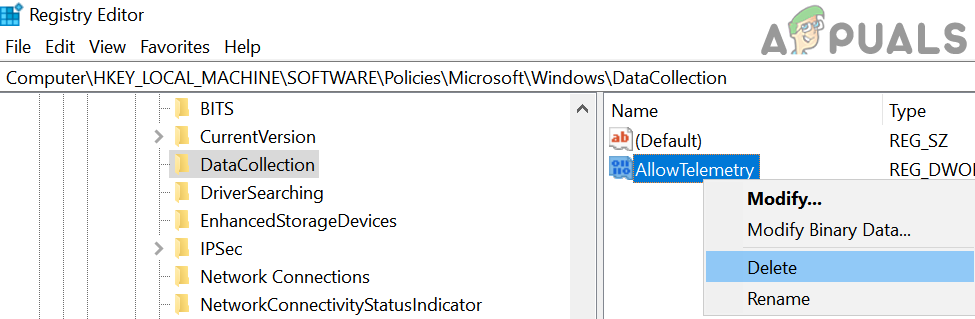
Delete AllowTelemetry Key in the Registry - If it does, delete it, then go to:
HKEY_LOCAL_MACHINE\SOFTWARE\Microsoft\Windows\CurrentVersion\Policies\DataCollection
- In the right pane, create a new DWORD (32-bit) Value named AllowTelemetry and set its value to 3 (if it already exists, make sure it’s a DWORD, not REG_SZ, and set it to 3).
- Also create or set MaxTelemetryAllowed to 3, then close the editor.
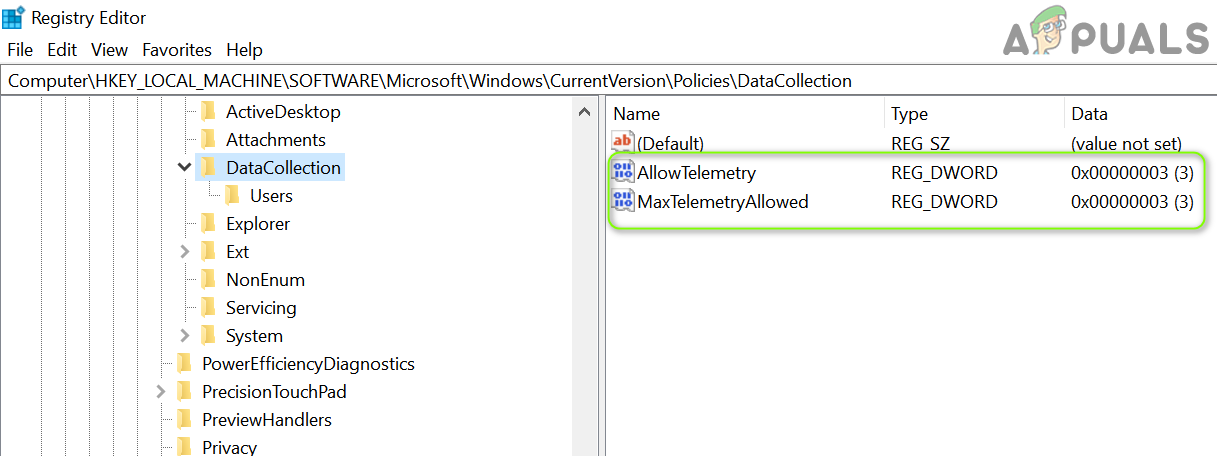
Set the Values of AllowTelemetry and MaxTelemetryAllowed to 3 - Reboot your PC and test.
- If it still fails, go to:
HKEY_CURRENT_USER\Software\Policies\Microsoft\Windows\DataCollection
- Right-click DataCollection and select New > DWORD (32-bit) Value.
- Name it AllowTelemetry, double-click it, and set its value to 3.
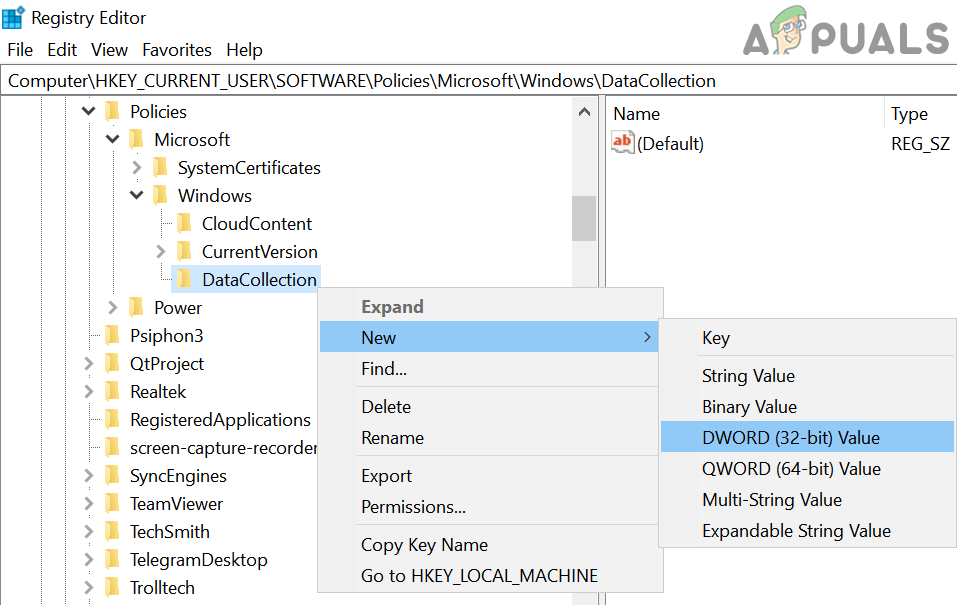
Create a New Dword (32-bit) Value in the DataCollection Key - Reboot your PC and check again.
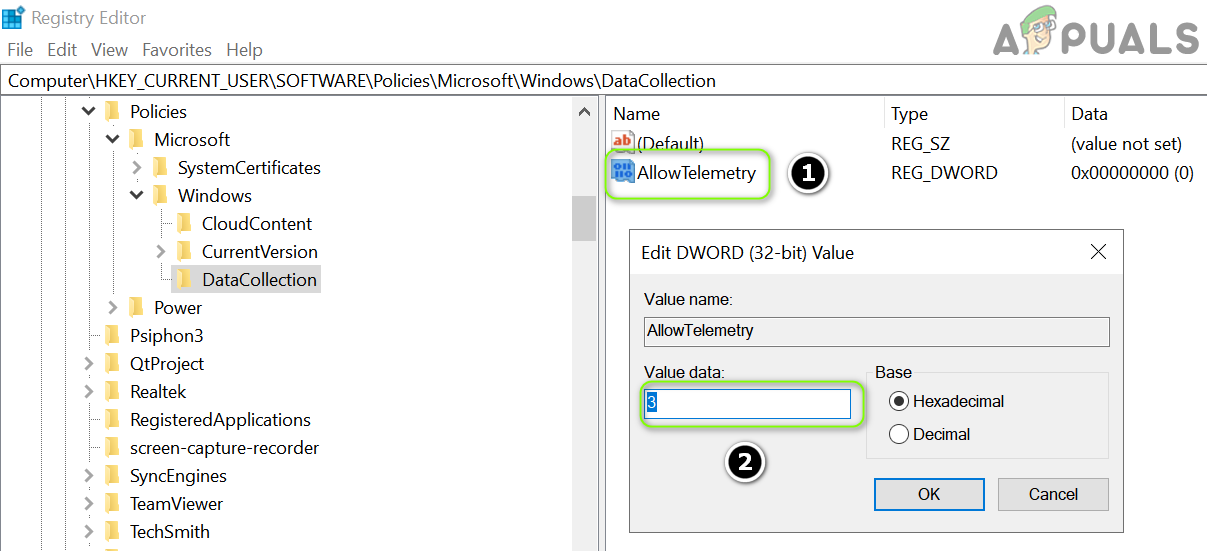
Name the New Key as AllowTelemetry and Set its Value to 3 - If needed, also create the same value here:
HKEY_LOCAL_MACHINE\SOFTWARE\Policies\Microsoft\Windows\DataCollection
- In the right pane, create AllowTelemetry as a DWORD (32-bit) Value and set it to 3.
- Close the editor, reboot, and test.
6.2. Use Command Prompt to Delete Keys Related to Diagnostic Data
If the issue persists, you can remove several related registry keys using an elevated Command Prompt.
- Press the Windows key and type: Command Prompt. In the results, right-click Command Prompt and choose Run as administrator.
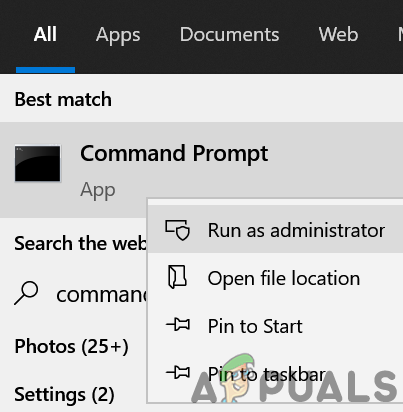
Open Command Prompt as Administrator - Run these commands one by one (press Enter after each):
reg delete "HKCU\Software\Microsoft\Windows\CurrentVersion\Policies" /f

reg delete "HKCU\Software\Microsoft\WindowsSelfHost" /f

reg delete "HKCU\Software\Policies" /f

reg delete "HKLM\Software\Microsoft\Policies" /f

reg delete "HKLM\Software\Microsoft\Windows\CurrentVersion\Policies" /f

reg delete "HKLM\Software\Microsoft\Windows\CurrentVersion\WindowsStore\WindowsUpdate" /f

reg delete "HKLM\Software\Microsoft\WindowsSelfHost" /f

reg delete "HKLM\Software\Policies" /f

reg delete "HKLM\Software\WOW6432Node\Microsoft\Policies" /f

reg delete "HKLM\Software\WOW6432Node\Microsoft\Windows\CurrentVersion\Policies" /f

reg delete "HKLM\Software\WOW6432Node\Microsoft\Windows\CurrentVersion\WindowsStore\WindowsUpdate" /f
- Close Command Prompt and reboot your PC. Check if the issue is resolved.


thanks.
Allow telemetry (point no 4) was the key for me.