What is Bootsect.exe and How to Use It
The bootsect.exe utility is a tool used to update the partition boot sector code, which is responsible for starting the bootloader that launches your Windows operating system. In some situations, it can also update the master boot record (MBR) code of a hard disk partition, all without changing the actual partition table. The bootsect.exe utility is available on Windows XP, Vista, 7, 8, 8.1, and 10.
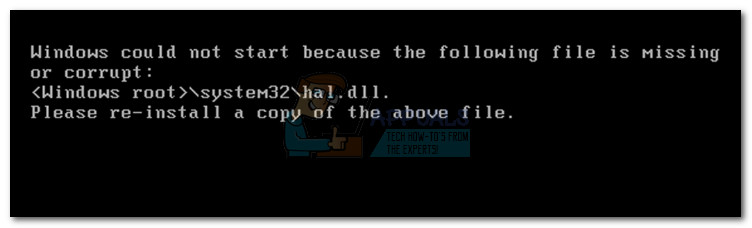
This utility is most helpful when the volume boot code (on your Windows drive) becomes corrupted or is accidentally set up to use the wrong boot manager. That kind of error can cause serious startup problems, like the well-known hal.dll issues on Windows Vista, 7, 8, and 10.
Note: bootsect.exe is also commonly used to fix the Boot Configuration Data File is Missing error or to create a bootable USB drive.
The good news is that bootsect.exe is highly effective at repairing boot sector errors. However, it can only be used via the Command Prompt—which you need to access through Advanced Startup Options or System Recovery Options, depending on your Windows version.
Below, we’ve put together step-by-step guides for running the Bootsect utility. Please note, the steps differ depending on your version of Windows. Make sure to follow the guide that matches your system.
1. Access Bootsect using the Installation Media on Windows 7
- Insert your Windows installation DVD or bootable flash drive and boot from it. If your system does not automatically boot from the new media, you may need to go into your BIOS/UEFI settings and change the boot order.
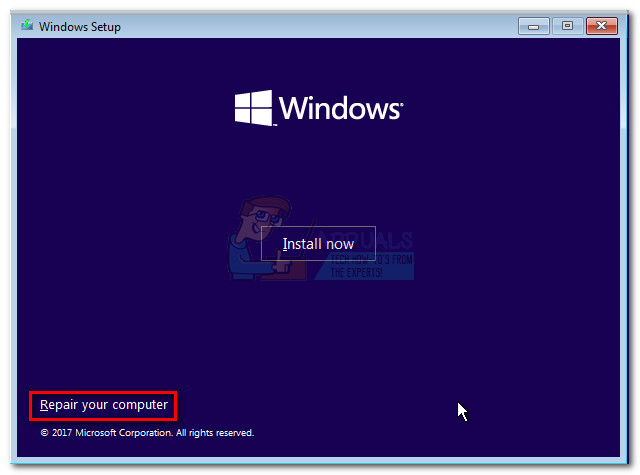
- At the first Install Windows screen, click Next, then select Repair your computer. (You can also press the R key.)

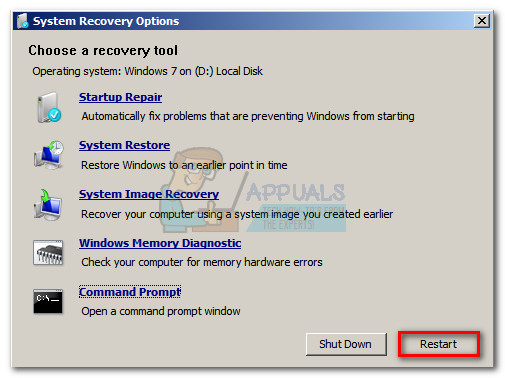
- Select Use recovery tools that can help you fix problems starting Windows. Make sure Windows 7 is chosen, then click Next.

Note: You may see more than one entry under Operating System if you dual-boot your PC. - In System Recovery Options, click Command Prompt.

- Type the following command into Command Prompt and press Enter to launch the Bootsect utility:
bootsect /nt60 sys

Note: Use bootsect /nt60 sys for the modern BOOTMGR (on Windows Vista, 7, 8, and 10). If you are using an even older Windows version, use bootsect /nt52 sys instead. - If you see the message “Bootcode was successfully updated on all targeted volumes,” the boot code has been updated.
Note: If you receive an error, try running bootsect /nt60 all instead. This resolves most permission-related problems.
Keep in mind that if you have a dual-boot setup, updating boot code on “all” volumes may affect your other operating systems. - Close Command Prompt and remove the installation media. Click Restart in System Recovery Options—your computer should now boot normally.
2. Use Bootsect Without Installation Media on Windows 7
If you don’t have the Windows installation media, you have a couple paths forward. You can either create your own Windows installation media and follow Method 1, or see if your computer has pre-installed recovery tools on the hard drive.
If you want to make your own installation media, follow our guide linked above, then return here to use Bootsect. Otherwise, here’s how you can try using the built-in recovery options (note: not all computers have these pre-installed):
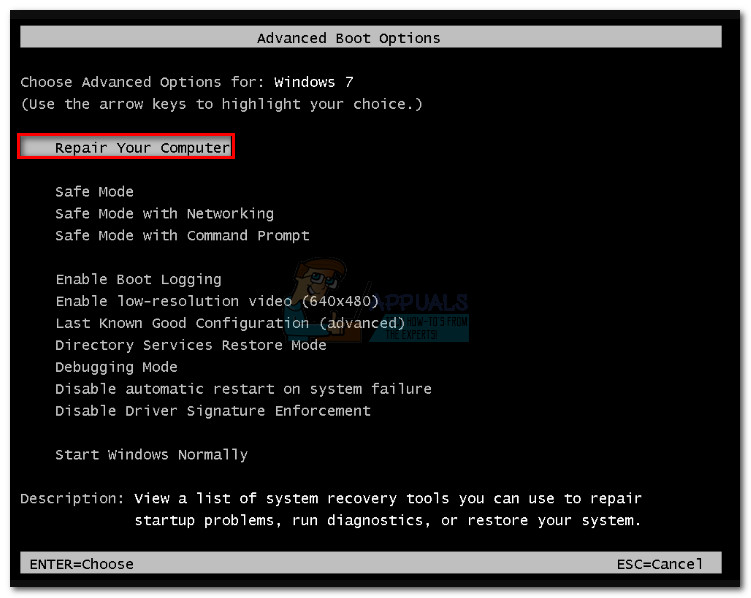
- Restart your computer. As soon as it turns on, keep pressing the F8 key repeatedly to open the Advanced Boot Options menu.
- In Advanced Boot Options, use the arrow keys to highlight Repair Your Computer and press Enter.
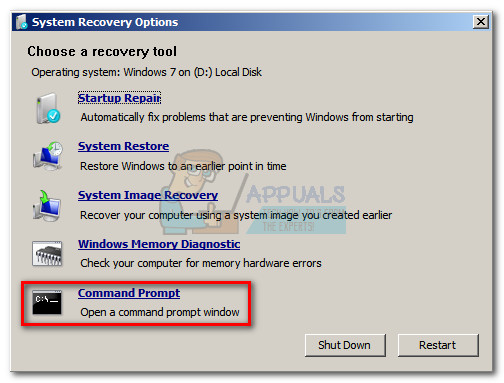
- The System Recovery Options window should appear. Select Command Prompt from the list.
- Type the following command and press Enter to run Bootsect:
bootsect /nt60 sys
Note: As before, use bootsect /nt60 sys for Windows Vista, 7, 8, and 10, or bootsect /nt52 sys for earlier systems.
- If you see “Bootcode was successfully updated on all targeted volumes,” the update was successful.
Note: If there’s an error, try bootsect /nt60 all to fix permission issues. Be aware, this updates the boot code on all partitions, which can affect multi-boot setups. - Close Command Prompt and click Restart in System Recovery Options. Windows should now start normally.
How to Use the Bootsect Utility on Windows 8.1 and 10
The process for Windows 8 and Windows 10 is similar to Windows 7. The simplest method is to use Windows installation media, but there are also other ways to access the Bootsect utility even if you don’t have installation media.
If you have installation media for Windows 10 or 8.1, use Method 3. If you do not, refer to Method 4 for alternatives.
3. Run Bootsect Using Installation Media on Windows 8.1 and 10
- Insert your Windows installation DVD or USB drive and boot from it.
Note: If your computer won’t start from the installation media, enter your BIOS/UEFI and make sure the boot order is correct. - On the Windows Setup screen, click Next, then select Repair your computer.
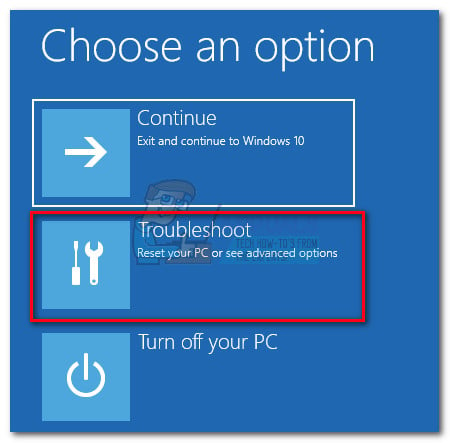
- Click Troubleshoot to open the Advanced options menu.
- Under Advanced options, click Command Prompt.

- Type the following command and press Enter:
bootsect /nt60 sys
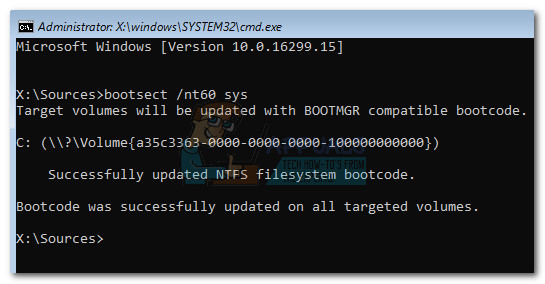
Note: If you see an error, try bootsect /nt60 all. If your PC is dual-booting, this will also update the other OS’s boot code. - If you see “Bootcode was successfully updated on all targeted volumes,” you can close Command Prompt, remove the installation media, and click Turn off your PC. Your boot code is now fixed.

4. Run Bootsect Without Installation Media on Windows 8.1 and 10
If you don’t have installation media, there are still a few ways you can access the Advanced Startup menu and run bootsect.exe:
- Follow this guide to create a bootable Windows 10 USB drive using Rufus, then use the steps in Method 3.
- Force two or three failed boot attempts by powering off your computer while it is starting up. This isn’t a perfect solution, but Windows will eventually open the Advanced Startup menu after repeated failed boots.
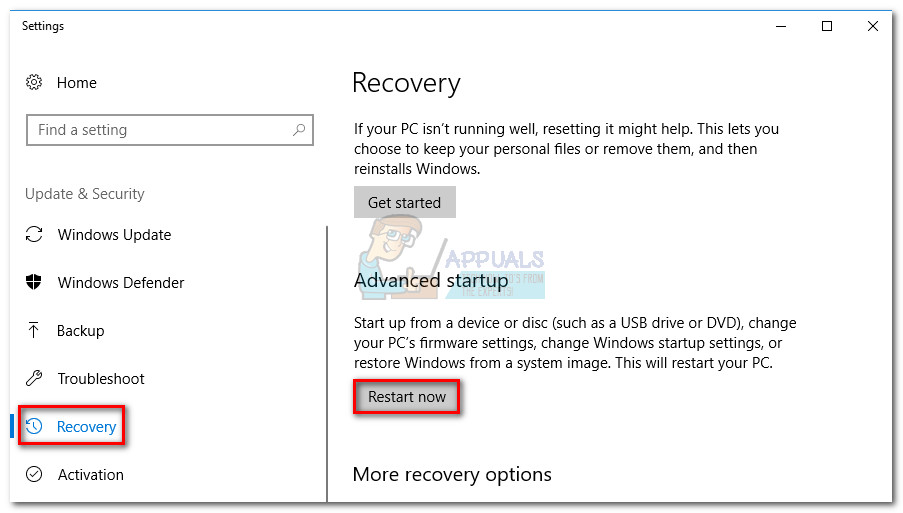
- If your PC starts normally, you can make Windows 8 or 10 restart directly into Advanced Startup. Open a Run window (Windows key + R), type ms-settings: and press Enter. Go to the Recovery tab in Settings, scroll to Advanced Startup, and click Restart now.
If you followed one of the options above, you should now be in the Advanced Startup menu. Follow these instructions next:
- Click Troubleshoot to access the Advanced options menu.
- Under Advanced options, select Command Prompt.
- Type and run this command:
bootsect /nt60 sys
Note: If any error appears, try bootsect /nt60 all—but remember, this will update all operating systems if you use dual boot. - If you see “Bootcode was successfully updated on all targeted volumes,” close Command Prompt and click on Turn off your PC. Your system boot code should now be fixed.