How to Change IP Proxy Settings on BlueStacks? Easy Steps
Network-dependent apps in BlueStacks may stop working or fail to connect if the proxy settings are set up incorrectly or not used correctly. This usually means BlueStacks cannot send internet data through the chosen proxy, causing apps to time out or not load.

The main reason for this problem is that normal BlueStacks does not have an easy way to set up a proxy. Other problems can happen if your computer’s operating system proxy settings conflict with BlueStacks.
In this article, we’ll walk through the easiest methods to change IP proxy settings on BlueStacks. But before we start, let’s go over some basics to help you understand what you’re doing. Keep reading!
1. Use Command Prompt
You can change the IP proxy for BlueStacks using the Windows Command Prompt. This method works on all versions of BlueStacks. You just need to use a special command, and you must have BlueStacks already installed on your PC.
- First, make sure BlueStacks is open and running on your PC.
- Open Command Prompt by pressing Windows + R, typing cmd, and pressing Enter on your keyboard.
- Type or copy and paste this command, then hit Enter:
HD-ConfigHttpProxy.exe
- To set a new proxy, enter this command:
HD-ConfigHttpProxy.exe set <host> <Port>
Replace host with your proxy server’s IP address or hostname, and Port with the correct number. For example:
HD-ConfigHttpProxy.exe set 123.45.67.888 9999
- After running the command, you’ll get a notification confirming if it worked.
- Once you’re done, close all programs and restart your computer.
2. Use BlueStacks Settings
You can change proxy settings within BlueStacks itself, though this option is only available in older versions (not in BlueStacks 5 or later).
- Open the BlueStacks app and find the Settings button in the upper right corner.
- Go to Preferences, then click Network.
- Here you can set your preferences for proxy settings, such as manual or system proxy for HTTP or HTTPS traffic.

Use BlueStacks settings - For manual proxy setup, enter your proxy server address and port number, then click Save to apply the changes.
- Finally, restart BlueStacks and enjoy using apps and games with your new settings.
3. Use Third-Party Software
There are credible third-party programs that allow you to change IP proxy settings for BlueStacks. Always be careful and do some research before choosing third-party software, as not all tools are trustworthy or fully compatible.
For this example, we’ll use Proxifier, a program that works on both Mac and Windows.
- Go to the official Proxifier download page, then download and install the app on your computer.
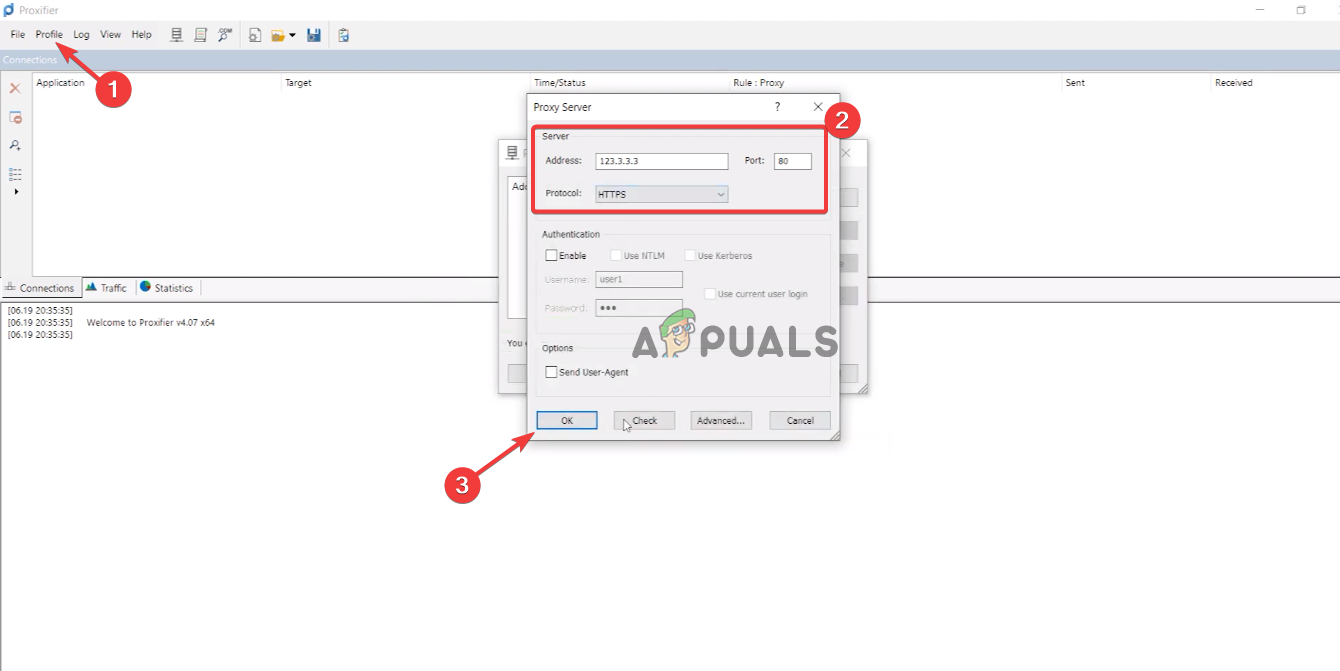
- Open Proxifier and go to Profile.
- Click Proxy Servers, then Add.
- Fill in all the required details, such as protocols, usernames, passwords, proxy IP or hostname, and port number.

Use third-party software - Once you’ve added your proxy, return to the Profile section and click Select Target Applications.
- Click Add, select BlueStacks from the list of apps, and confirm.
- Finally, click OK and restart both Proxifier and BlueStacks.
NOTE: You can try other trusted third-party tools to change IP proxy settings in BlueStacks. Just make sure you use legitimate software.
 Reviewed by


