How to prevent Adobe Premiere Pro from lagging?
Experiencing severe lag in Adobe Premiere Pro usually means the program responds slowly when you do simple things like play or pause your video, move along the timeline, or add effects—even if you have a powerful computer. This lag often happens because Premiere Pro has trouble processing and showing your video smoothly in real time.

One common reason is using variable frame rate (VFR) videos, which are often recorded on smartphones and can make playback choppy. Other factors that can cause lag include using highly compressed video formats like H.264 or HEVC, having a buildup of media cache files, and working with effects that haven’t been rendered yet.
In this article, we will discuss different ways to solve this error.
1. Check Image Sizes (If Applicable)
The first thing you should do when troubleshooting lag in Adobe Premiere Pro is to check the size of any images used in your project. Sometimes, images that are much larger than your sequence or project can slow down playback and cause lag.
When image files are unnecessarily large, Premiere Pro has to process more data, making playback less smooth. To avoid this, use images that match your project’s needs and resolution.
Review the images in your project, and if any are too large, resize them and replace them in your timeline. Make sure to remove the old, larger image files from your project to fully resolve the issue.
2. Lower Playback Resolution
High playback resolution settings in Adobe Premiere Pro can also cause playback lag. This is because higher resolutions require more decoding and processing power, which may overwhelm less powerful computers.
To improve performance, lower the playback resolution. This reduces the amount of data Premiere Pro needs to process in real time, resulting in smoother playback.
- Click the drop-down menu at the bottom-right corner of the Preview Window.
- Select 1/2 or 1/4 from the menu to see if playback improves.

Changing Playback Resolution - Next, click on the wrench icon beside it, and in the menu, uncheck the High Quality Playback option.
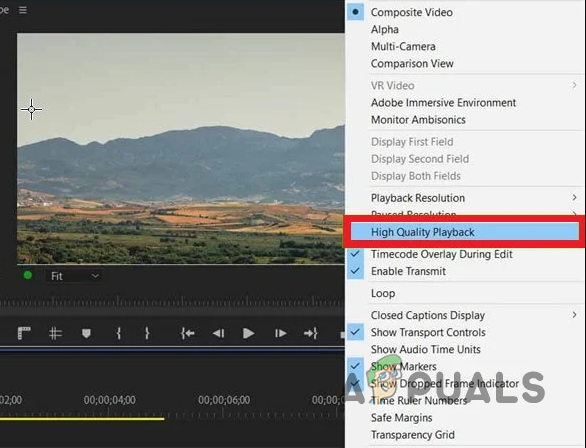
Disabling High Quality Playback
3. Optimize Rendering for Performance
Adobe Premiere Pro includes a setting that allows you to optimize rendering either for memory usage or for maximum performance. When memory is prioritized, Premiere Pro may run more slowly if the available memory is limited.
- Open the Preferences window from the Edit menu.
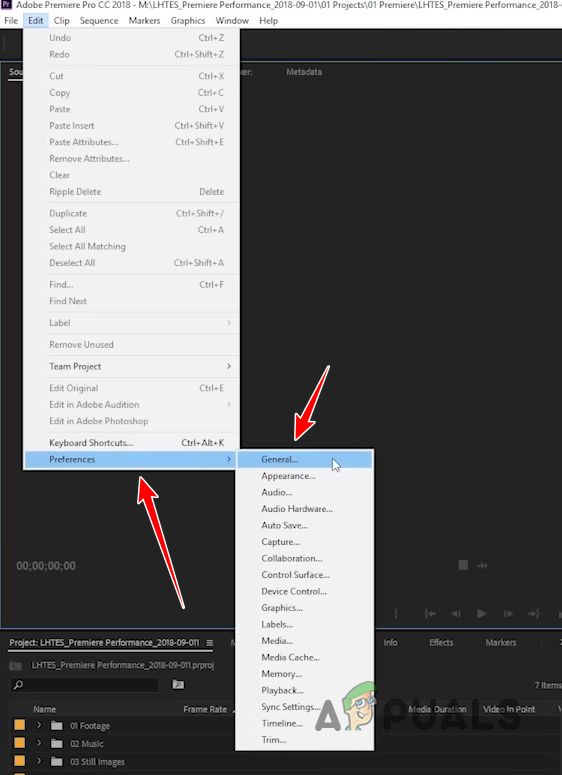
Opening Preferences Window - Select the Memory tab.
- In the Optimize rendering for menu, select Performance.
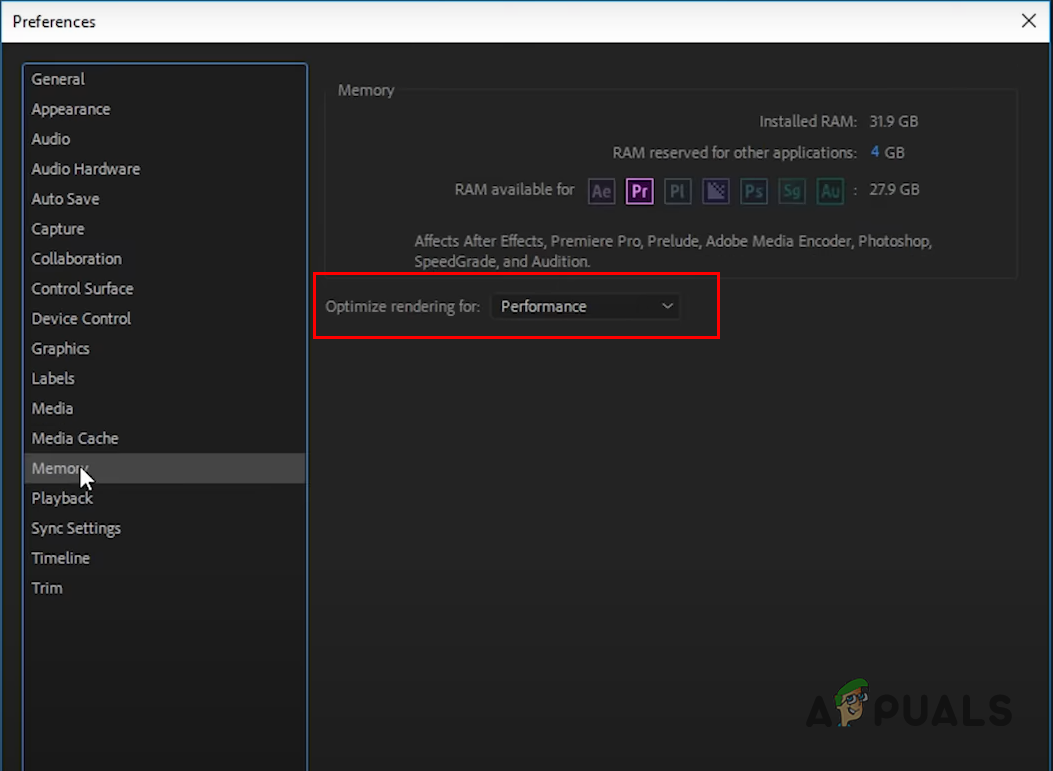
Optimizing Rendering for Performance
4. Turn Off Hardware Accelerated Decoding
Premiere Pro offers hardware-accelerated decoding to improve playback performance, especially when working with H.264/AVC or HEVC video formats. However, if you are not using these formats, or if your hardware doesn’t fully support them, this option can sometimes cause lag.
- Open the Preferences window under the Edit menu.

Opening Preferences Window - Go to the Media tab.
- Uncheck the Enable hardware accelerated decoding option.
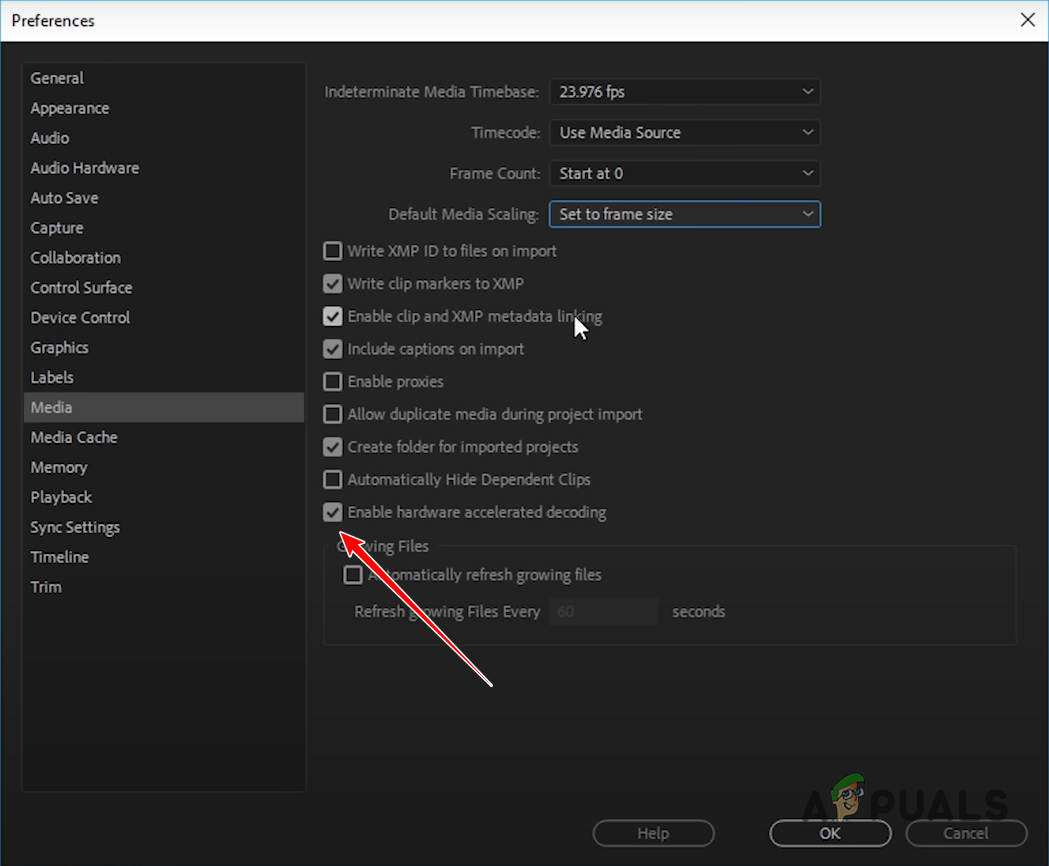
Disabling Hardware Accelerated Decoding - Click OK and restart Premiere Pro.
- Test playback to see if the lag is gone.
5. Change Default Audio Input
The default audio input setting in Premiere Pro can sometimes cause lag or stuttering, usually because of conflicts with audio drivers or certain webcam drivers, like EpocCam. Changing the default audio input to “None” in the preferences may resolve playback lag in some cases.
- Open the Preferences window in Premiere Pro.

Opening Preferences Window - Go to the Audio Hardware tab.
- Set the Default Input to None.
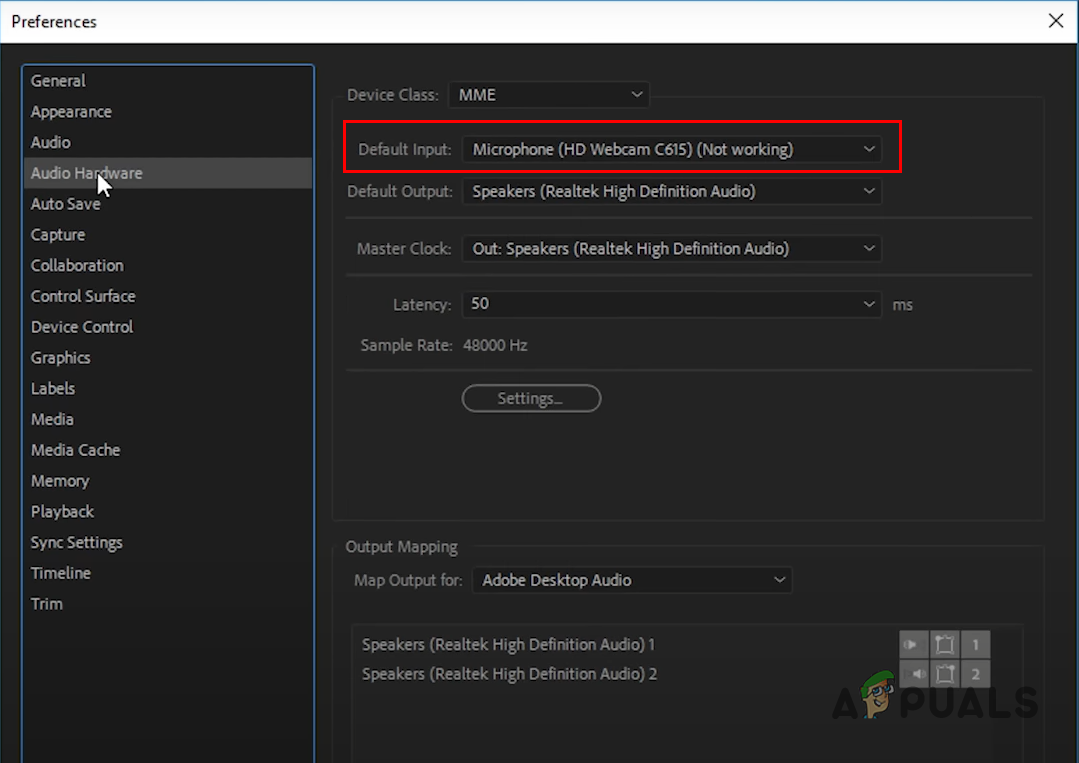
Changing Default Audio Input - Click OK and check if playback lag is resolved.
6. Turn On GPU Acceleration
Adobe Premiere Pro can use your GPU (graphics card) to help process effects, rendering, and other tasks, which can greatly enhance performance. By default, the CPU handles most tasks, but enabling GPU acceleration can offload some of the work to your graphics card, making playback smoother.
If the GPU Acceleration option appears greyed out in your project settings, you may need to update your graphics drivers.
- Go to File > Project Settings.
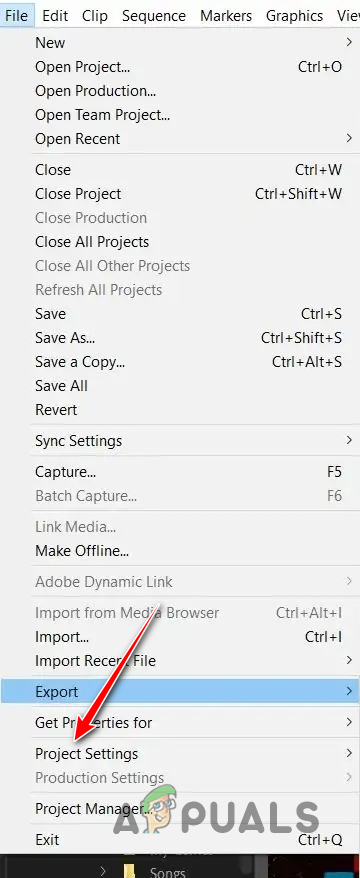
Opening Project Settings - In the General tab, select Mercury Playback Engine GPU Acceleration from the Renderer menu.

Enabling GPU Acceleration - Check if the playback lag issue is resolved.
7. Delete Media Cache
Sometimes, old or very large media cache files in Premiere Pro can slow down performance. The media cache helps the program load files faster, but when it gets too large, it can actually cause lag.
- Open the Preferences window from the Edit menu.

Opening Preferences Window - Go to the Media Cache tab.
- Click on Delete unused next to Delete unused media cache files.
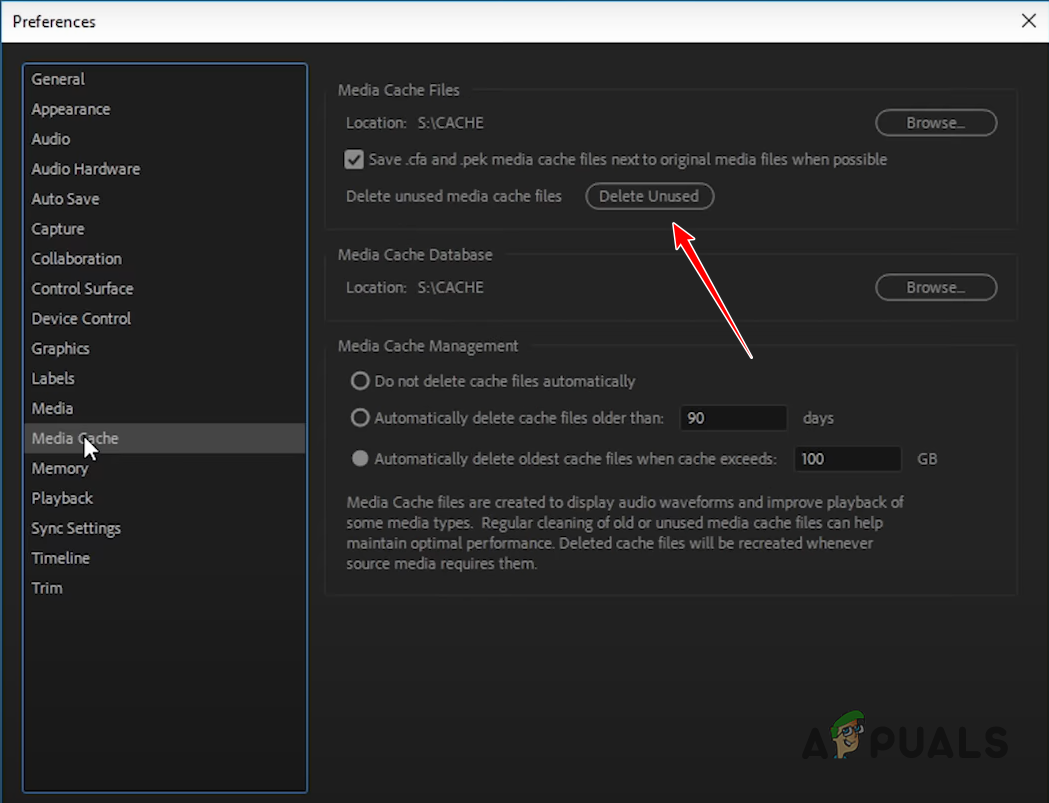
Deleting Media Cache - After clearing the cache, restart Premiere Pro and check if the lag has improved.
8. Reset Premiere Pro Preferences
Over time, custom preferences in Premiere Pro can slow down the application, causing lags and stutters. Resetting your preferences can often resolve these performance issues and get Premiere Pro running smoothly again.
- Close Premiere Pro completely.
- Open File Explorer on your computer.

Opening File Explorer - Navigate to the Documents folder.
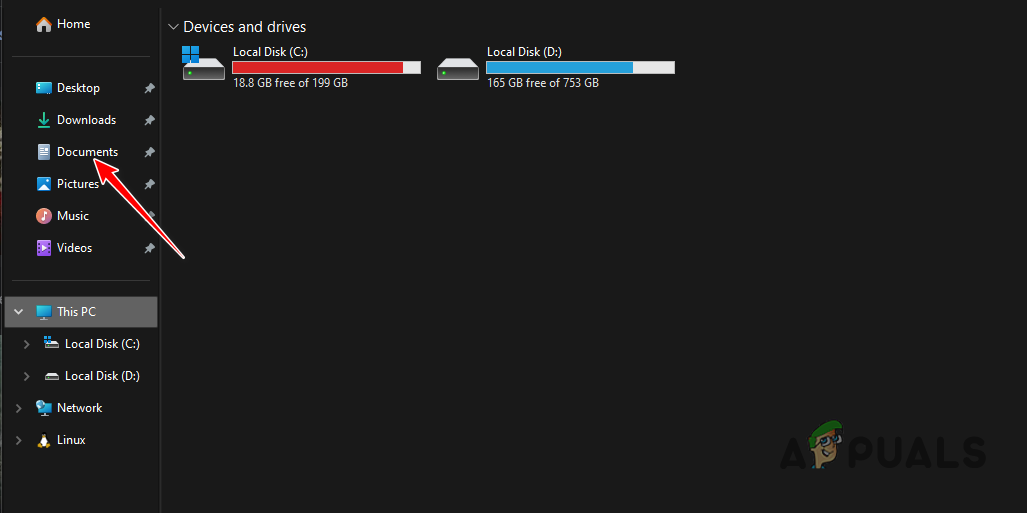
Navigating to the Documents Folder - Go to the Adobe folder, then navigate to:
Adobe > Premiere Pro > <version> > Profile-profilename - Inside your profile folder, move the preferences folder to another location, like your desktop.
- Open Premiere Pro. It will load with default settings. Check to see if the performance issue has been resolved.
 Reviewed by


