The Address List Cannot Be Displayed in Outlook (Fix)
The error message “The address list cannot be displayed” shows up in Outlook when you try to open the address book, but it’s empty or you can’t get to it. This means that Outlook can’t find the Contacts folder that is supposed to be connected to the address list. Sometimes the folder is missing, not connected properly, or you don’t have permission to view it.

Usually, this problem happens because your Outlook profile is corrupted. Other possible causes include a damaged PST file, problems with syncing, or the address book being set up incorrectly. If you are using Outlook with Exchange, the issue might also be caused by Autodiscover not being set up right, or old settings in the registry that are blocking access to the address list.
Before attempting these solutions, try using the same user profile on a different computer. If the problem continues on the second machine, contact your Organization’s IT Administrator for further assistance.
1: Use Online Mode in Outlook
Outlook can work in either Online Mode or Cached Mode when connected to an Exchange Server. In Cached Mode, data is stored locally, which can sometimes cause address book issues if things get out of sync. Switching from Cached Mode to Online Mode can often resolve the error.
- Open Outlook and click on the File tab.
- In the window’s right pane, click Account Settings and then select Account Settings from the dropdown menu.
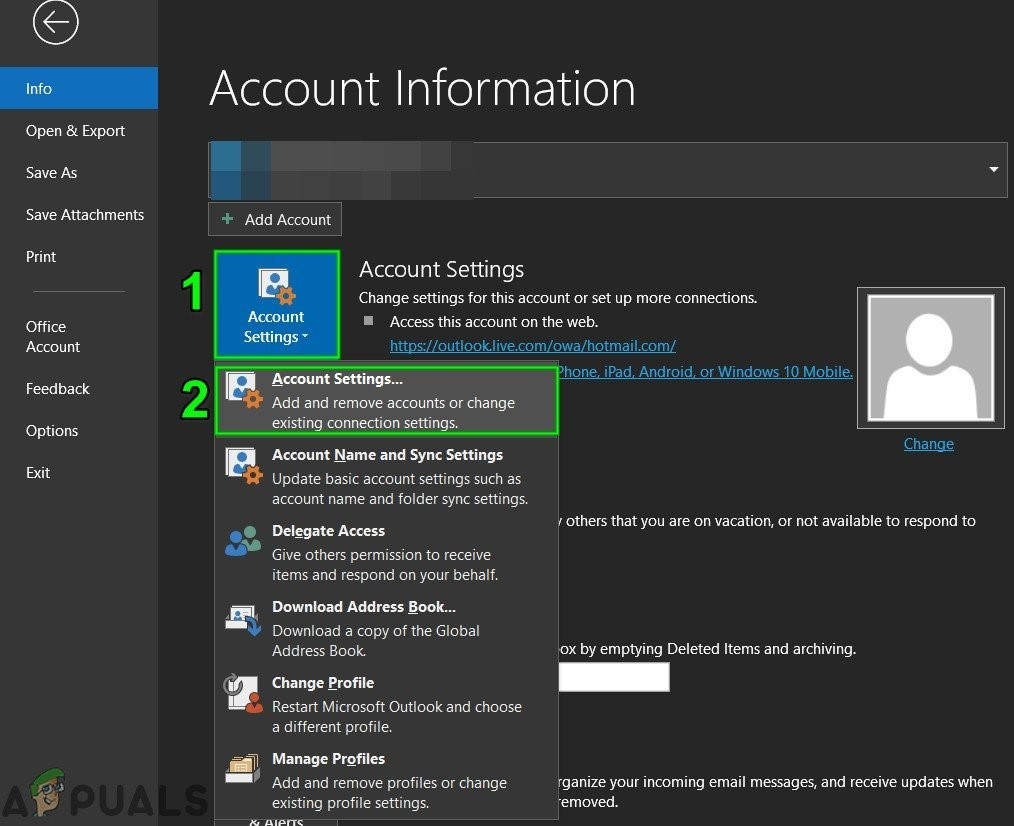
Open Account Settings of Outlook - On the Email tab, select your account and click Change.
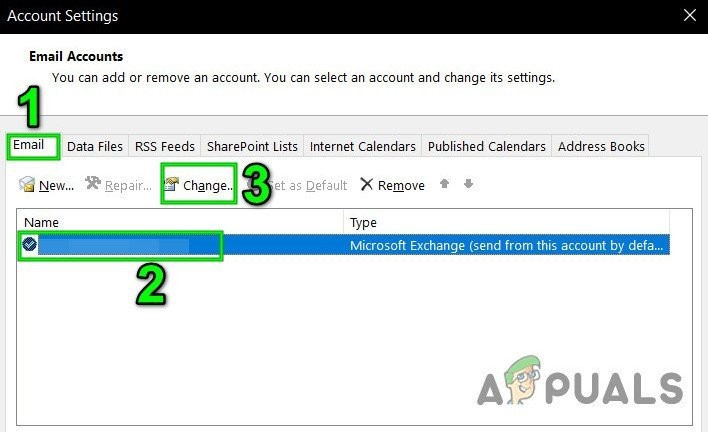
Change Email Account Settings - Click More Settings.
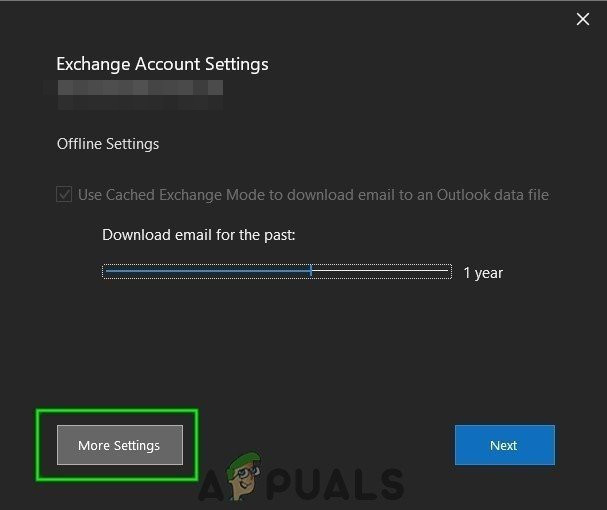
Open More Settings of Outlook - In the Advanced tab, uncheck “Use Cached Exchange Mode”.
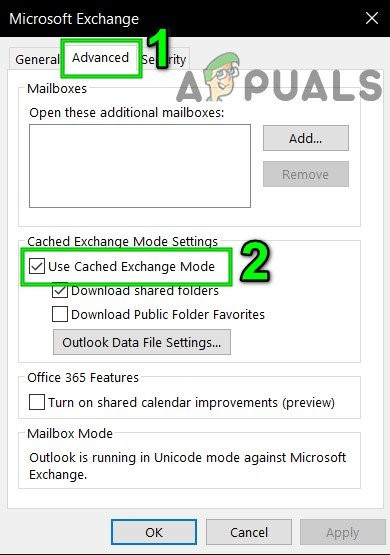
Uncheck Cached Mode in Outlook - Click Apply and then Ok.
- Restart Outlook and check if the address book is working properly.
2: Repair the PST File
When sending or receiving emails, Outlook uses the “.pst” file to store your data. If the .pst file becomes corrupted, it might cause problems with your address book. Microsoft provides a built-in tool called “SCANPST.EXE” to fix problems with PST files.
- Close Outlook.
- Press the Windows key, type Outlook into the search box, and right-click the Outlook shortcut, then select “Open File Location”.
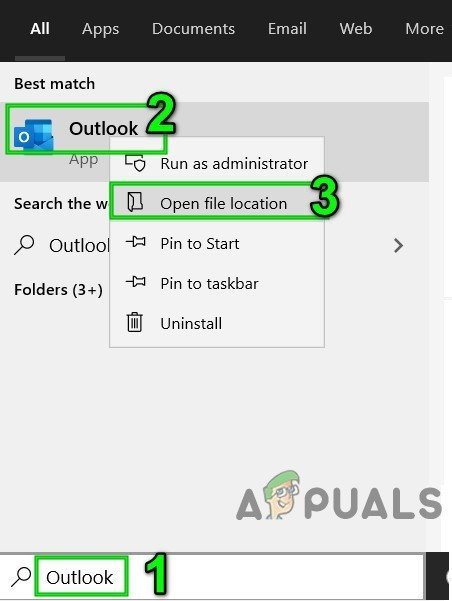
Open Outlook Startup Shortcut Location - Navigate to the folder shown:
C:\ProgramData\Microsoft\Windows\Start Menu\Programs
In this folder, right-click the Outlook shortcut icon again and choose “Open File Location”.
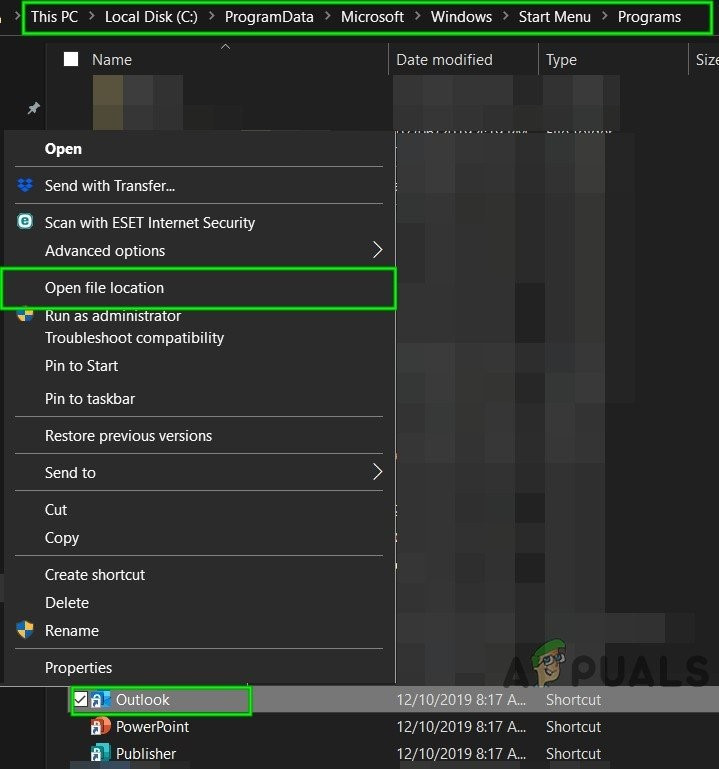
Open Outlook File Location - The following folder should open:
C:\Program Files (x86)\Microsoft Office\root\Office16
- In this folder, find SCANPST.EXE. Right-click on it and choose “Run as Administrator”.
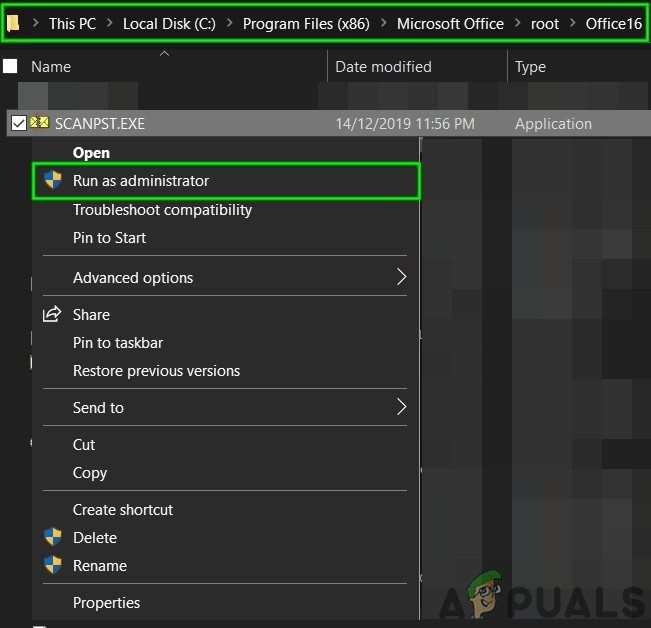
Run ScanPST as Administrator - In the Microsoft Outlook Inbox Repair Tool, click Browse.
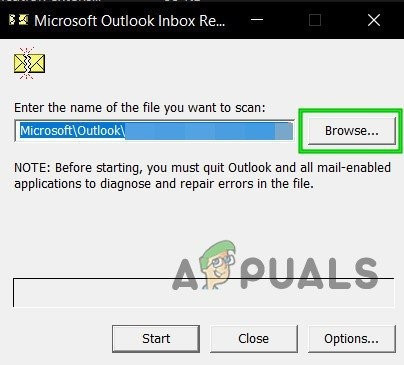
Browse to Corrupted PST File in ScanPST - Select your PST file (see below for common file locations).
- Click Start to begin scanning the PST file.
- If errors are found, click Repair to fix them.
- Restart Outlook and see if the address book is now working.
The PST file location will vary depending on your Outlook and Windows version, and profile set up. Here are the typical default locations:
- Windows 10
drive:\Users\<username>\AppData\Local\Microsoft\Outlook
drive:\Users\<username>\Roaming\Local\Microsoft\Outlook
- Older Windows Versions
drive:\Documents and Settings\<username>\Local Settings\Application Data\Microsoft\Outlook
After repairing the PST file, check if the Outlook Address Book starts to work correctly.
3: Enable Encryption of Data Between Exchange Server & Outlook
If the data transferred between the Exchange Server and Outlook isn’t encrypted, Outlook might prevent you from accessing the address book. Enabling encryption can fix this.
- Open Outlook and click the File tab.
- In the right pane, click Account Settings, then select Account Settings from the dropdown.
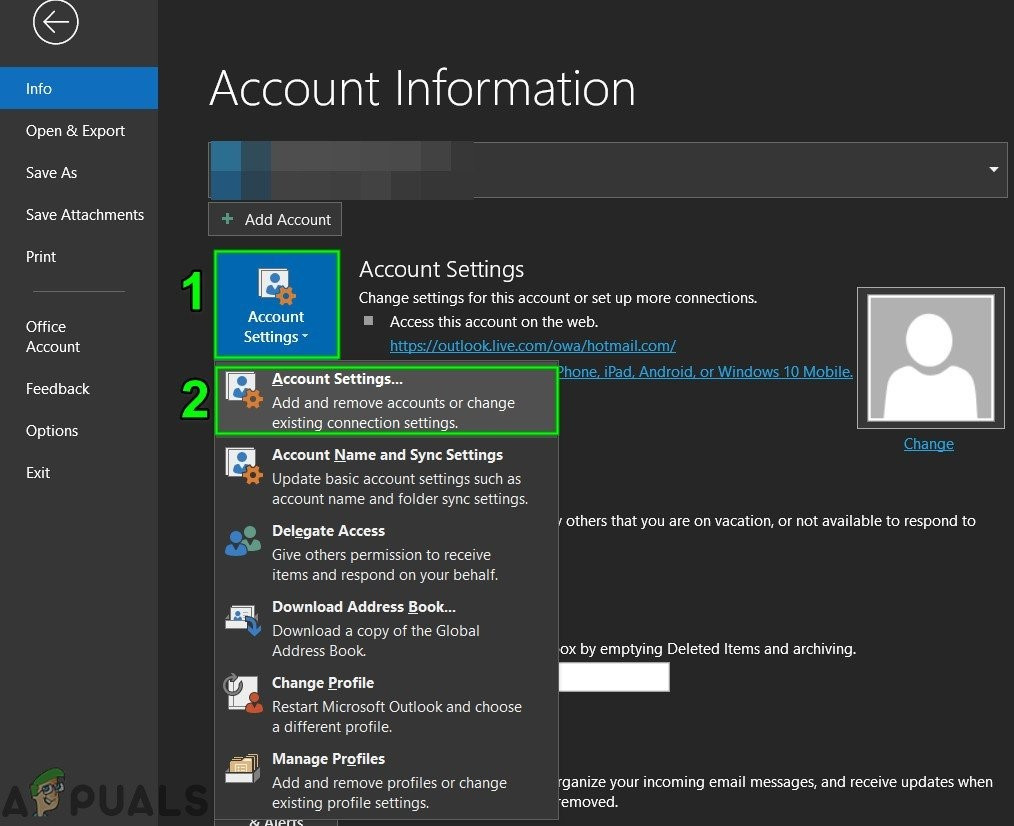
Open Account Settings of Outlook - On the Email tab, select your account and click Change.
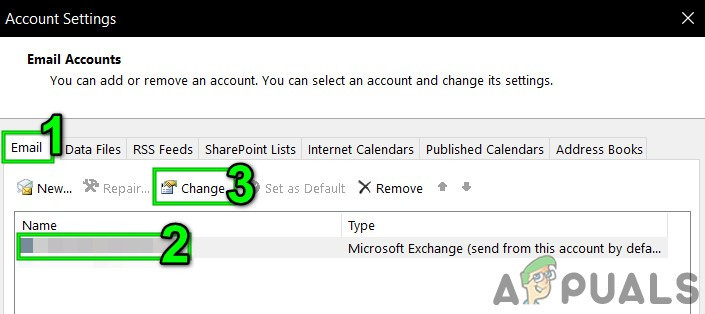
Change Email Account Settings - Click More Settings.

Open More Settings of Outlook - Go to the Security tab and make sure Encrypt Data Between Microsoft Outlook and Microsoft Exchange is checked.
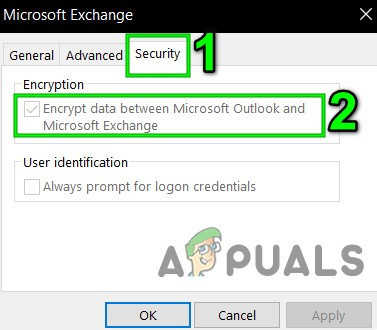
Enable Encrypt Data Between Microsoft Outlook & Microsoft Exchange - Restart Outlook and see if your Address Book works as expected.
4: Empty the Autocomplete List
Outlook remembers addresses entered in the To, Cc, and Bcc fields to help you quickly address future messages. If this Autocomplete List is corrupted, it can cause errors with displaying addresses. Clearing it can help.
- Go to the File tab, then select Options from the left side.
- In Outlook Options, click on the Mail category.
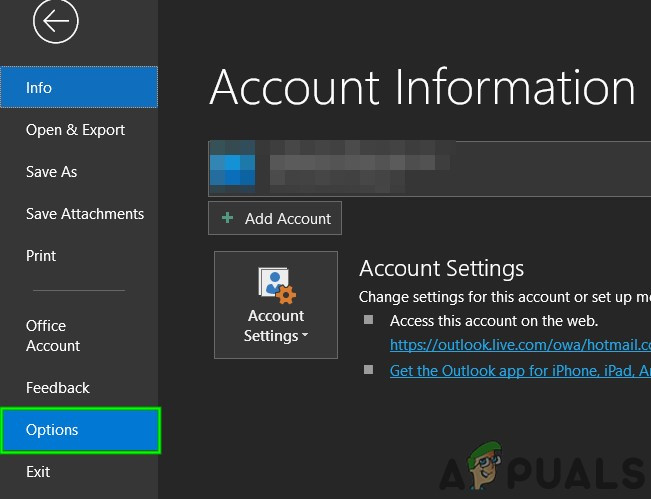
Open Outlook Options - Scroll down to the Send messages section and click Empty Auto-Complete List.
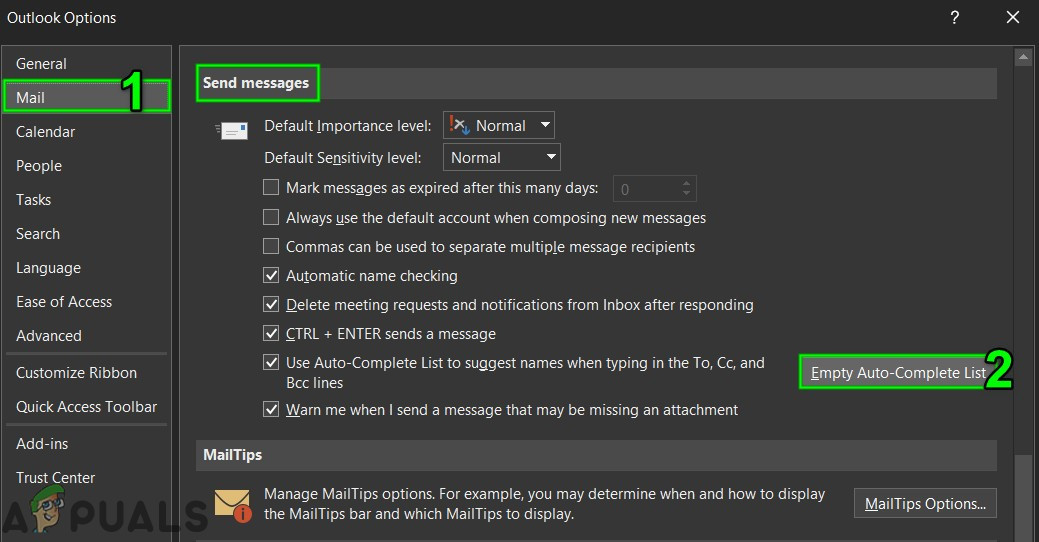
Empty Auto-Complete List - When asked to confirm, click Yes.
- Restart Outlook and see if the Address Book is now working.
5: Repair Office/Outlook
If your Office or Outlook installation is corrupted, various features—including the Address Book—may fail to work. Running Office’s built-in repair tool can often resolve these problems.
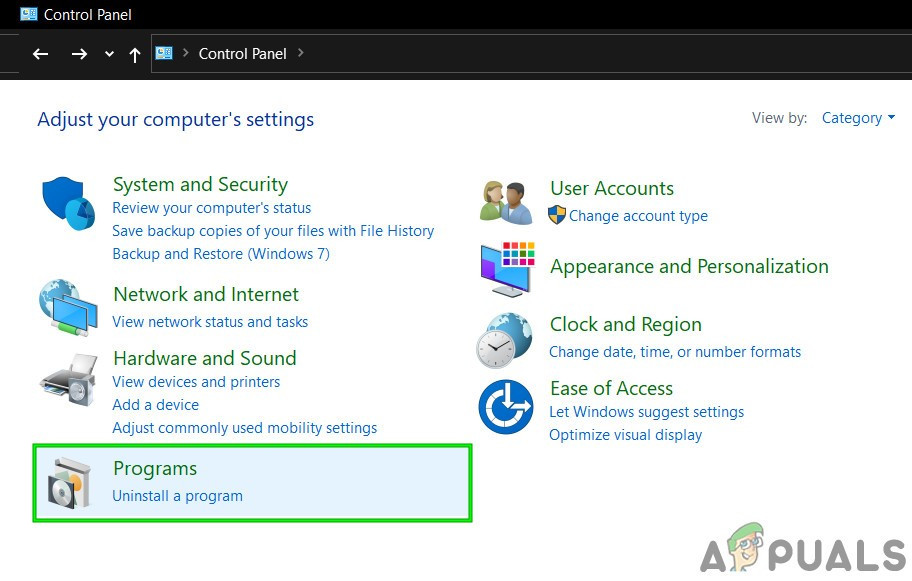
- Click the Windows button, type Control Panel, and open it.
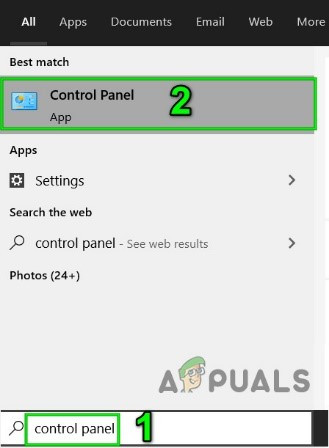
Open Control Panel - Select Programs.
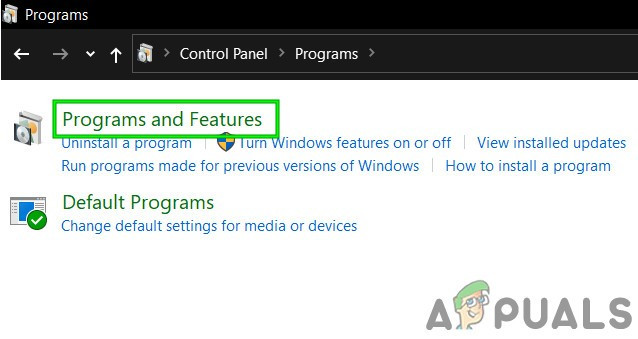
Open Programs in Control Panel - Click Programs and Features.
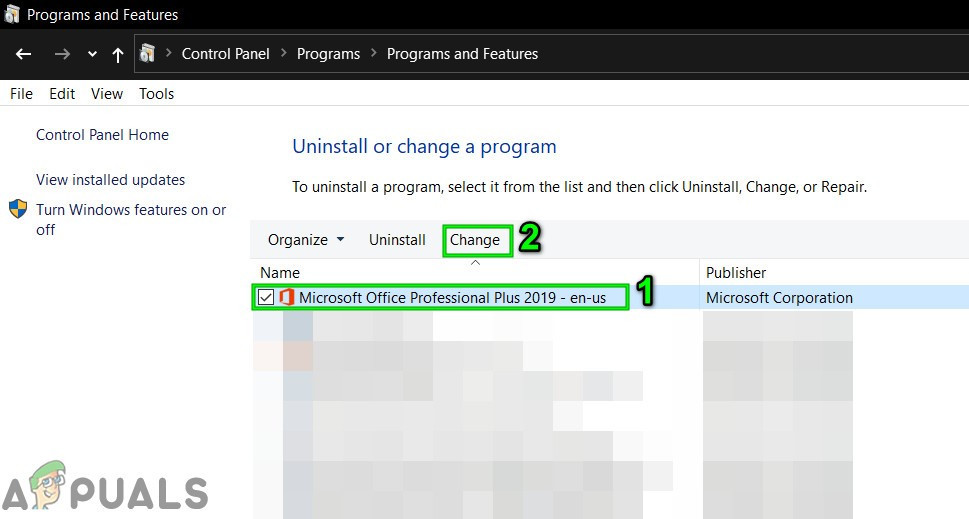
Open Programs and Features - Select the Office suite you wish to repair, then click Change.
Change the Office Installation in Programs and Features - If prompted by User Account Control (UAC), click Yes.
- Choose Quick Repair and click Ok.
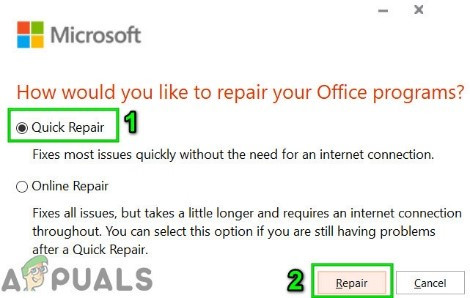
Quick Repair of Office - Click Repair, and then Continue.
- Once the process finishes, restart your computer and check Outlook.
- If the issue remains, repeat steps 1–5, but this time choose Online Repair and then Ok.
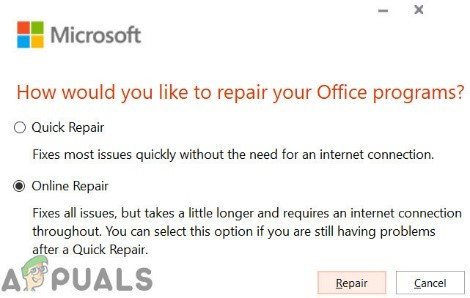
Online Repair of Office - Click Repair and then Continue.
- Once finished, restart your computer and check if Outlook is working as it should.
Note: This process repairs the entire Office suite, even if you just need to fix Outlook. If you use a standalone version of Outlook, search for it separately in Control Panel and follow the same repair steps.
6: Remove the Address Book and Add it Back
Sometimes, sync issues or a corrupted Address Book can cause this error. Removing and then re-adding the Address Book in Outlook might fix the issue.
- Open Outlook and click on the File tab.
- Select Account Settings and then again Account Settings from the dropdown.

Open Account Settings of Outlook - Go to the Address Books tab.
- Select your current Address Book and click Change.
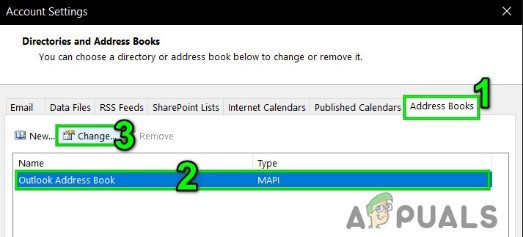
Change Address Book - In the Address Book window, click Remove the Address Book.
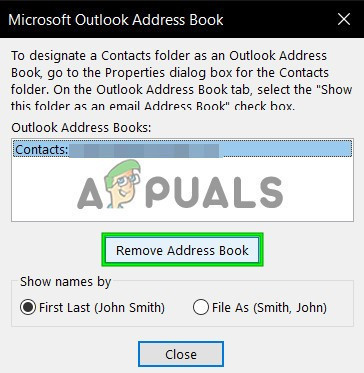
Remove Address Book
Note: If you don’t see the Outlook Address Book option, start from step 7 below.
- Click Yes to confirm the removal.
- Back under the Address Book tab, click New.
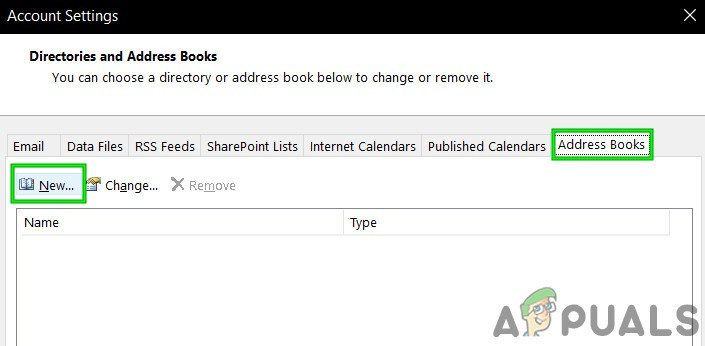
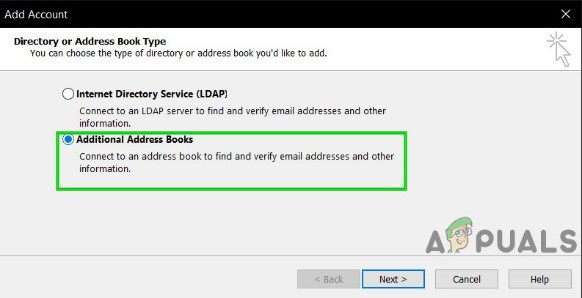
Add New Address Book - Select Additional Address Books, then click Next.
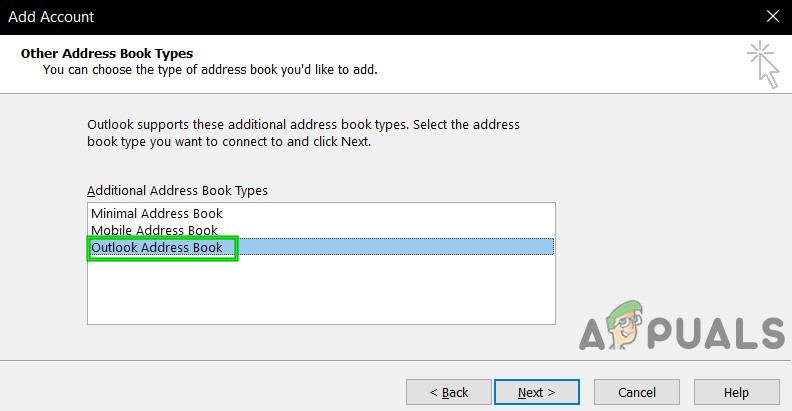
Select Additional Address Books - Choose Outlook Address Book and click Next. (If you use a different type, select that.)
Select Outlook Address Book - Click OK when prompted to restart Outlook.
- Click Finish.
- Restart Outlook.
- In the folder list, right-click the folder you want to use as your address book (e.g., Contacts), then choose Properties.
- Click the Outlook Address Book tab.
- Make sure Show this folder as an e-mail Address Book is checked, then click OK.
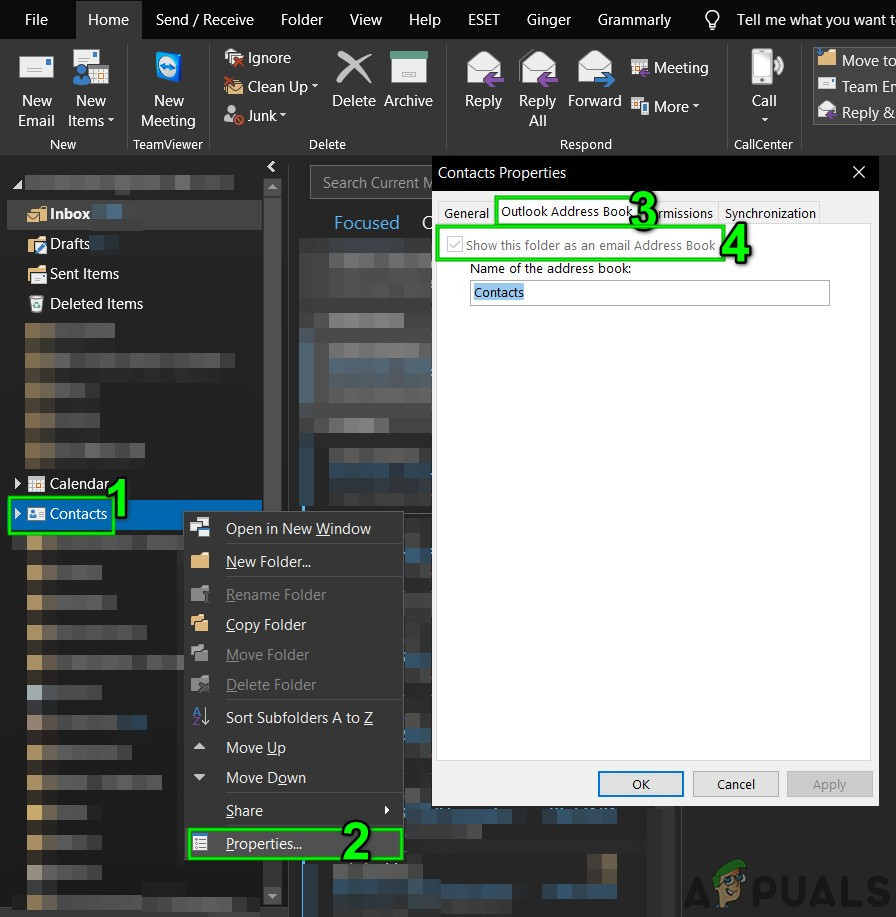
Enable Show this folder as an e-mail Address Book - Restart Outlook and check if the Address Book is working properly.
Important: If your address list was large, re-adding contacts manually can take time, and some entries might be lost.
7: Delete Offline Address Book Folder Contents
Outlook keeps a copy of your address books to access them offline. If there is a sync error or conflicting entries in this folder, problems may occur. Deleting the offline copy forces Outlook to rebuild it, which can solve display issues.
- Close Outlook.
- Press Windows+E to open File Explorer and go to:
C:\Users\%USERNAME%\AppData\Local\Microsoft\Outlook\Offline Address Books
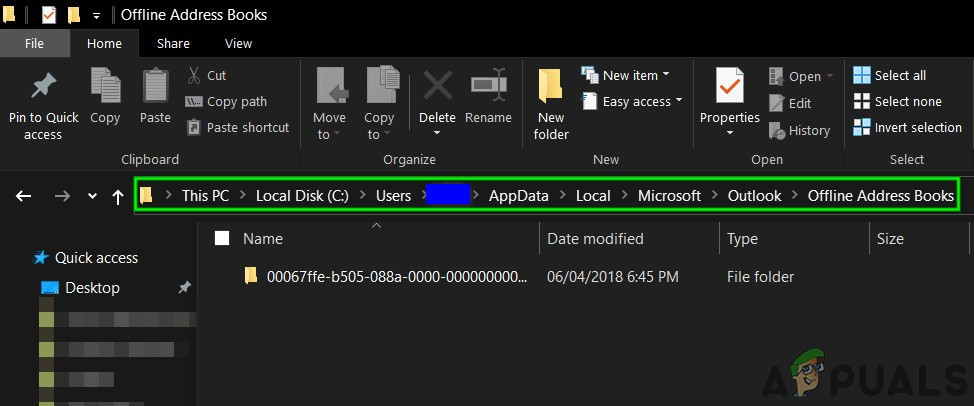
Open Offline Address Books Folder - Press Ctrl+A to select all the contents, then Shift+Delete to permanently remove them.
- Reopen Outlook and check if your Address Book works correctly.
8: Delete the User Profile and Create a New One
A wrong or corrupted user profile in Outlook can also cause this error. Creating a new one may solve the issue. Note that this process will delete your current Outlook profile, so you will need to set up your account again.
- Press the Windows key, type Control Panel, and click on it.
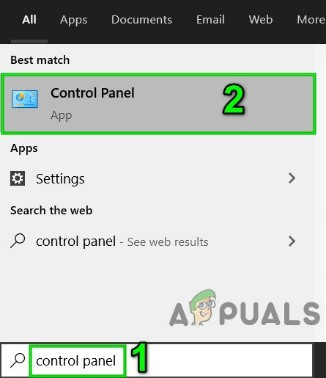
Open Control Panel - Near the top right, set “View by” to Large Icons.
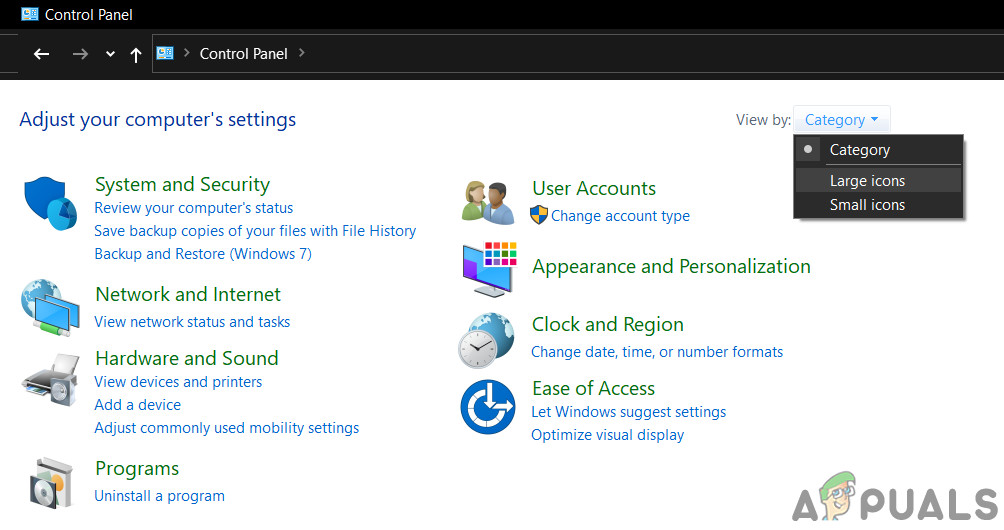
Switch to Large Icons View - Click Mail.
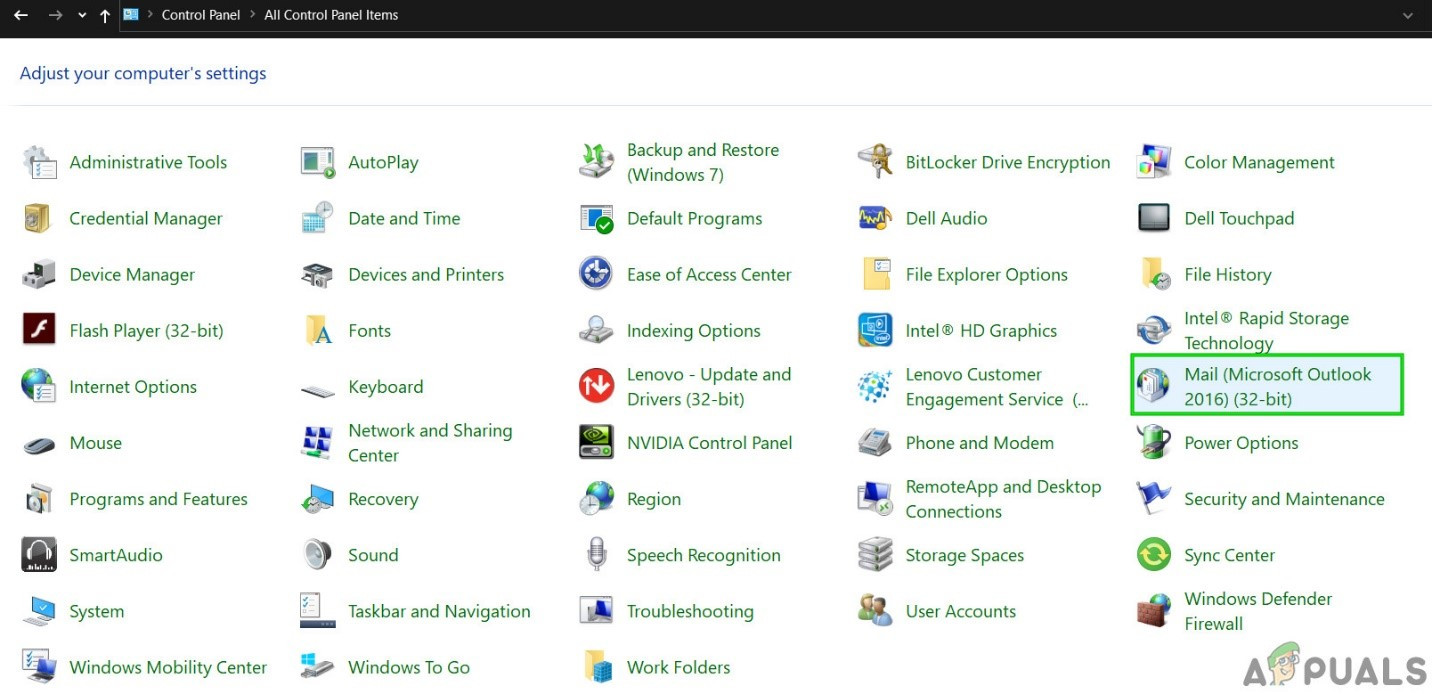
Open Mail in Control Panel - In Mail Setup, click Show Profiles.
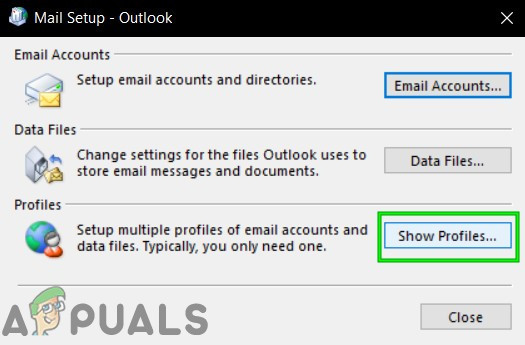
Show Profiles in Mail Setup - Select the Outlook profile and click Remove to delete it.
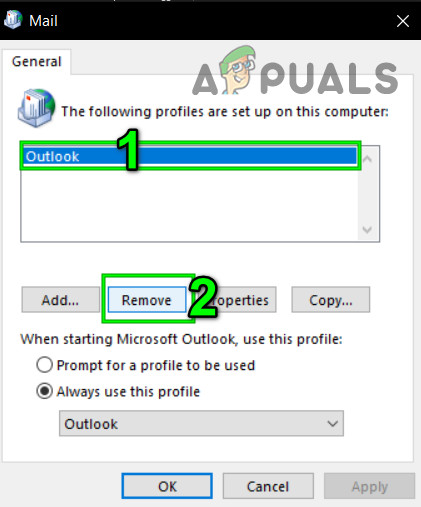
Remove Outlook Profile - Add a new profile.
- Once configured, open Outlook again to see if the issue is resolved.


