How to Add a Blank Page in Microsoft Word
When creating a document in Microsoft Word—which is arguably the best word processor for the Windows Operating System—users often need to insert blank pages at different points in their documents. Whether you want to leave a blank page to signify a section break or simply want an extra page you can write on by hand after printing, knowing how to add a blank page in Microsoft Word is essential.

Adding a blank page to a Microsoft Word document is actually very straightforward, and the steps are almost the same across all versions of the program. There are two main ways you can do this.
1. Insert a Blank Page
The easiest way to insert a blank page into a Microsoft Word document is by using the toolbar in Microsoft Word. Here’s how you can do it:
- Move your mouse pointer to the exact location in the document where you want the new blank page to appear.
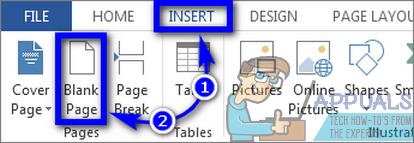
- Go to the Insert tab in Microsoft Word’s toolbar.
- Click on Blank Page.
As soon as you do this, a completely blank page will be inserted into your document right after the position where your mouse pointer was.
2. Insert Multiple Line Breaks to Create a Blank Page
Another way to create a blank page (although this method is slower and not always recommended) is by inserting multiple line breaks. Here’s how:
- Move your mouse pointer to the spot in the document where you want the new blank page to begin.
- Keep pressing Enter to add line breaks, one after another, until the combined line breaks push any content to a new page. When finished, you’ll have a blank page following the point in the document where you began adding line breaks.
Both methods will help you insert blank pages into your Microsoft Word document wherever you need them. Choose the method that works best for your situation!
Ctrl + Enter also adds a page break.