Troubleshoot Zoom Microphone Issues on Windows
As Zoom is a recent development, users come across different errors every now and then. Microphone not working is one of the problems users face. They successfully connect to the Zoom meetings, they hear others perfectly but their audio input (voice) does not get transferred to the connected audience. It wouldn’t be wrong to conclude that it is a hardware problem but in this kind of situation, it is mostly not. Microphones seem to work just fine when tested but the connected audience in the Zoom meeting is not able to hear the user’s voice. User is notified as follows:
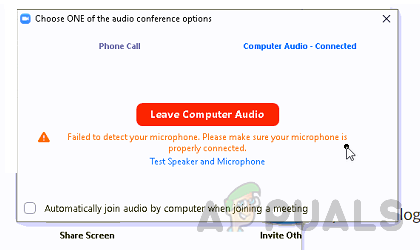
What Causes is Microphone not Working on Zoom?
In the wake of checking on the client’s input through network support, we concluded a list of reported reasons for this problem which is as follows:
- Disabled Microphone: In many circumstances, users are not technical experts. Thus, it is a possibility that their microphone is disabled (without them knowing) from Windows or Zoom Settings which would ultimately cause this problem.
- Device Connection Failure: Sometimes when we connect microphones to the computer via USB or 3.5mm jack, the system initializes background connection processes. If the processes fail then the microphone will not be added to Windows devices and Zoom won’t be able to use it for meetings.
- Corrupt Zoom: Sometimes installation failures are not prominent enough to notice. Users do not get any warning messages but some of the program files are corrupted which may lead to multiple errors. Similarly, if Zoom had installation failures then you are most likely to get this error.
- Miscellaneous: This may include hardware failures, outdated drivers, recognition issues, etc.
All the causes mentioned above are the result of thorough online research done by our technical researchers. Let us move forward now.
Pre-requisites:
Before jumping into the solutions, our advice is to go through these short but promising workarounds that helped many individuals online. If you are still facing the microphone not working problem then jump to the solutions to get rid of this problem. Discussed workarounds are as follows:
- Restart Zoom Application: Terminate Zoom and its processes from Task Manager. Once done then launch it back again to check whether the issue has been resolved or not.
- Restart PC: A computer restart will clear your Random Access Memory (RAM). This practice will help Windows to initialize the microphone device again. This gives your system a fresh start and your issue may get resolved.
- Unplug and Plug-in Microphone: Sometimes when the user plugs in the device, the system may not recognize it due to a system error as discussed in the causes. Therefore, unplug the microphone and plug it back in.
Solution 1: Configure Microphone Device Settings
Many Zoom users are not technical experts thus there is a strong possibility that your Microphone is either disabled or not set as the default audio input device. Due to which Zoom can not recognize your Microphone and thus your voice does not get transmitted to the connected audience in the meeting. This solution proved to be helpful for a lot of users online.
There are two methods by which you can check the status of your Microphone device, configure its settings, and set it as the default computer audio input device.
Method One: Using Windows Settings
- Right-click on the Speaker icon at the bottom-right corner of your PC’s taskbar and select the Open Sound settings option. This will open a window where all settings for Windows sound reside.
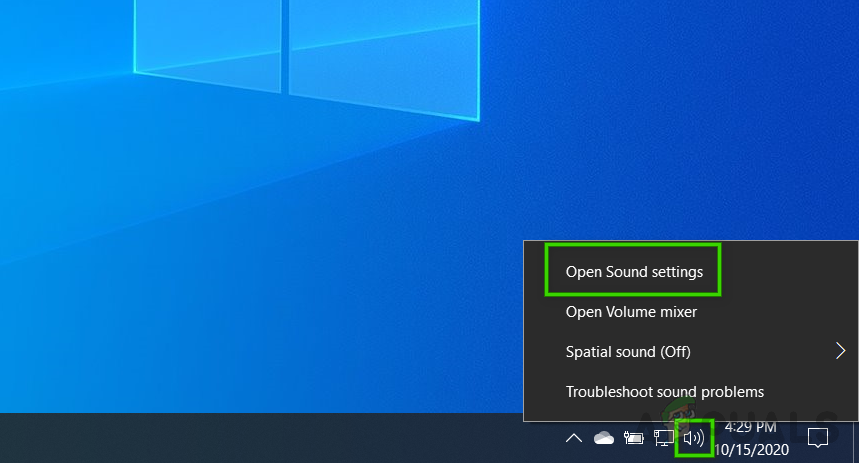
Opening Windows Sound Settings - In the Input section, click the Manage Sound Devices option under Troubleshoot.
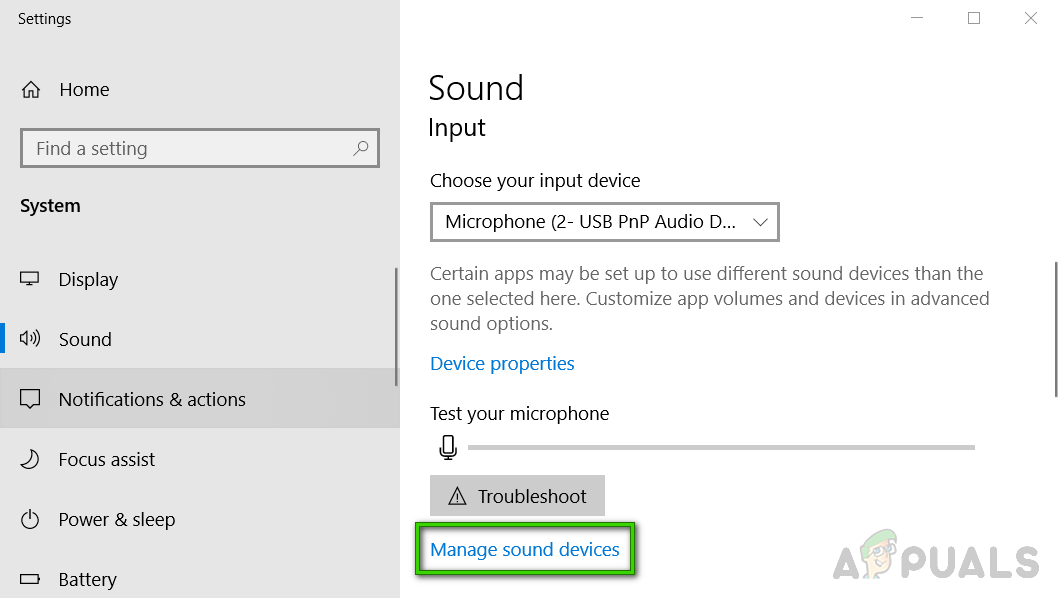
Opening Sound Devices Manager - Check if your microphone (mostly your microphone’s model name appears) is located under the Disabled section. If it’s there then your microphone is disabled which is ultimately causing this problem. Click on your Microphone Device option and then click Enable. This will allow Windows to use your microphone as a recording device for itself and different applications i.e. Zoom, Skype, etc.
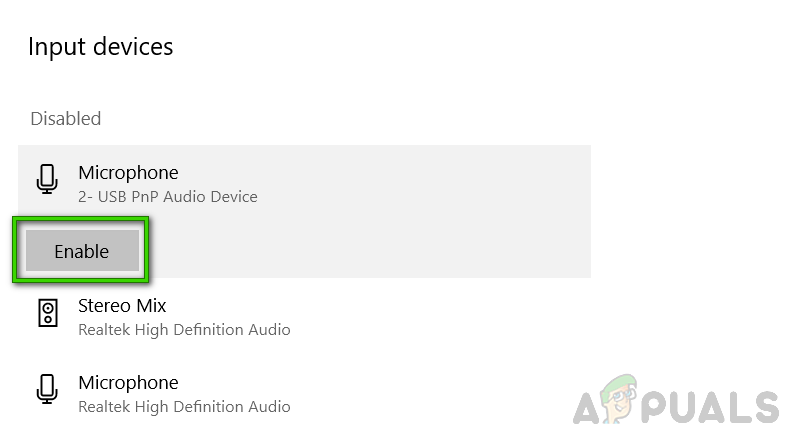
Enabling Microphone Device - To confirm that your PC’s microphone is working, head back to the Sound settings page and speak something in your microphone device. If you see the bar moving under Test your microphone then that means your microphone is working fine. Now your microphone is ready to be used by Zoom.
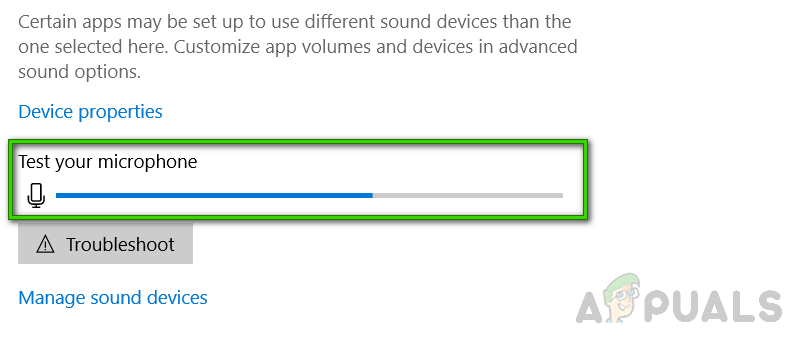
Testing Microphone Device - Launch Zoom application and join or create a meeting to test your microphone with the application. Your problem should be fixed.
Method Two: Using the Sound Control Panel:
- Right-click on the Speaker icon at the bottom-right corner of your PC’s taskbar and select the Open Sound settings option. This will open a window where all settings for Windows sound reside.
- On the right side of your screen, select the Sound Control Panel under Related Settings. This will open the classic sound control panel just like it used to be on Windows 7.
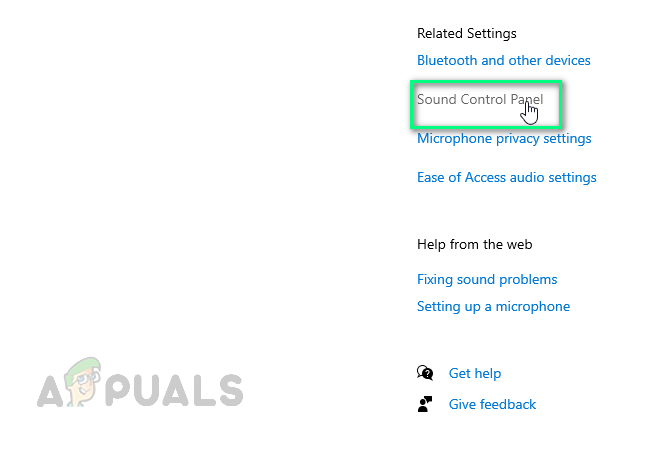
Opening Sound Control Panel - Switch to the Recording tab and check if your microphone (mostly your microphone’s model name appears) has Disabled written under its option and greyed out. If it is the case as shown in the image below, right-click on your Microphone Device option and then click Enable. This will allow Windows to use your microphone as a recording device for itself and different applications i.e. Zoom, Skype, etc.
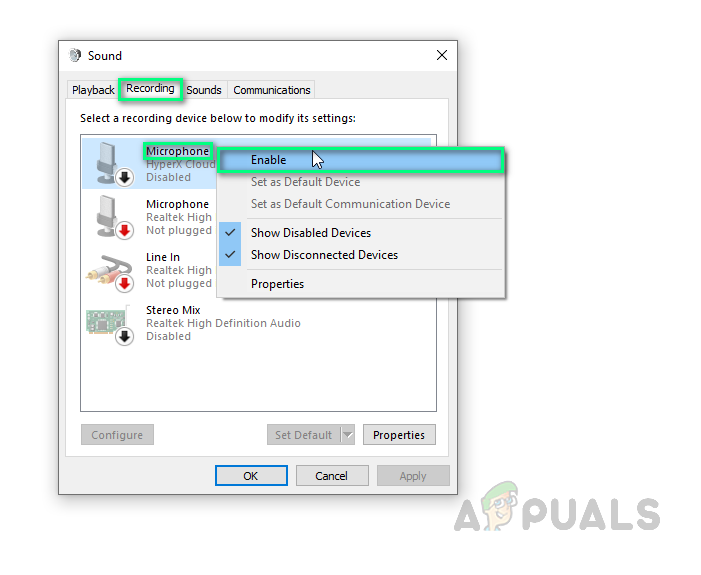
Enabling Microphone Device - Now to configure your microphone settings, select your Microphone Device option and click Properties. This will open a window that contains all the options related to your microphone which you can play with.
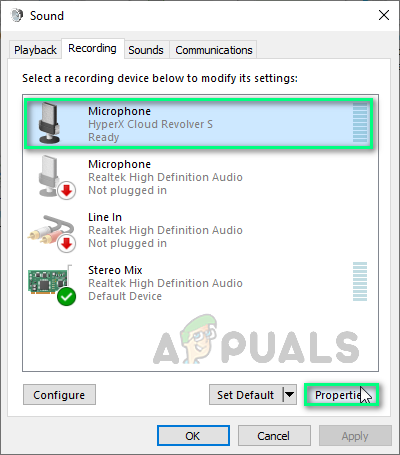
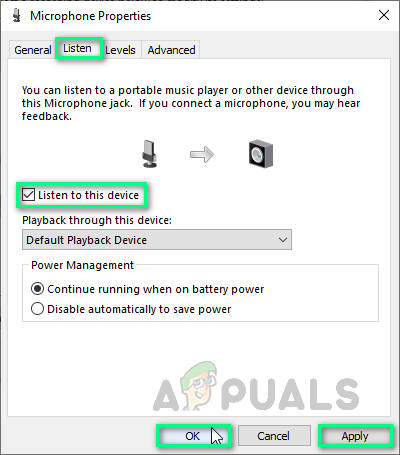
Opening Microphone Device Properties - Switch to the Listen tab and check the box for Listen to this device option. Click Apply > OK. You will now be able to hear whatever you speak in your microphone. Move to the next step to understand the cause behind this action.
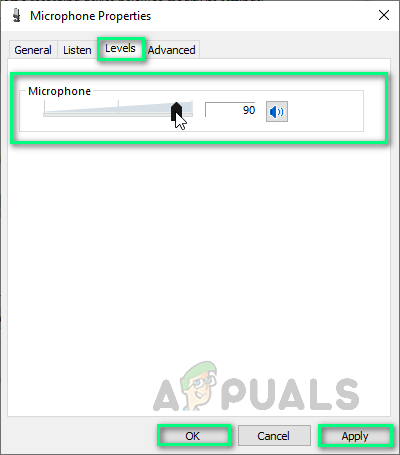
Enabling Listening to Microphone Device Option - Switch to the Levels tab. Now keep speaking something in the microphone device and adjust the intensity level by dragging the bar left and right or by putting in the numeric value between 10 and 100 until you hear your voice in a decent manner. Once done, click Apply > OK.
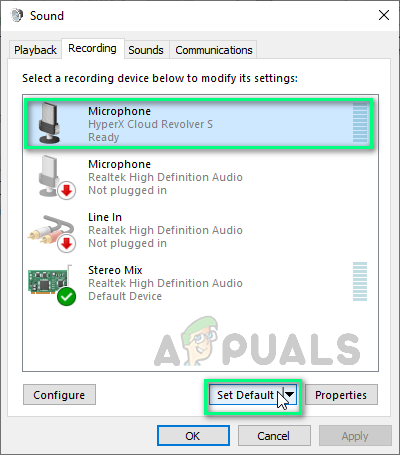
Configuring Microphone Device Level Settings - Select your Microphone Device and click Set Default. This will allow Windows to use your microphone device as a default audio input device in its services and applications i.e. Cortana, Zoom, MS Teams, etc.
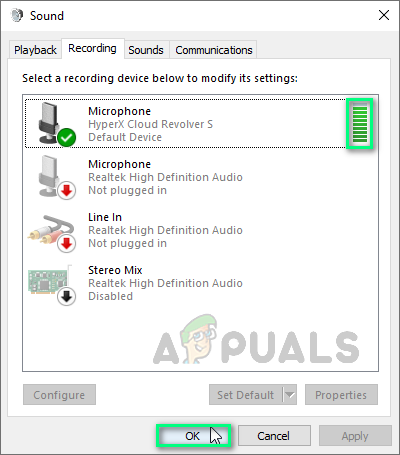
Setting Microphone Device as Default - Now perform a final check by speaking something in your microphone device. If bars are moving as shown in the image below then you are good to go. Click OK to close Sound Control Panel.
Testing Microphone Device - Launch Zoom application and join or create a meeting to test your microphone with the application. Your problem should be fixed.
Solution 2: Clean Uninstall & Reinstall Zoom
The user may have done a corrupted installation or used a corrupted installer itself. This program must be added to the Registry before it can be installed properly on your computer. At this time, we would like to recommend removing this program from the Control Panel. This is to clear everything related to this program including its left-overs. This proved to be helpful for a lot of users online. Please follow the steps given below:
- Click Start, search Control Panel, and open it. This will open Windows Control Panel that is a hub for all Windows settings i.e. Software, Hardware, Personal, Programs, Personalization, etc.
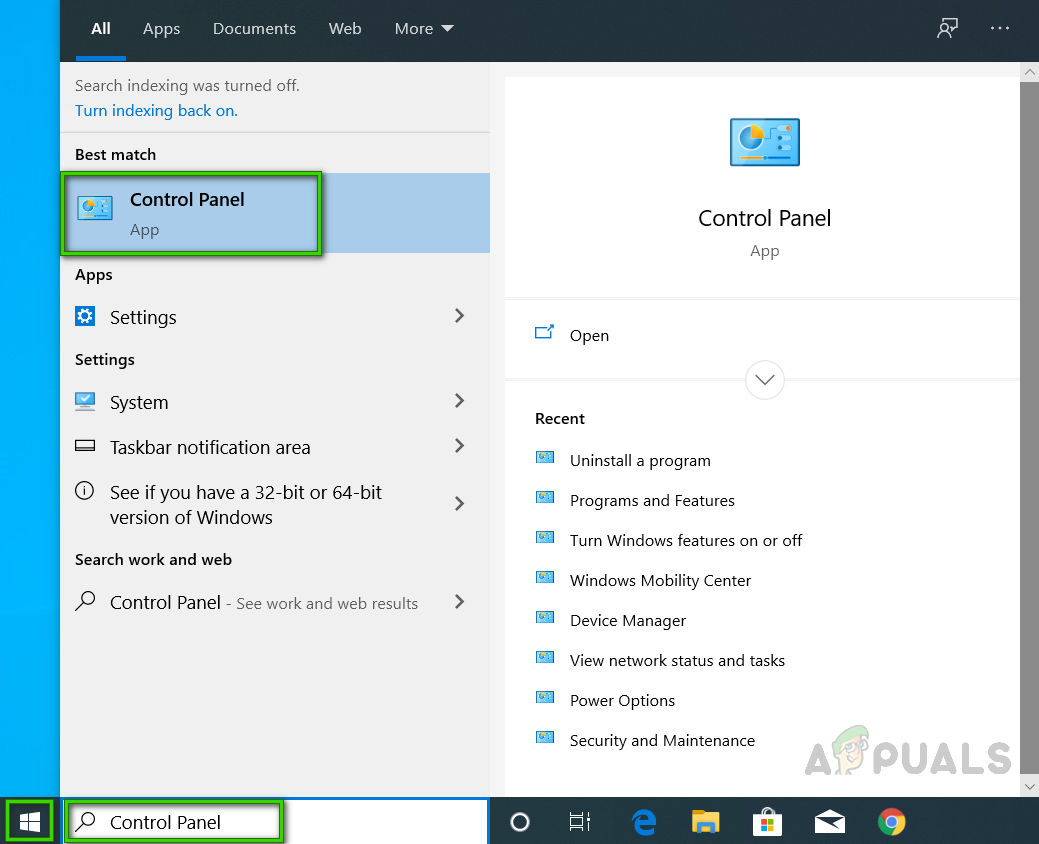
Opening Control Panel - Select Uninstall a Program under the Programs section. This will take you to the list of all installed programs on your PC.
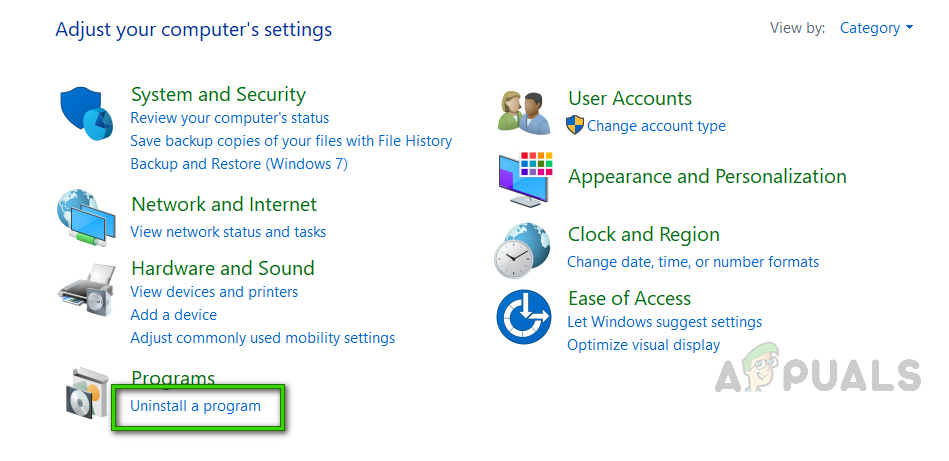
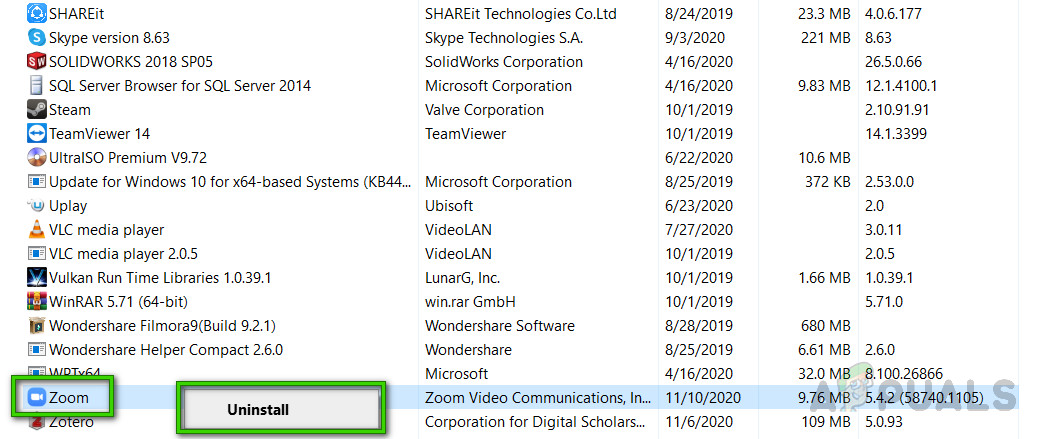
Opening Installed Programs List - Locate Zoom application, right-click on it and select Uninstall. This will start uninstalling the Zoom application from your PC. The procedure may take some time so wait until it gets finished.
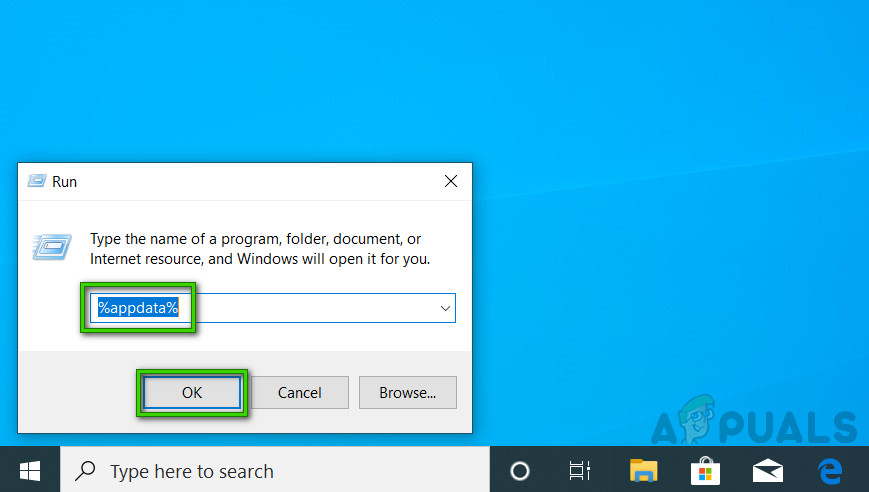
Uninstalling Zoom - Press Windows + R keys on your keyboard to open the Run dialog box. Type %appdata% and click OK. This will take you to a hidden folder named AppData where user data is stored for different applications installed on your PC.
Opening AppData Folder - Right-click on the Zoom folder and select Delete.
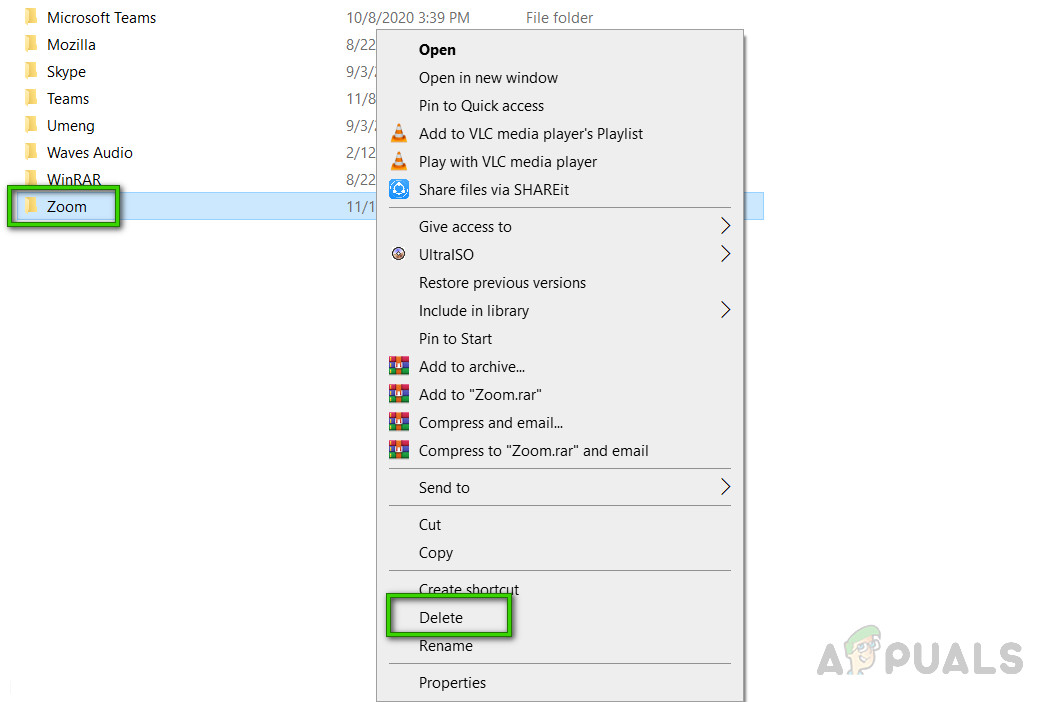
Deleting Zoom Folder - Close all windows and again press Windows + R keys on your keyboard to start Run. Type %Programdata% and click OK. This will take you to a hidden folder named ProgramData where program-related settings or data are stored.
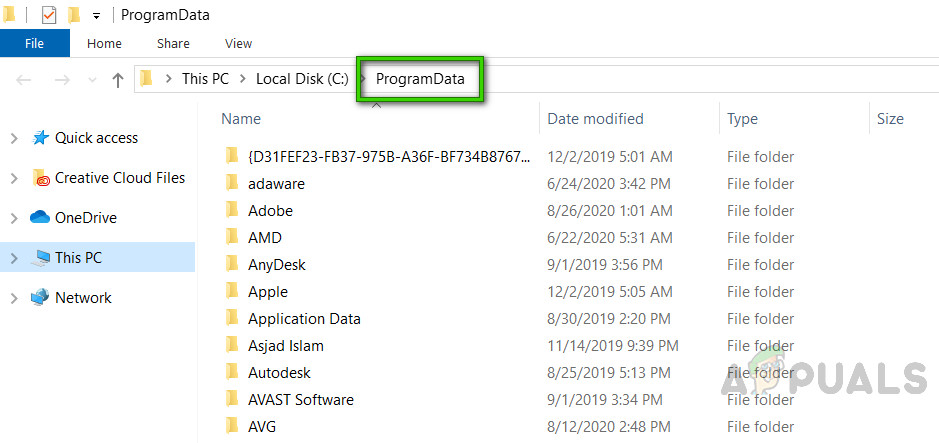
Opening ProgramData Folder - Repeat step 5. Now you have finally uninstalled Zoom completely from your computer.
- Download a fresh updated copy of the Zoom setup from the Official Zoom Download Center and then install it. This should finally fix your problem.


