Fix: Your computer has lost the lease to its IP address
Usually, after installing a new modem or router some users face a DHCPv6 error, which reappear from time to time. The error messages goes like this “Your computer has lost the lease to its IP address ffff:fff:fff:ffff on the Network Card with network address 0xffffffffff.” Now, the first thing to understand here is the difference between IPv4 and IPv6. IPv4 is an IP Protocol which assigns our computers with a unique address which is our identity to communicate with the world over the internet.
Most of us, are on the IPv4 technology and so is the rest of the world. However, due to high usage of the IPv4 available addresses being occupied the Internet is running out of IPv4 addresses as more and more of us have started using internet and networks heavily which is the main reason we now have the IPv6 (Internet Protocol Version 6) which brings in an uncountable number of addresses, that is 2 to the power of 128 – 2^128 (340,282,366,920,938,000,000,000,000,000,000,000,000) never ending. Considering, the shortage – ISPs, Network Device Manufacturer’s and the other to-do’s with network have started to phase out IPv6 to meet the requirements. However, still not most of the ISPs are using IPv6.
Therefore, it is better to disable it (Method 3) unless you really need it and you know that you need it. If you do no need it, see (Method 1) and (Method 2)
Method 1: Increase the DHCPv6 Lease Time
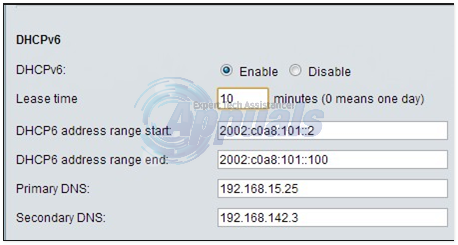
The main reason for this error to occur is when the DHCPv6 lease time expires The simplest solution is to log into your router allocating IPv6 addresses, and increase the DHCPv6 lease time. Since all router’s have a different interface and firmware running, it is not possible to give the exact steps but here’s normally how it would look like:

After the lease time has been increased, save the settings and reboot your router and it should work fine.
Method 2: Reset your network adapter
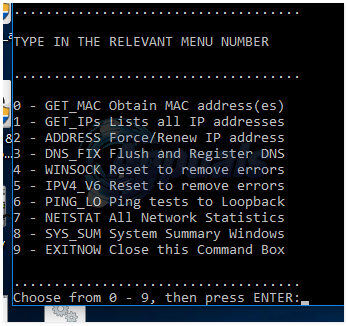
Click (here) to view the reset script. Copy the contents of the script, and paste it in a notepad file, save the file as reset.bat (file type should be all files) in order for it to associate the batch file with command prompt. Once done, right click the reset.bat file you saved, and choose Run As Administrator.
Use option 4 and reboot the PC. Test to see if the issue is fixed, if not, re-run the script and use option 5. Reboot and Test.
