Fix: Windows Update Error 800f0902
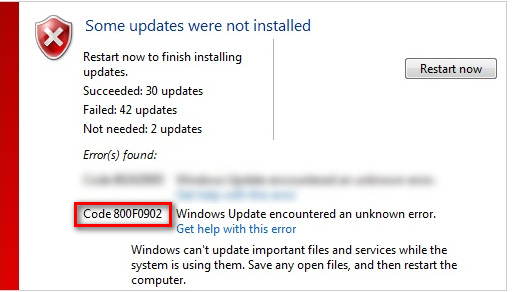
Error 800f0902 is a transient error. In most cases, it appears because the update installer (Trusted Installer) is busy processing requests from another client. Because it handles important OS files, Trusted Installer cannot be interrupted until it finishes the task at hand. This issue is usually seen when installing Windows OS updates. Typically, the error code appears after the user checks for updates or after an automatic update fails. It’s known to happen frequently on machines that have a lot of updates to catch up to.

If a busy TrustedInstaller is causing the 800f0902 error, waiting a while before installing the faulty update will most likely solve the problem. However, sometimes a corrupt update installation will end up causing this issue. In that case, you’ll have to go through the trouble of resetting the Software Distribution folder.
Another possible scenario for your 800f0902 error is that the updates that are failing we’re already replaced by newer updates via installing. In this case, your OS will look at the failing updates as “not applicable” and will display the 800f0902 error. However, the issue could also be server-side, so if possible, wait a few hours and see if the issue resolves by itself.
Below you have a collection of methods that have successfully helped Windows users eliminate the 800f0902 error. Please follow each method in order until you find a fix that works.
Note: Before you start with the methods below, make sure your network connection is working properly. In addition, check to see if you don’t have any proxy settings that are coming into play when Windows tries to perform an update. If you use proxy or VPN, disable the services and try to install the failing updates again.
Method 1: Initializing Interner Explorer
The 800f0902 error is often linked with incomplete installs of IE (Internet Explorer). Some users successfully eliminated the error after opening IE and allowing it to initialize. If you use a 3rd party browser like Chrome or Firefox, try opening Internet Explorer and then closing it again. Next, return to Windows Update an try to execute the update. If it’s still failing, move to Method 2.
Note: This solution is only applicable if you don’t normally use IE and/or you didn’t open it after the update failed.
To open Internet Explorer: Hold the Windows Key and Press R, type iexplore.exe and Click OK
Method 2: Restarting Windows Module Installer service (trustedinstaller.exe)
TustedInstaller is an executable used by a service called Windows Module Installer. Its purpose is to install Windows system modules – this includes Windows updates and automatic updates, and hotfixes. TrustedInstaller.exe is known to be a memory hog and has the potential to glitch out on Windows 7 and prevent the updates from installing. Some users have managed to solve the 800f0902 error by restarting the service and rebooting their system. Here’s what you need to do:
Note: Before you go ahead and restart the service, you need to make sure that it’s not currently processing an update. To do this, open Task manager (Ctrl + Shift + Esc), go to Resource Monitor and check whether TrustedInstaller.exe is currently using physical memory. If it’s using system resources, wait for the update to finish before following the guide below.
- Press Windows key + R to open a Run window. Then, type services.msc and hit Enter.
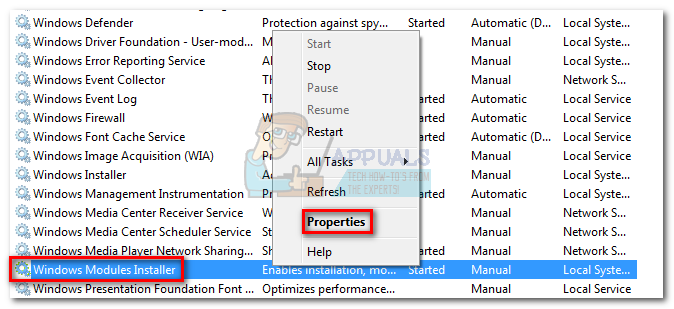
- Once you’re in the Services window, scroll down and find Windows Modules Installer.
- Right-click on Windows Modules Installer and select Properties.

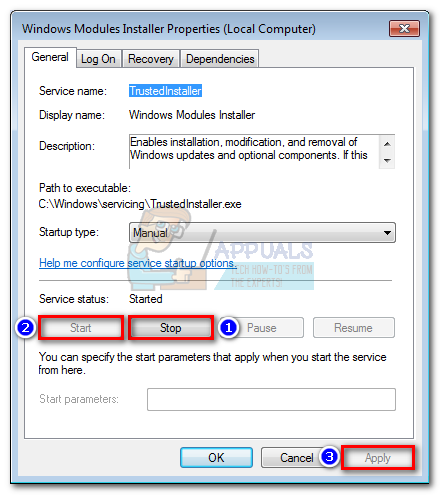
- Next, select the General tab and click on the Stop button. Once the service has been stopped, click the Start button to restart it. Finally, hit Apply to confirm and close the Services window.

- Try to install the update that was previously failing.
Note: If the update fails again with the 80080005 error code, restart your computer and follow Method 3. If the error code displayed is still 800f0902, move straight to Method 4.
Method 3: Scanning for System errors with SFC
Corrupt Windows system files can also lead to the 800f0902 error. This will typically happen when the download or the installation of a Windows Update is interrupted. This can be triggered by a sudden power source or a network failure. If following the method above has changed the error to an 80080005 code, follow the steps below on running SFC (System File Checker).
Windows has a built-in tool that is capable of scanning and fixing most issues related to system file corruption, including the error at hand. Follow the fixes below to perform a system-wide scan and repair your files of corruption:
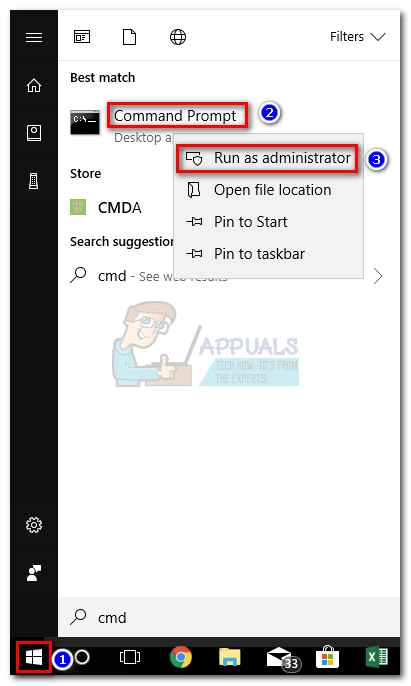
- Click the Windows start bar icon in the bottom-left corner and search for “cmd“. Then, right-click on Command Prompt and click on Run As Administrator.

- Once Command Prompt is opened as Administrator, tap sfc /scannow and press Enter. This will trigger a system-wide scan that will take a while to complete. If the tool manages to find corrupted files, you will need to press the Y key at the next prompt to have the corrupted files repaired.
- When the process finishes, restart your machine and attempt to install the updates again.
Method 4: Resetting the Software Distribution folder
The Software Distribution folder in Windows maintained by the WUAgent. The folder is responsible for storing temporary files required by Windows Update. Under normal circumstances, there’s no need to ever interact with this folder. However, if Windows updates are still failing after following the methods above, renaming the folder might eliminate the issue. This method is effective in those situations where Windows sees the updates as “Non-applicable” because newer updates were already installed.
You can find the Software Distribution folder under C:\ Windows \ SoftwareDistribution. If you notice that the size of this folder is considerably large (over 700MB), then there’s a high chance that this method will eliminate the 80080005 error.
Note: Performing the steps below are safe and will not hurt your system. This procedure will reset the contents of the Software Distribution folder, forcing Windows to recreate the WU components and re-download the drivers.
Here’s a step-by-step guide to resetting the software distribution folder:
- First, disconnect your machine from the internet. This could either mean turning off the Wi-Fi or physically unplug the wired connection.
Note: If you skip this step, Windows might indicate that some files are in use and the commands below will not work. - Click the Windows start bar icon in the bottom-left corner and search for “cmd“. Then, right-click on Command Prompt and click on Run As Administrator.

- First, we’ll need to stop BITS, Cryptographic, MSI INstaller and the Windows Update Services. To do this, insert the following commands into Command Prompt and press Enter after each of them:
net stop wuauserv
net stop cryptSvc
net stop bits
net stop msiserver

- Now, we’ll need to rename the SoftwareDistibution folder and the Catroot2 folder. This will force Windows to recreate the Windows Update components and download the updates again. To do this, insert the following commands into Command Prompt and hit Enter after each one:
ren C:\Windows\SoftwareDistribution SoftwareDistribution.oldren C:\Windows\System32\catroot2 Catroot2.old
- Now that we renamed the folders, let’s restart the services we previously disabled. Proceed by inserting the following commands and hit Enter after each one:
net start wuauserv
net start cryptSvc
net start bits
net start msiserver - Close Command Prompt and restart your computer. After the restart, the updates should automatically start. But if they don’t, make your way to Windows Update and start them from there.