Fix: Windows Update Error 80072ee2
Windows Update Error 80072EE2 stops updates from downloading by interrupting the system’s update process. This error means there was a timeout while connecting to the Windows Update servers. Network issues, often due to proxy settings, are the main cause.

However, security software, firewall settings, registry errors, or system misconfigurations can also interfere with a stable connection.
In this article, we will discuss different ways to solve this error.
1. Edit the Registry
Modifying certain registry settings can restore the connection to Windows Update servers, particularly if some entries are corrupted or misconfigured. By adjusting these values, you can fix issues causing the update timeout, allowing downloads to proceed smoothly.
- Hold the Windows key and press R.
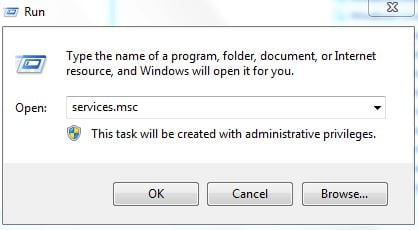
- Type “services.msc” in the Run dialog and click “OK”.

- In the Services console, find “Windows Update“, right-click it, and select Stop.
- Hold the Windows key and press R again.
- In the Run dialog, type:
C:\Windows\SoftwareDistribution
- Click OK and delete the contents of this folder.
- Return to the Services console, right-click “Windows Update“, and select Start.
- Hold the Windows key and press R again.
- Type “regedit” in the Run dialog.
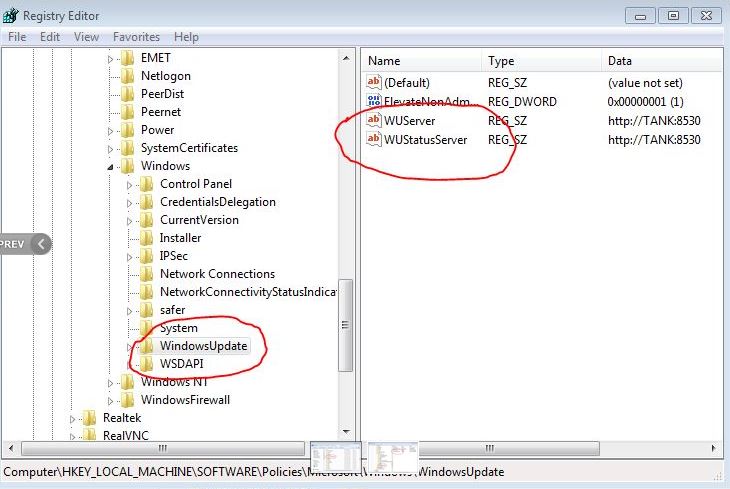
- In the Registry Editor, navigate to:
HKEY_LOCAL_MACHINE\SOFTWARE\Policies\Microsoft\Windows\WindowsUpdate

- Find and delete the keys named WUServer and WUStatusServer.
- Ensure the Windows Update service is running.
2. Run the Windows Update Troubleshooter
The Windows Update Troubleshooter diagnoses and fixes common update issues like misconfigured settings or missing files. It checks your computer’s settings against Windows Update requirements to resolve problems causing the 80072EE2 error. Ensure you have an administrator account before running it.
- Press Windows + S to open the Start menu search bar. Type “troubleshoot” and click on the first result.

- In the Troubleshoot menu, select “Windows Update” and click “Run the troubleshooter“. For Windows 7, access it through the Control Panel.

- If prompted for administrator access during troubleshooting, select ‘Try troubleshooting as an administrator‘.

- After applying fixes, restart your computer to see if the issue is resolved.
 Note: Ensure an active internet connection for best results and run the troubleshooter multiple times if necessary.
3. Delete the Software Distribution
Clearing the Software Distribution folder allows Windows Update to start fresh by removing old, possibly corrupt update files. This folder holds temporary update files, and deleting them forces Windows to download new ones from the server.
- Press Windows + S, type “command prompt“, right-click the application, and select “Run as administrator.”
- In the command prompt, enter these commands one at a time:
net stop cryptSvc

net stop wuauserv

net stop msiserver

net stop bits

- Open File Explorer and go to C:\Windows\SoftwareDistribution.
- Delete everything inside the Software Distribution folder or move the contents elsewhere for backup.
 Note: You can rename the folder to “SoftwareDistributionOld” as an alternative.
 - In an elevated command prompt, enter these commands to restart the services:
net start cryptSvc

net start wuauserv

net start msiserver

net start bits

- Restart your computer and attempt to update Windows again.
- Note: Alternatively, in an elevated command prompt, run:
net stop wuauserv

rmdir /q /s c:\windows\softwaredistribution\.

wuauclt /detectnow
- If the problem is network-related, execute this command:
netsh int tcp set global autotuninglevel=disabled
4. Check Official Microsoft Documentation
Microsoft’s official documentation provides guidance and solutions for Windows Update issues. It includes troubleshooting steps, configuration checks, and updates for fixing connectivity problems, offering trusted instructions for users.
5. Completely Reset Windows Update Modules
Resetting Windows Update modules gives the update process a fresh start by removing corrupted files or settings. This clears issues in update components, reinitializes services, and removes obstacles causing connection or download failures, returning Windows Update to its default state.
- Press Windows + S, type “command prompt“, right-click the application, and select “Run as administrator“.
- In the command prompt, execute these commands one by one:
net stop wuauserv

ren %systemroot%\SoftwareDistribution SoftwareDistribution.old

net start wuauserv

net stop bits

net start bits

net stop cryptsvc

ren %systemroot%\system32\catroot2 catroot2.old

net start cryptsvc

regsvr32 /s Softpub.dll

regsvr32 /s Wintrust.dll

regsvr32 /s Initpki.dll

regsvr32 /s Mssip32.dll
- Restart your computer and check if the issue is resolved.