SOLVED: Windows 10 Will Not Save WiFi Password
Some users reported a strange behavior regarding Windows 10 and all the networks they want to connect to. If they connect their device trough cable or ethernet, everything works fine but a connection trough WiFi only works as long as the device is running and has not been rebooted or hibernated – After waking up from standby or after a restart Windows 10 loses the connection to the WiFi and is not able to reconnect automatically again. The user is then asked to put in the same password again, to be able to connect and use the internet. Once they do it connects fine, but the cycle repeats until system is rebooted/hibernated or turned off. The main issue here, is that your Windows 10 will not store the wifi password. In this guide, we are going to list three methods that have reportedly worked for a number of users.
Method 1: Uninstall the WiFi-adapter
Hold the Windows Key and Press R. Type hdwwiz.cpl and Click OK. Expand the Network Adapters tree, and write down the name of your wifi adapter. The reason why i am suggesting you to write it down is because if you (for any reason) while performing the steps here lose the driver or should you need to update the driver or download it again, you can easily do a “google search” for the driver using the adapter’s name. Once done, Right Click your wifi adapter name, and choose Uninstall.
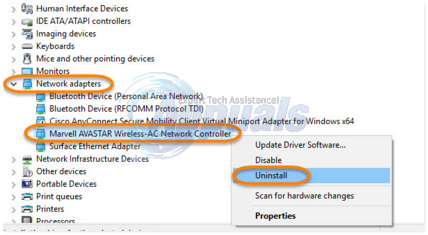
Now, reboot your PC and the wifi adapter should be installed automatically. Re-connect, and reboot again to see if the issue is resolved or not. If not, connect to the wifi and download the latest driver for your wifi adapter from the web. Install it, and reboot again. Then test, if this still doesn’t solves the issue then (with the same driver, proceed to Method 2).
Method 2: Forgetting the network
In some cases it might help to only make Windows to “Forget” the network and add it again.
To do that, click on the Start-button, select Settings, select Network & Internet, click on “Manage WiFi settings“, scroll down to “Manage known networks“, click on the wireless network in question and click ” Forget“.
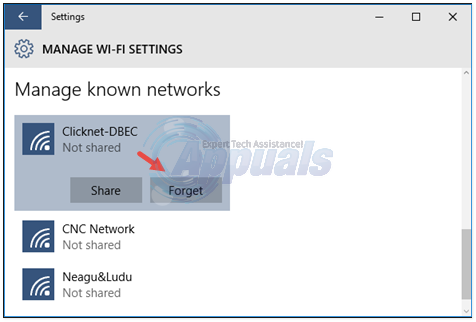
Restart your computer and try to connect to the WiFi-Network again. Reboot and test, if the issue persists proceed to Method 3.
Method 3: Disable/Enable the WiFi-adapter
Hold the Windows Key and Press R. Type ncpa.cpl and Click OK. Right-click your wifi network adapter and choose Disable. Right-Click again and choose Enable. Reconnect and test, reboot and test.
Method 4: Stop the WLAN AutoConfig Service and delete some Wlansvc files
Another pretty effective method that can be used to fix this issue is to stop the WLAN AutoConfig service and then, while the service is stopped, go into the root drive of your computer and delete some specific files pertaining to the Wlansvc. The Wlansvc is the service that basically handles all communication between your computer and wireless networks, and that is how deleting files pertaining to it (and basically resetting it) can, in many cases, resolve this problem. In order to use this solution, you need to:
Press the Windows Logo key + R to open a Run
Type services.msc into the Run dialog and press Enter.
In the Services window, scroll down, locate and right-click on the service named WLAN AutoConfig.
Click on Stop in the contextual menu.
Press Windows Logo key + E to launch the File Explorer and, within it, navigate to the following directory:
X:\ProgramData\Microsoft\Wlansvc\
Note: The X in this directory is to be substituted with the drive letter for the partition of your HDD/SSD that Windows 10 is installed on.
Delete everything in the Wlansvc folder except for a folder titled profiles.
Open the profiles folder and delete everything within it except for a folder named interfaces.
Open the interfaces folder and delete everything inside it.
Close the File Explorer and, in the Services window, right-click on the WLAN AutoConfig service and click on Start.

Once you have completed each and every single one of the steps listed and described below, connect to a password-protected wireless network of your choice, making sure to enable the connect automatically option. Once done, restart your computer and it should automatically connect to the wireless network as soon as you login.
or just disable “secure boot” in Bios.
this solves the issue.