Fix: Windows Mail not Working
Windows 10 included dozens of new applications to the operating system which changed the Windows outlook forever. The applications are very useful and provide ease of access to the user. One of these applications is Mail. It allows you to bind your account to the application through which you can directly interact with all your emails and receive them in real-time.
Despite constant updates and bug fixes, there are many instances where the Mail application fails to work or launch as expected. This is an ongoing issue and is mostly associated with the corrupt user profile or the application being corrupt.
Solution 1: Creating a new Administrator User Account
The first and foremost workaround you should try is creating a new user account. This is a known problem in Windows where user accounts get corrupt or due to some module getting damaged, some functions in the user profile fail to work as expected.
You can check out our guide on how to make a new user account and transfer all the existing data to it. Before transferring any data, make sure that Mail is working perfectly in the new user account. If it is, only then transfer the data and delete your old profile. It is recommended to back up your important data before executing this solution.
Solution 2: Reinstalling Mail Application
If Mail doesn’t work in the new administrator account, it probably means that installed instance is corrupt or not working as expected. This happens in a lot and there is nothing for you to worry about. Do note that you will require administrative privileges to perform this solution.
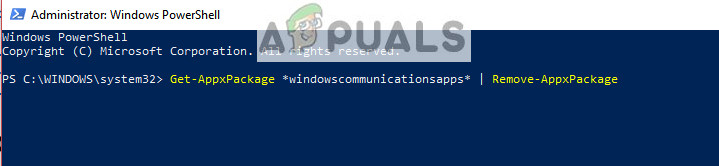
- Press Windows + S, type “PowerShell” in the dialogue box, right-click on the application and select “Run as administrator”.
- Once in elevated PowerShell, execute the following command:
Get-AppxPackage *windowscommunicationsapps* | Remove-AppxPackage
This command will uninstall the Mail application. Restart your computer after this command.
- Now you can reinstall the application using two methods; either navigate to Windows Store and install the application from there or you can execute the following command in elevated PowerShell.
Get-AppxPackage -AllUsers| Foreach {Add-AppxPackage -DisableDevelopmentMode -Register “$($_.InstallLocation)\AppXManifest.xml”}
This command will check if any application isn’t installed on your computer according to the Application manifest, and if it isn’t, it will be installed. There may be a lot of errors when the command runs so don’t panic and let them be.
Tip: You can try ending the task “Appmodel” using the task manager when you are just about to run the commands if this normal approach doesn’t work.
Solution 3: Running Command for Account not Adding
If you have run into the situation where you are unable to add an account to the Mail application, you can try running the command listed below. This will ensure that the application has all the necessary permissions and capabilities which it needs to communicate with the servers.
- Press Windows + S, type “Command Prompt” in the dialogue box, right-click on the application and select “Run as administrator”.
- Once in elevated PowerShell, execute the following command:
dism /online /add-capability /capabilityname:OneCoreUAP.OneSync~~~~0.0.1.0
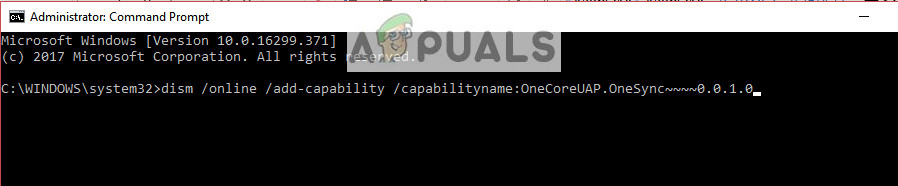
- Restart your computer after executing the command and check if the problem at hand got solved.
Solution 4: Performing a System Restore
If all the above methods don’t work and you are stuck with the applications not working, it is worth a shot restoring back before any latest Windows 10 updates were installed on your computer. If you don’t have a last restore point, you can install a clean version of Windows. You can use the utility “Belarc” to get all your licenses saved, backup your data using external storage and then perform a clean install.
Note: This method will work if the applications were working prior to any Windows update. Also, make sure to back up your data before performing this solution. Use an external hard drive or USB to save all your important files just in case.
Here is the method on how to restore Windows from the last restore point.
- Press Windows + S to launch the start menu’s search bar. Type “restore” in the dialogue box and select the first program which comes with the result.

- Once in the restore settings, press System Restore present at the beginning of the window under the tab of System Protection.
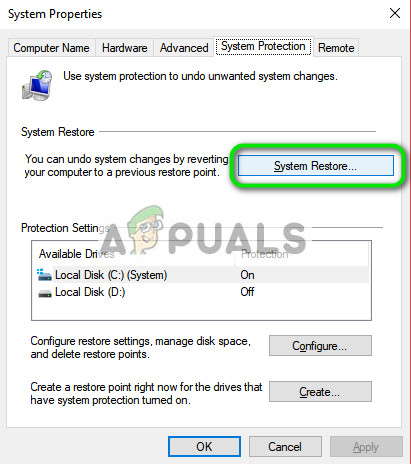
- Now a wizard will open navigating you through all the steps to restore your system. You can either select the recommended restore point or choose a different restore point. Press Next and proceed with all the further instructions.
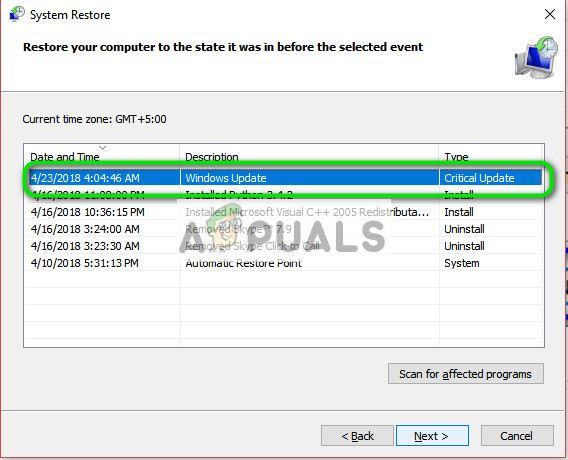
- Now select the restore point from the list of options available. If you have more than one system restore points, they will be listed here.
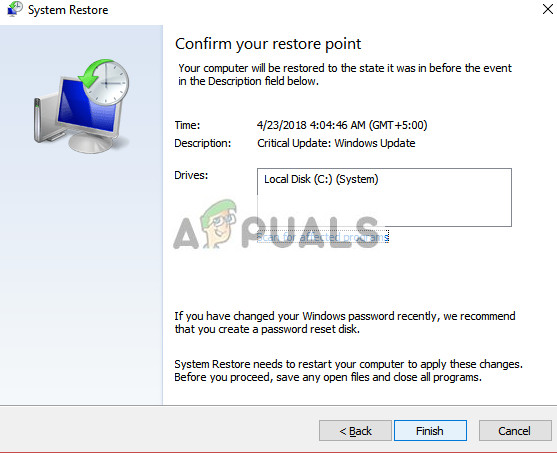
- Now windows will confirm your actions for the last time before it starts the system restore process. Save all your work and backup important files just in case and proceed with the process.
You can learn more about system restore to gain more knowledge about what it does and what are the processes involved.
- Once you have restored successfully, log into the system and check if the error at hand got fixed.
If you don’t have any restore points or if the system restore doesn’t work, you can do a clean install of Windows using bootable media. You check our article on how to create a bootable media. There are two ways: by using media creation tool by Microsoft and by using Rufus.


