Fix: Windows 10 Error C1900101 – 0x20017
Microsoft announced its latest version of Windows, called Windows 10, a few months ago. Windows 10 comes with plenty of neat features, and the GUI has improved significantly. That’s the reason millions of Windows users started upgrading their OS to the latest version right after its release on July 29, 2015. Almost 67 million people have Windows 10 installed on their PCs until now, and the number is increasing rapidly.
However, there are some people who are unable to complete the upgrade process and remain stuck on the previous build. Various errors have been reported by individuals attempting to update their Windows. One such reported error is Error C1900101 – 0x20017, which states that Windows 10 could not be installed. During the SAFE_OS phase of the boot process, the installer fails. Consequently, this prevents the update process from functioning properly and reverts users back to their previous operating system.

Reasons behind the Error ‘C1900101-0x20017’
The main culprit behind this error is known to be the faulty BIOS setting. Therefore, by fixing a minor setting inside the BIOS, you can get rid of this error.
Another reason for this error in some cases might be an external USB device connected to the PC during the Windows 10 upgrade.
Solution to Fix the Error ‘C1900101 – 0X20017’:”.
Knowing the reasons leads you toward solutions. I would recommend a clean installation of Windows 10 instead of an upgrade because it reduces the chances of crashes and also feels fresh. So, in order to get rid of this error and enjoy the elegance of Windows 10, please follow these steps.
Setting the BIOS and Performing a Clean Installation:
This has been found to be the best solution if you encounter the error C1900101 – 0X20017. Please follow these steps carefully.
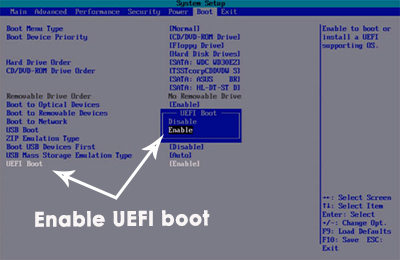
1. Firstly, you need to restart the system in order to change the BIOS setting. At the time of boot, press F12 or Del (depending on your BIOS manufacturer) repeatedly until it boots you into your system’s BIOS. Inside the BIOS, navigate to the Boot menu and find the UEFI Boot option. If it is disabled, enable it and exit the BIOS while saving the settings by pressing F10. Restart your computer to boot into your installed Windows.
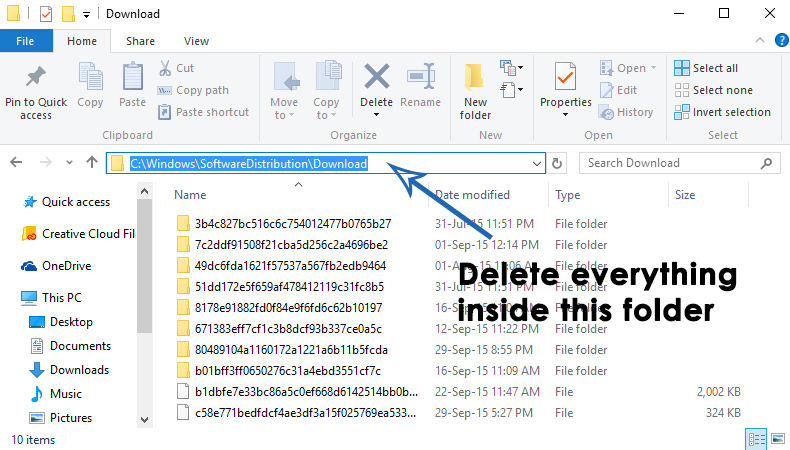
2. After the system has been restarted, navigate to C: > Windows > SoftwareDistribution > Download, and delete everything inside this folder.
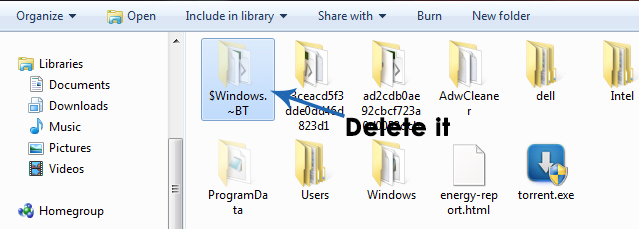
3. Now, unhide your hidden files from the View section at the top of Windows Explorer. Go to the “C” Local drive or any drive where Windows is installed, and delete the hidden $Windows.~BT.
4. To perform a clean installation of Windows 10, download the official ISO file from Microsoft’s website and create a bootable installation media by following the steps listed in this guide.
5. After the entire process is complete and the Windows 10 bootable installation media is in your hands, you simply need to restart your system and boot it using the installation media you created earlier. Follow the instructions, and you will have a clean and fresh installation of Windows 10 without any errors.
Note: Please ensure that you do not have any external USB devices (other than your bootable USB) attached to the system during installation.
mmm, changed my bios setting to use UEFI and now laptop will not boot up.