Fix: Windows 10 Creators Update Brightness Issues
Following the release of the Windows 10 Creators Update, many Windows 10 users who have downloaded and installed the update on their computers have been complaining of their display brightness being reset to its default value every single time they reboot their computers. Along with the display brightness, users affected by this problem also experience other display and power plan settings being reset to their default values. For some affected users, display brightness resets to 100%, which is the maximum possible amount, whereas for others it resets to 50% or some other value, varying from one affected computer to the next.
Many hypothesized that this was simply the Windows 10 Creators Update’s Adaptive Brightness setting interfering with the display brightness, but this theory has since been debunked. Some affected users are even unable to change their display brightness back to their preferred value after a reboot, and the only way they are allowed to do so is if they disable and then enable their display adapter in Device Manager first.
Having your display brightness change every single time you boot your computer up can be a horrifyingly annoying ordeal. Thankfully, though, this problem is not at all an unsolvable one – the following are the most effective solutions that you can use to try and get rid of this issue.
Solution 1: Disable the Brightness Reset task in Task Scheduler
In various editions of Windows 10 – such as Windows 10 Education – there is a scheduled task named BrightnessReset which causes display brightness to be reset to its default value every time a computer running on the Creators Update is rebooted. If the BrightnessReset task is causing this problem in your case, here’s what you need to do in order to resolve it:
- Open the Start Menu.
- Search for “task scheduler”.
- Right-click on the search result titled Task Scheduler and click on Run as administrator.
- In the left pane of the Task Scheduler, navigate to the following directory:
Task Scheduler Library > Microsoft > Windows > Display > Brightness
- In the right pane of the Task Scheduler, locate and double-click on the task titled BrightnessReset. If no such task exists, simply try a different solution.
- Navigate to the Triggers
- Click on the At log on trigger to select it and click on Edit….
- The Enabled option at the bottom of the page will be checked – clear this check to disable the task.
- Click on OK, click on OK in the next window, and close the Task Scheduler. Set your display brightness to your preferred value and restart the computer – when the computer boots up, check to see whether or not the display brightness setting intact.
Solution 2: Disable Low Power Mode in the Intel GPU Control Panel
If your computer has an Intel GPU, integrated or otherwise, the cause of this issue in your case may be an Intel GPU Control Panel feature by the name of Low Power Mode. If that’s true, simply disabling this feature should get rid of the problem for you. To disable Low Power Mode, you need to:
- Open the Intel GPU Control Panel.
- Locate an option by the name of Low Power Mode, and disable
- Save your changes if required to do so.
- Restart the computer and check to see whether or not its display brightness resets to the default value when it boots up.
Solution 3: Update your display adapter’s driver software
You might be experiencing this problem because the driver software your computer has for its display adapter is outdated and not entirely compatible with the Creators Update. This has been found to be the most common cause of this problem for affected users with NVIDIA GPUs, although users with AMD GPUs can also experience this problem because of outdated GPU drivers. If outdated GPU drivers are the cause of your sorrows, all you need to do in order to fix the problem is update your GPU’s drivers. To do so, simply:
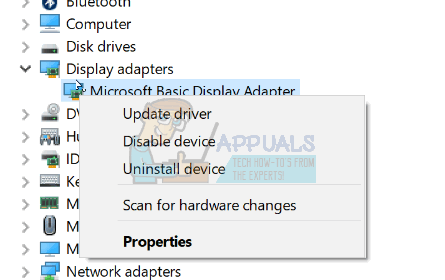
- Right-click on the Start Menu button or press the Windows Logo key + X to open the WinX Menu, and click on Device Manager.
- In the Device Manager, double-click on the Display adapters section to expand it.
- Locate your computer’s active display adapter under the Display adapters section, right-click on it and click on Update Driver Software….
- Click on Search automatically for updated driver software, and wait for Windows to conduct the search.
- If Windows finds that new driver software is available for your computer’s display adapter, it will be automatically downloaded and installed. If Windows does download and install new drivers, restart your computer once it’s done and check to see whether or not the problem persists when it boots up.
If Windows does not find any updated driver software, however, make your way to the Downloads section of the official website of the manufacturer of your computer’s GPU and search for driver software for your GPU and Operating System combo just to be sure that you have the latest drivers available. If a newer version of the drivers for your GPU and Operating System combo are available on the website, simply download and manually install them, and see if that fixes the problem.
Solution 4: Roll back to the Windows 10 build you were previously using
If none of the solutions listed and described above have worked for you, you can simply get rid of the Windows 10 Creators Update and this problem by rolling back to the Windows 10 build that you were previously using. Provided that it hasn’t been 30 days since you installed the Creators Update (at which point the installation files required for the rollback are deleted by your computer), the process should be a quick and simple one. In order to roll back to the Windows 10 build that you were previously using, you need to:
- Open the Start Menu.
- Click on Settings.
- Click on Update & Security.
- Click on Recovery in the left pane.
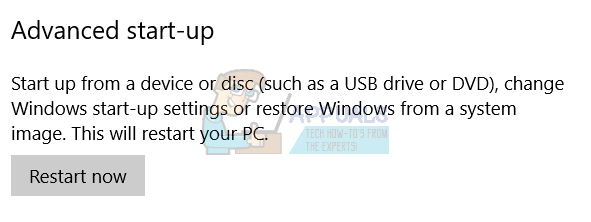
- Click Restart Now under Advanced start-up.
- Go to Troubleshoot and choose the Go Back to Previous Build
Once you have successfully rolled back to an older build of Windows 10, you can just stay on it and delay the Creators Update until Microsoft resolves this problem and any other issues that you may have been facing on the Creators Update.
I cant find brightness reset task
And I am stuck there.
All drivers are up to date.