Fix: White Boxes/Squares on Desktop Shortcuts
Some Windows 7 users may be baffled when they turn their computer on one day only to see that all of the shortcut arrows that are usually located on the bottom left of shortcut icons have been replaced with ugly white boxes. This situation looks like the image below:
Shortcut arrows being replaced by unpleasant white boxes is more common among Windows 7 users than one might think. This problem, in almost all instances, occurs when a user or a program they employ, either intentionally or unintentionally, corrupts or deletes the .ico (icon) file for the shortcut arrow familiar to all Windows users. Fortunately, there exists a highly effective and relatively quick solution for this issue – simply remove the shortcut arrows altogether. Although this removal of shortcut arrows from shortcut icons means no longer being able to distinguish between an actual program and a shortcut to that program, it is deemed worthwhile. Doing so eliminates those aesthetically unappealing white blobs that have replaced your beautiful shortcut arrows.
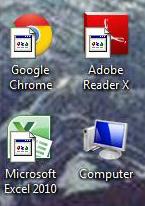
The following are some of the easiest methods you can use to remove shortcut arrows from your computer so that you can get rid of the ugly white boxes with which they have been replaced.
Method 1: Remove the shortcut arrows using Winaero Tweaker
Download Winaero Tweaker by visiting this site, then click on ‘Download Winaero Tweaker’ located above the ‘Donate’ button.
Install Winaero Tweaker. Open Winaero Tweaker and click on Shortcut Arrow under Appearance in the left pane.
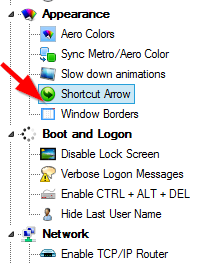
In the right pane, click on the small circle beside the No arrow option, and then click on Change shortcut arrow.
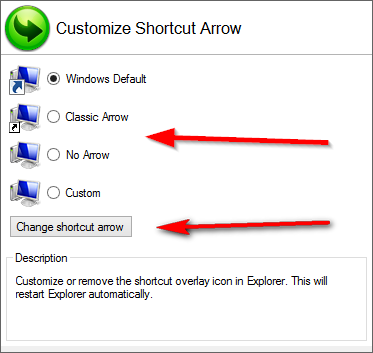
Restart your computer and the ugly white boxes where the shortcut arrow used to be will have disappeared.
It should be noted that Winaero Tweaker can also be used to replace the ugly white boxes with a custom shortcut arrow by clicking on Custom in Step 4 and then specifying the path to the .ico file for the custom shortcut arrows. In order to do so, you will also have to download custom shortcut arrows.
Method 2: Remove the shortcut arrows using the Registry Editor
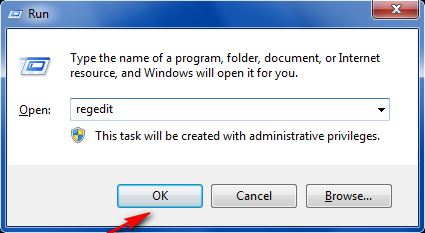
Press the Windows Logo key and the ‘R’ key simultaneously to open the Run dialog box.
In the Run dialog, type regedit and click on OK
In the Registry Editor, navigate to the desired key or folder.
HKEY_LOCAL_MACHINE\SOFTWARE\Microsoft\Windows\CurrentVersion\Explorer\Shell Icons.
If there isn’t a folder named ‘Shell Icons’ under ‘Explorer’, click on ‘Explorer’, then ‘Edit’ in the toolbar. Hover over ‘New’ and click on ‘Key‘. Name the new key ‘Shell Icons’ and press Enter. Now, click on ‘Shell Icons’.

Name the new string value ’29’, and then press ‘Enter’.
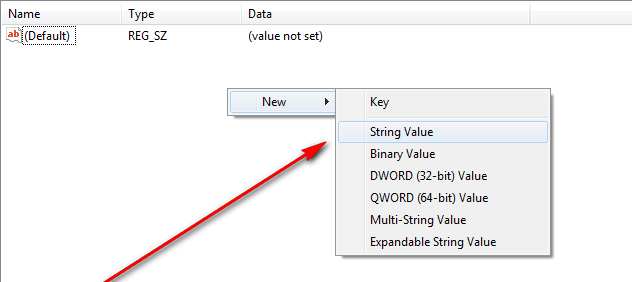
Name the new String Value 29 and press the Enter
Double click on the new String Value named 29 to modify it.
Paste %windir%\System32\shell32.dll,-50 into the Value Data bar and click on OK.
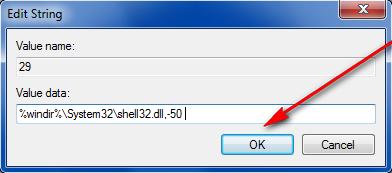
Restart your computer, and once it boots up, those annoying white boxes will have disappeared.
Method 3: Get rid of the shortcut arrows using a .reg file
Using a .reg file is the same thing as Method 2, except this method will save you a lot of time and will also do all the fiddling around with your computer’s registry, something that most people are usually afraid to do.
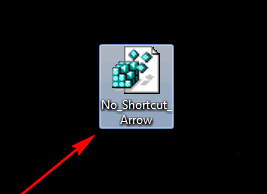
First, download the .reg file that will edit your computer’s registry to disable shortcut arrows altogether by clicking here. Open the .reg file by double-clicking on
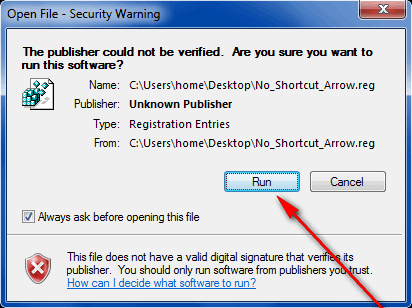
If asked whether or not you really want to run a program from an unverified publisher, click on Run.
When prompted by the Registry Editor, click on Yes.

Once the .reg file is done working its magic, restart your computer and those ugly white boxes will be gone. The .reg file can be deleted once it has served its purpose.
