What is ‘traceroute’ and How to Use It?
Traceroute is a network troubleshooting tool that traces the route of your network packets and presents it on your screen. This is useful in troubleshooting network problems and looking at which intermediate devices are causing the problems.
Basically, when you connect to a website, there are information packets that are sent back and forth between your computer and the server. But, the information packets go through a lot of other devices (a.k.a. hop) during their path towards your computer or the server. So, by using the traceroute tool, you can trace the route that your information packets took which can help your figure out a problem in the network.
This was, of course, just an overview of what the traceroute is, let’s have a detailed look at what happens behind the scenes.
How does Traceroute work?
Whenever you connect to a website, a connection is established between your computer and the server. There are information packets sent back and forth from the two connected devices i.e. your computer and the server. The information packets sent and received during the whole session travels through a route using intermediate devices that are also known as hosts.
Traceroute, in simple words, traces the route of your information packets. So, you can have a look at the entire path that your information packets took to reach their destination. The tracing results will also include the devices (hosts) that were used during the journey of your information packets.
Traceroute actually traces the entire route of your information packets and doesn’t use pings unlike other tracing tools. This is mainly because a lot of servers or devices have blocked the pings for security purposes which makes a lot of tracing tools unreliable. Since Traceroute doesn’t use the traditional pinging technique, it will be able to trace the entire path with each hop to help you see as much as possible. You will be able to see all the information about the hopes including the provider’s information, IP Addresses, Hostname, Latency and lots more.
Why would you use Traceroute?
If you are having a network problem like slow internet and you want to troubleshoot the problem then Traceroute is a perfect tool for you. You can use Traceroute to trace the packets and see all the hops and the entire path. With all the information that the Traceroute will provide, you will be able to see which host from the route is causing trouble or where your packet is getting lost. You will also be able to determine whether the problem is in the network or a host and, if it is in a host, which host is causing the problem. In short, Traceroute will help your figure out where exactly the problem is or which device is causing the problem. Using Traceroute not only saves time but a lot of effort as well. This is mainly because all you have to do is enter the IP Address of the targeted server (usually the end of your packet’s journey) and see the results.
You can then analyze the results without doing any manual work. You can easily solve the problem once you have determined what is causing the issue.
How to use Traceroute?
Using Traceroute is very simple. You can use Traceroute by following the steps given below
- Download the Traceroute and install the program.
- Open the Traceroute once it is installed
- Enter the IP Address or the Hostname of the end device e.g. networked server and click Trace

- Wait a while for the Traceroute to work
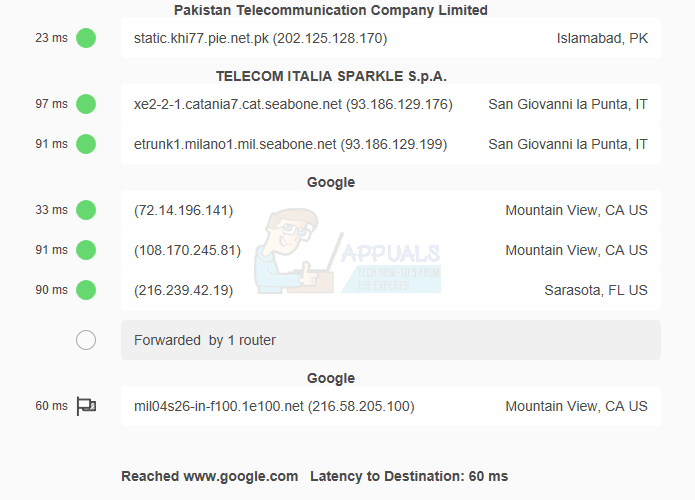
The Traceroute will trace your packets and show you the route your packets took including the details about hops, devices, latency, IP Addresses and hostnames.
Traceroute from Windows: TRACERT
Windows Operating System also comes with its own traceroute utility that can be used for the same purpose as the above given traceroute tool i.e. to trace your packets and get the information about your packet’s trip. This utility is known as the TRACERT (short for TraceRoute).
Now, you must be wondering, if we already have a built-in Windows tool that does the same thing as the third party tool we mentioned above, why aren’t we using it? Well, firstly, the Windows traceroute utility isn’t a very user friendly tool. The tool is used from the Command Prompt and you will have to enter a few commands to perform the tracing of your packets. The results will also be mentioned within the Command Prompt. This means that it isn’t a user friendly way of tracing routes and would need a little bit of technical knowledge. Another thing to keep in mind is that the built-in route tracing in Windows uses the ping system which, as mentioned above, isn’t as reliable.
But, if you are interested in using the traceroute of Windows, the steps for using the traceroute are given below for anyone who wants to use it.
Note: The tool is available on all Windows versions.
- Press Windows key once
- Type command prompt in the Start Search box
- Right click the Command Prompt from the search results and select run as administrator
- Now, type tracert 192.168.1.1 and press Enter. What this command does is that it will send the packet to the IP address 192.168.1.1 and trace the devices/hops your packets went through. The hops will be shown on the Command Prompt in the order they were reached i.e. the hop at the first line will be the closest to your machine so the packet reached it the first. The IP addresses at the end of each line are of the network device that your packet reached (there might be a host name mentioned at the end as well). Note: You can enter both IP Addresses and hostnames with the tracert.
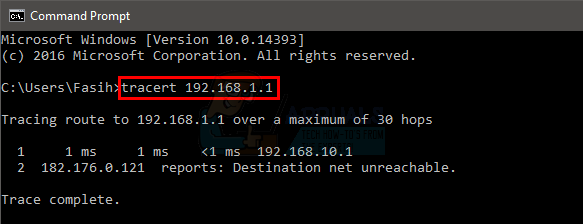
- You will be able to see the hops until your packets reaches the destination or the hop limit is exceeded which is, by default, a maximum of 30 hops.
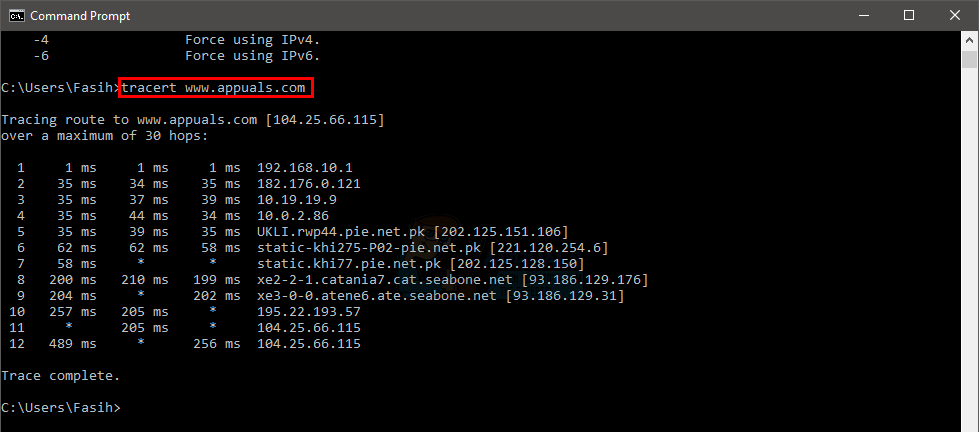
- You can try with the hostname as well. This is actually more useful since we aren’t in a habit of memorizing the IP Addresses. Type tracert www.appuals.com and press Enter
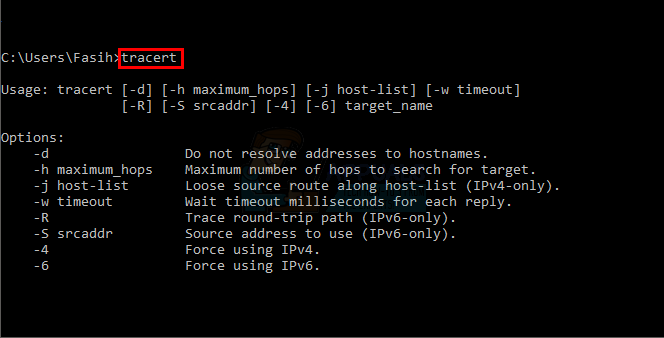
You can change the paramaters of tracert as well. The general command syntax of the tracert is
tracert [-d] [-h maximum_hops] [-w timeout] [-4] [-6] target_name
target_name: target_name is the targeted IP Address or Hostname. This is the destination that you want your packet to reach. In other words, the end of the path that you want to trace. This is the only thing that is necessary for your tracert to work. Other parameters are optional and Windows will use default values for these if not specified.
That’s what we were doing while using the tracert. We were only mentioning an IP Address or a hostname.
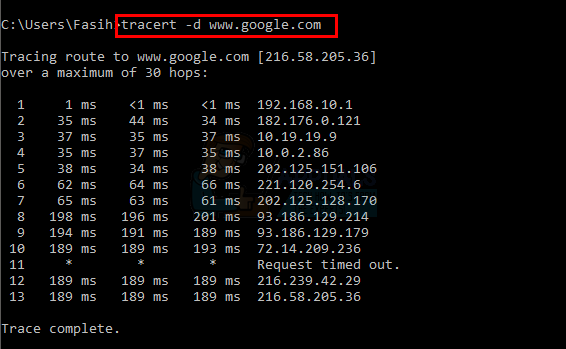
-d: If you write a –d before your target_name, the hostnames won’t be resolved. Meaning, only the IP addresses of the hops will be shown without their hostnames. Use this parameter if you aren’t interested in the hostnames of the hops.
-h maximum_hops: This is to control the maximum number of hops to search for target. By default, your utility will stop on 30 hops but you can change that number. Type –h “number of maximum hops” before the target_name to adjust the maximum number of hops allowed.
-w timeout: This is to set the wait timeout milliseconds for each reply. This option is available for anyone who wants to set the timeout (in milliseconds) for each reply.
-4: This is to force the usage of IPv4.
-6: This is to force the usage of IPv6.
Note: You can actually type tracert and press Enter to see the list of parameters and what they control.
There are other commands that you can use as well but the above mentioned are the common ones.