What is Microsoft Virtual WiFi Miniport Adapter and How to Set it up?
Windows 7 introduced a plethora of features and functionalities to the world of Windows, with the Microsoft Virtual WiFi Mini Port Adapter being among the least known yet highly useful ones. The Virtual WiFi Adapter is designed to essentially virtualize the physical network adapter present in every computer. This means that, by using the Microsoft Virtual WiFi Mini Port Adapter, one can transform their computer’s physical network adapter into two virtual network adapters.
One of the two virtual network adapters can be used to connect to the regular wireless network, while the other can be used to connect to another network, such as an ad-hoc, or transformed into a WiFi hotspot that users of other networks can connect to. Most people do not know exactly how to turn a virtual network adapter into a Wireless Access Point, so that their computers can be used as a WiFi hotspot. Well, there are two methods that can be used to easily turn the Microsoft Virtual WiFi Mini Port Adapter into a Wireless Access Point for others to connect to.
However, before the Microsoft Virtual WiFi Mini Port Adapter can be turned into a Wireless Access Point using any method, the computer’s main network adapter needs to be allowed to share its internet connection with devices that connect to it through the virtual one. To do so, you will need to go to the Network and Sharing Center, click on Change Adapter Settings, navigate to the Sharing tab, and check the box beside the ‘Allow other network users to connect through this computer’s internet connection’ option.
Method 1: Set Up a Wireless Access Point Using a Command Prompt.
1. Open the Start menu.
2. Type ‘cmd‘ in the search field and press the Enter key.
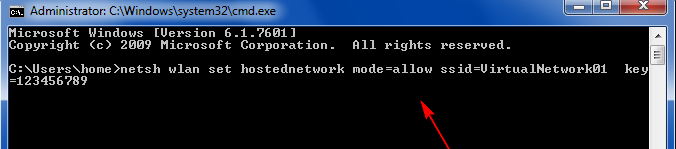
3. In the window that appears, type ‘netsh wlan set hostednetwork mode=allow ssid=VirtualNetworkName key=Password,’ replacing ‘VirtualNetworkName’ with the desired name of the Access Point, and ‘Password’ with the desired password for the Access Point.
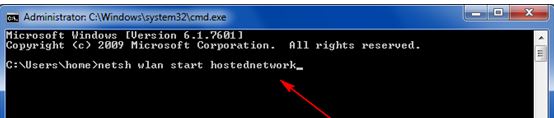
4. Next, type ‘netsh wlan start hostednetwork‘ into the Command Prompt and press Enter. This will enable the Wireless Access Point, which will then become visible in other users’ lists of wireless networks.
5. To see details related to the Wireless Access Point at any time, type ‘netsh wlan show hostednetwork‘ into an open Command Prompt.
