What is HP_Tools Drive and How to Fix It When Full?
Hewlett Packard (HP) makes very reliable computers and is well known for this fact. Along with their windows operating system, HP usually deploys several user utility software to help their consumers run their computer smoothly. One such utility is the HP Tools. On several occasion, HP users get a message on their computer that the HP_Tools drive is full. This message becomes a nuisance when it keeps on appearing every minute. It gets even more frustrating when they cannot locate the HP_Tools drive mentioned.
This article is bent on explaining why your HP_Tools is full, and how you can free up the space to stop the ‘drive full’ message.
Why is your HP Tools partition is full?
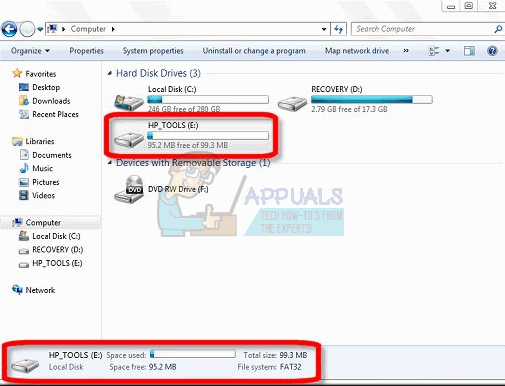
The HP_Tools drive is created by the system when the HP Tools utility is installed on your HP computer. This drive usually has the drive letter (E:). The partition houses your computer’s diagnostic tools. These tools are used to check for failing hard disks, memory etc., which are usually accesses by pressing F11 during booting. The partition is around 100MB and only 20MB is used to store the utilities.
By design, the HP_Tools drive should always be less than a quarter or half full at the worst case. So what would drive it to a fully occupied state? The issue is always related to data that is not meant for that drive. Here are a few causes that might be filling the HP tools partition in your case.
- You have saved personal data into the HP tools partition: – If you store your personal data into this partition, then sooner or later, the partition is going to fill up. This means that the ‘HP_Tools drive is full’ error will appear whenever the HP Tools utility tries to save data into this partition.
- Windows Recovery or the Backup and Restore utility is storing data into the HP tools partitions: – This is the most likely cause for the message. The HP tools utility is not to be confused with ‘Windows Recovery’ that creates data based on a restoration point in your PC. Another Windows system utility that stores data is the ‘Back up and Restore’ feature; which uses enormous amounts of space. A likely case is that these two utilities, or either of them, are saving data into the HP_Tools drive. Backup utilities never back up to drive C and, in the case of an HP computer, they will glide beyond D which is the DVD drive and land on E, the Tools partition. Your computer might run out of space when trying to automatically save this data to the HP Tools partition via the Recovery, Back up and Restore, or the HP tools utility. You will therefore get the message that your disk is full.
Having pointed out the possible causes of the error, here are the solutions to your problem.
Method 1: Stop windows from storing back up data and remove already backed up and personal data from the HP_Tools partition
Step 1: Stop windows back up
This will prevent windows from saving the backup files to the HP_Tools partition in the future.
- Press Windows/Start Key + R to open the run window
- Type ‘sdclt’ in the run box and hit enter to open the Back Up and Restore Window. If the backup location is set as (E:), then windows is probably storing data to your HP_Tools drive.
- To disable the system automatic back up, click on “Turn off schedule” on the left panel of the window.
- To change the folder in which windows backs up:
- Click on Change Settings under the backup options.
- Wait for windows backup to start, then select the location/partition for your back up (not the HP_Tools drive) by clicking on it, and press “Next”.
- Choose what you want to back up, or let windows do it for you, and click next.
- Finally, click on ‘Save settings and run backup’ to save your changes.
Step 2: Delete personal data and already backed up data
This will clear the already used up space on your drive
- Open the HP_Tool (E:) partition from ‘My Computer.’ If you cannot see this partition, type ‘E:’ on the file path address bar and hit enter.
- Delete the backup file bearing your user name eg, USERNAME-HP or YOURNAME-HP. Delete the file named ‘MediaID.’ These files are the backup data.
- Move everything else except for the folder named Hewlett-Packard and the files HP_WSD.dat and HPSF_Rep. Everything else is probably personal data, so move it from this folder into another folder.
If you really need to make a back-up of your computer, it is advisable to save the data into an external disk, or a partition/drive that is not in the same drive as the one your operating system is. This will make the back up more secure in case your primary hard disk fails.
thank you!!