Fix: Webcam Error Code 0xA00F4271 (0x80070001) on Windows 10
This era of our society has made it possible for us to stay in touch with our loved ones if you want to be able to hear and see them. Video calls and conversations even made their breakthrough in the business world and, nowadays, plenty of meetings are being held over the wire using some of the best video call apps such as Skype, Viber Video Call, and Messenger. That is why webcams are so important for some people and losing access to it can mean the world to them. Let’s learn just how to fix this particular webcam issue!
Webcam Error Code 0xA00F4271 (0x80070001)
This particular error appears randomly and it can disrupt your video call because of the fact that your webcam will sometimes work and sometimes it will display this error message. Users thought that issue was related to a specific app but they realized that the same issue occurs no matter what software you use.
First of all, this error code is related to your laptop’s built-in camera and it won’t appear if you are using an external webcam. Apart from that, this issue usually strikes people who use Windows 10, especially after the Creators Update. Find out how to fix it by following the solutions from below!
Solution 1: Troubleshoot Windows Store Apps
Built-in Windows devices and apps are somewhat more difficult to troubleshoot because sometimes your system depends on them. Issues with your internal webcam may be linked to your Camera app or any of the Windows Store apps, especially if this error appears while you are using apps from the Store such as Skype, Viber, etc. The troubleshooter is quite easy to get started.
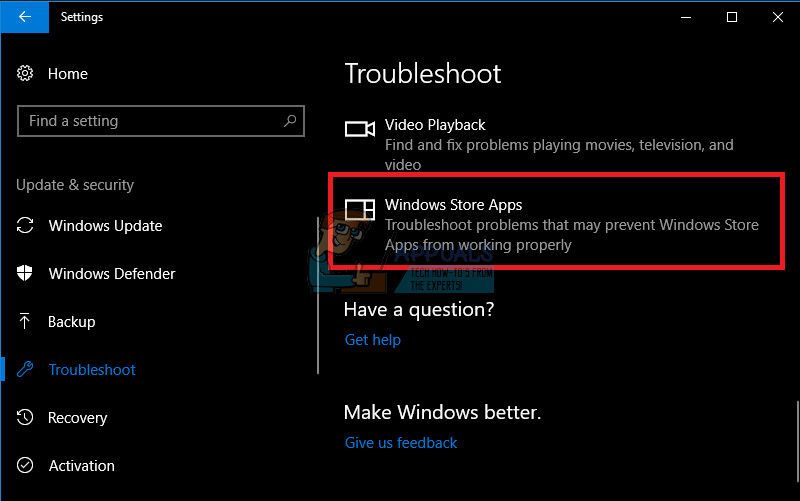
- Open the Settings app by clicking on the Windows logo located at the bottom left part of your screen and click on the gear icon just above the power button.
- Locate the Update & security section and open it.
- Navigate to the Troubleshoot submenu and scroll to the bottom of the list of available troubleshooters.
- Click on Windows Store Apps at the bottom of the list and follow the instructions on screen.
- Restart your computer and check to see if the issue is fixed.
Solution 2: Download New Drivers for Your Webcam
Generally, issues start appearing with any of your devices as soon as its drivers get too old. New computers with new apps will require that you use contemporary drivers because the old ones are simply not able to support your device in order to run a freshly updated app. Renewing these drivers is quite easy so let’s get going.
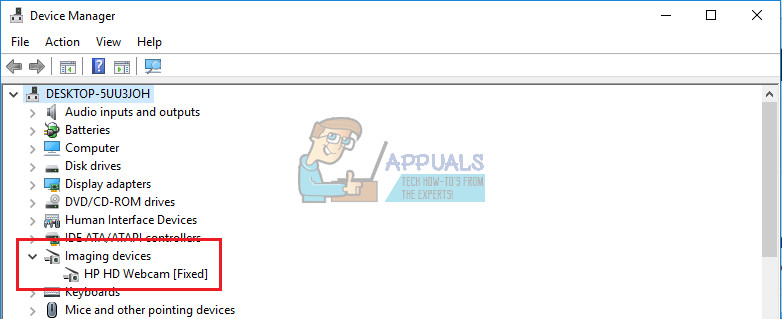
- Type “Device Manager” in the Search bar located in your Start Menu and open it.
- Locate the Imaging devices section and expand the list by clicking on the arrow button left to it.
- Locate the name of your webcam. It usually has your PC manufacturer’s name somewhere in its name.
- Right-click on it and select the “Uninstall device” option in order to get rid of your outdated driver.
- Your webcam will remain disabled so you won’t be able to use it at all before updating your driver.
- Navigate to your PC’s manufacturer website and try to locate the drivers for your webcam. It should be easy to handle.
- Download the driver from the website and choose where you want to save it to.
- Locate the file you just downloaded and double-click on it in order to open it.
- Follow the instructions on screen in order to install a fresh version of your webcam’s driver.
- Restart your computer in order to apply these changes and check to see if the issue still appears.
Solution 3: Update Windows 10 to the Latest Version
Some users claim that they needed to update Windows to the latest version before they were able to use their webcam properly. This may have something to do with the fact they their Windows Update process was somehow interrupted and some of the system files regarding your webcam may have been changed in the process.
- Windows 10 automatically updates your PC by default but if there are some errors regarding it, you can update Windows manually.
- Open the Settings app by clicking on the gear icon in your Start menu and navigate to the Update & security section.
- Navigate to the Windows Update submenu and click on the blue Update history button.
- Locate the latest update installed to your PC and copy the KB (Knowledge Base) number which is usually located in the brackets after the name of the update.
- If the update was not installed successfully, you should be able to see something regarding that in the Update history section.
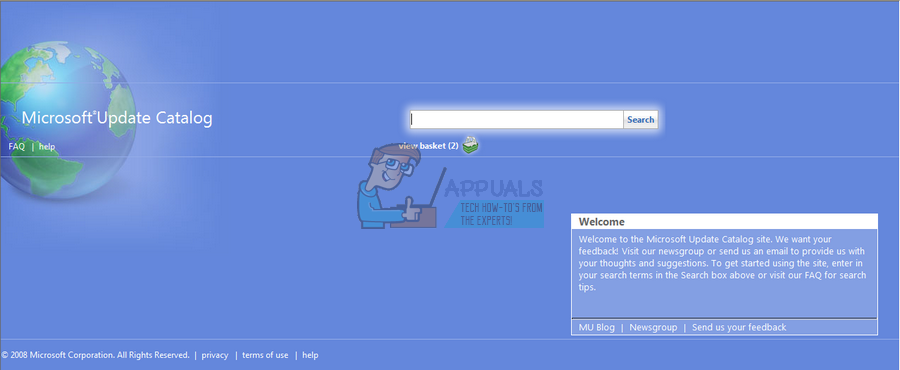
- Navigate to the Microsoft Update Catalog by clicking on this link.
- Paste the KB number you just copied in the search box located at the top right part of the page and click Enter.
- Locate the update that failed to install and click on download next to the name and date.
- Double-click on the file you just downloaded and follow the instructions on screen in order to install the update easily.
- Restart your computer and check to see if your webcam is working again.
Solution 3: Hardware Troubleshooting
In one of the previous steps we described the process needed to troubleshoot your Windows Store Apps in order to see if there is something wrong with them that might be causing the problem. However, it’s quite possible that it’s your hardware to blame for this one so make sure you troubleshoot it as well.
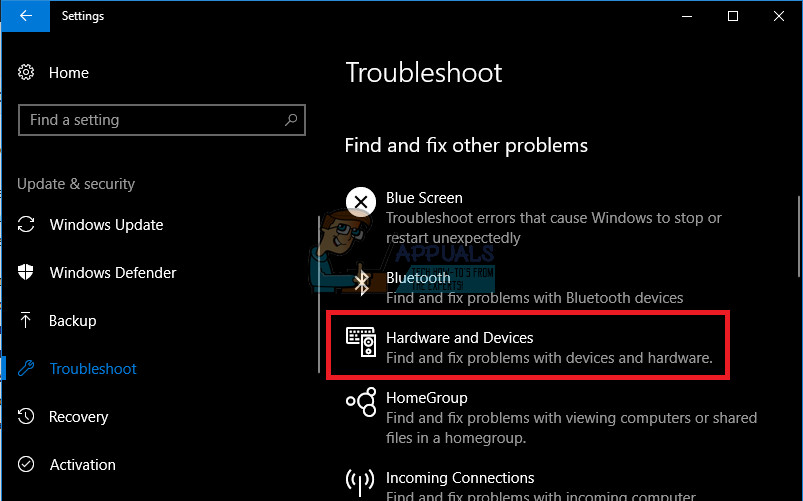
- Open the Settings app by clicking on the Windows logo located at the bottom left part of your screen and click on the gear icon just above the power button.
- Locate the Update & security section and open it.
- Navigate to the Troubleshoot submenu and scroll to the bottom of the list of available troubleshooters.
- Click on Hardware and Devices which should be located under the “Find and fix other problems” section at the third spot and follow the instructions on screen.
- Restart your computer and check to see if the issue is fixed.
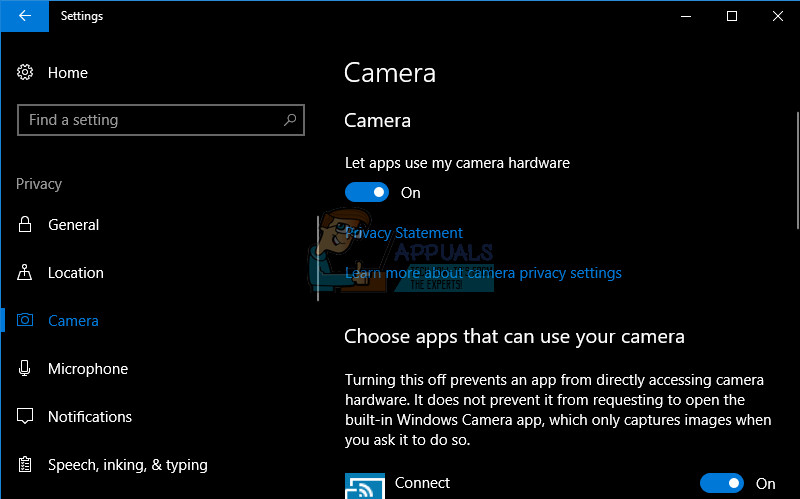
Solution 4: Fix Your Camera’s Privacy Settings
If your apps are not allowed to use your webcam, you won’t be able to use any of them as Windows has implemented new security features along their camera apps which won’t allow apps to use them on their own in order to prevent hackers from accessing it and turning it off an on.
- Open Settings by clicking on the gear icon above the power button in your Start menu.
- Open the Privacy section of the Settings app and navigate to the Camera submenu.
- Under the “Let apps use my camera hardware”, make sure the slider is set to On.
- Under the “Choose apps that can use your camera”, make sure the slider is set to On under your video call apps.
- Restart your computer and check to see if the issue is solved.
Solution 5: A Simple Registry Hotfix
When dealing with your Windows registry, it’s important to stay aware of the fact that any deviation from the instructions you were served can cause unpredictable and irreversible damage to your computer. All of your computer’s low-level settings are located in this database and you can pretty much access any aspect of your computer with it.
Before you start dealing with this issue, it’s advisable to backup changes to your registry just in case something unpredictable happens.
- Open the Registry Editor by searching for it in the Search box located in the Start menu or by using the Ctrl + R key combination in order to bring up the Run dialog box where you need to type “regedit”.
- Click on the File menu located at the top left part of the window and select the Export option.
- Choose where you want to save the changes to your registry.
- In case you cause some damage to the registry by editing it, simply open Registry Editor again, click File >> Import and locate the .reg file you exported beforehand.
- Alternatively, if you fail to Import the changes made to the registry, you can restore your system to a previous working state by using System Restore. Learn how to configure System Restore and how to use it by checking out our article on this topic via this link.
Now that we have successfully backed up our registry, let’s start with the solution:
- Open the Registry Editor by following the instructions above in Step 1.
- Navigate to the following location in your registry by expanding the menus located at the left side of the window.
HKEY_LOCAL_MACHINE\SOFTWARE\WOW6432Node\Microsoft\Windows Media Foundation
- In this particular location, right-click on the Windows Media Foundation folder and select New >> DWORD (32-bit) Value.
- Name this registry key as EnableFrameServerMode and click ok.
- Double-click on this new value and type 0 under the Value data setting and click OK.
- Restart your computer and check to see if the issue is fixed.