Fix: “Verizon Provisioning Error” on Android/iPhone?
The “Verizon provisioning error” mainly occurs due to issues with your phone. These issues range from corrupt network settings to the corrupt OS of the phone. The error occurs when you try to activate a new phone on Verizon or do not receive messages on the phone.
In some cases, the error only occurs on a particular Verizon application like Messages+ or One Talk. There are some reports of a Verizon provisioning error when playing online videos through the Verizon cellular data (especially, on streaming services like Netflix).
There may be many reasons for which you may encounter a Provisioning error on Verizon but the following can be considered as the root ones:
- Incompatible Messages+ App: If you are encountering the provisioning error on the Verizon Messages+ app, then the incompatibility of the app (either because it is outdated or due to a conflicting app update) with your device’s OS could result in the error at hand.
- Incompatible Features of the Cellular Data Options: You may also encounter the provisioning error on Verizon if the features of the cellular data options of your phone are not configured properly and this improper configuration is not letting the phone properly communicate with Verizon.
- Corrupt Network Settings of the Phone: The Verizon provisioning error might occur if the network settings of your phone are corrupt and due to this corruption, the Verizon network is failing to authenticate the device.
- Corrupt Firmware of the Phone: If the firmware of your phone is corrupt, then that could cause a provisioning error on Verizon as the essential communication modules of the phone are failing to perform the tasks required by Verizon, hence the provisioning error.
1. Restart Your Phone and Reinsert the SIM Card
A temporary glitch in your phone may cause the provisioning error on Verizon. Here, restarting your phone and reinserting your SIM card may clear the issue.
- Power off your phone and remove its SIM card.
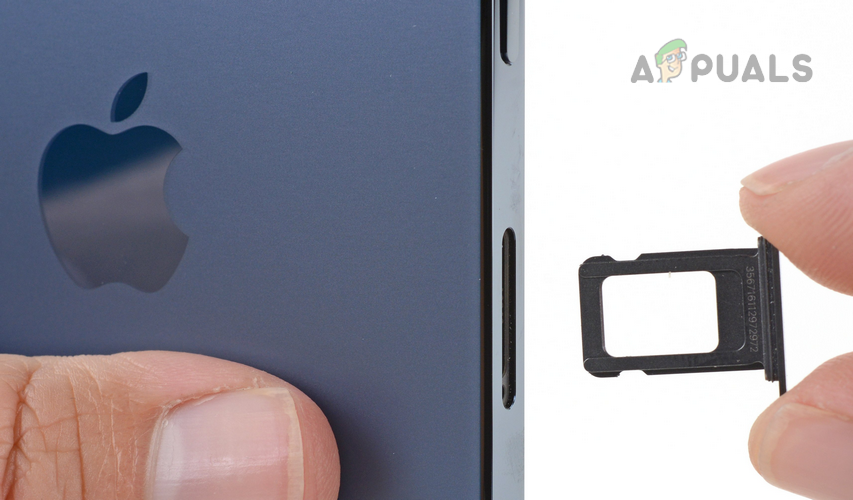
Remove SIM Card from iPhone - Now power on your phone and wait till it is properly powered on.
- Then wait for a minute, power off your phone, and reinsert the SIM card. Make sure the SIM is properly seated.
- Now power on your phone and then check if your phone is clear of the Verizon provisioning error.
- If not and the issue is occurring on an iPhone, press/release the volume up button of your iPhone.
- Then quickly press/release the iPhone’s volume down button and press/hold the power or side button of your iPhone.
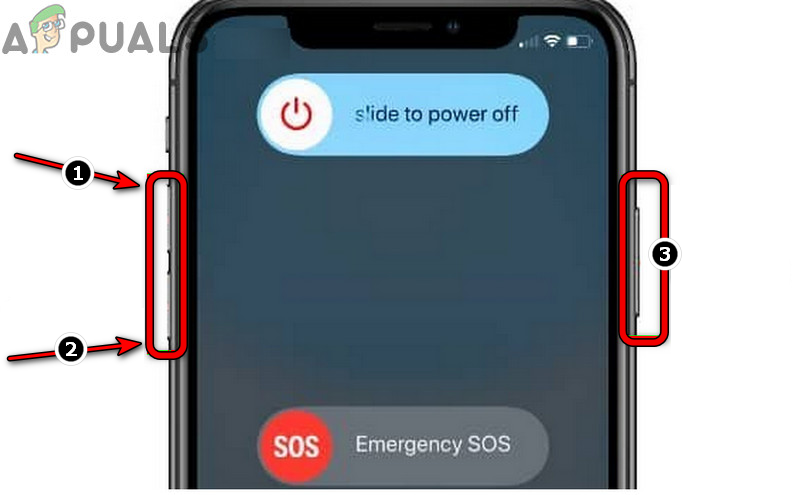
Force Restart the iPhone - Now keep the hold of the power button till the Apple logo is shown on the screen (do not release the button when the phone’s power menu is shown) and then release the power button.
- Once the iPhone is properly powered on, check if its provisioning error on Verizon is cleared.
- If that did not work, check if inserting a new 4G Verizon SIM (if the issue is occurring with a 5G SIM) clears the error.
2. Disable/Enable Features of the Cellular Data Options
If any of your phone’s cellular data options are not properly configured or corrupt, then that could result in the provisioning error on Verizon. In such a case, disabling and enabling features of the cellular data options may clear the error at hand. For elucidation, we will go through the process of disabling/enabling features of the cellular data options for an iPhone.
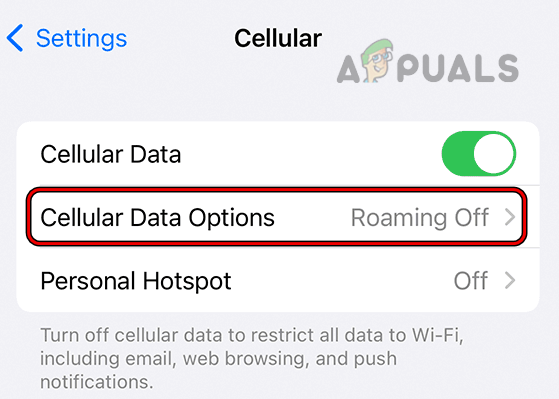
- Go to your iPhone Settings and open Cellular.
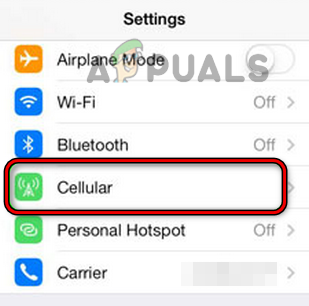
Open Cellular Settings of Your iPhone - Now select Cellular Data Options and disable the following features shown there. Some of these features may not be shown on some models of iPhones.
Reduce cellular usage

Turn Data Roaming on or off

Turn Voice Roaming on or off

Enable or disable 4G/LTE

Enable Smart Data mode to optimize battery life

Use higher-quality video and FaceTime HD on 5G networks
Open Cellular Data Options in the iPhone Settings - Then restart your iPhone and upon restart, enable the above features one by one and after each, check if that resolves the issue.
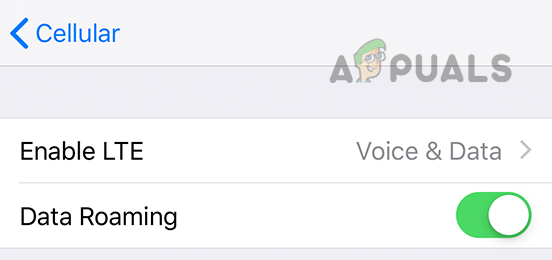
Disable Features in the Cellular Data Options
3. Try Another Wi-Fi Network
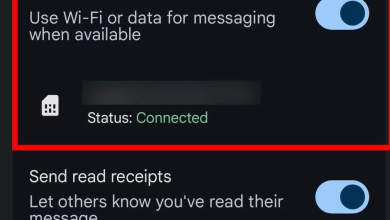
If you are a user of the Verizon One Talk and it is showing you a provisioning error on a Wi-Fi network, then restrictions by your ISP could be the root cause of the issue. In such a case, trying another Wi-Fi network may clear the Verizon error.
- Disconnect your phone from the current Wi-Fi network and connect to another Wi-Fi network.
- Now launch Verizon One Talk and check if it is clear of the provisioning error.
4. Remove Extra Devices from Messages+
If you have exceeded the limit (currently 5) of the devices that can connect to your Verizon Messages+ account, then that could cause a provisioning error on the Messages+ app. Here, removing the extra devices from your account may clear the Verizon error under discussion.
- Launch a web browser and head to the Verizon website.
- Now open My Verizon and select My Devices.
- Then open Manage Connected Devices and click on Manage Message+ Devices.

Disconnect the Message+ Devices on the Verizon Portal - Now delete or disconnect the extra devices shown there. Sometimes, a device may be shown multiple times if the Messages+ app was reinstalled on it.
- Then check if the Messages+ app on the problematic device is clear of the provisioning error.
5. Remove the Updates of the Messages+ App
If the latest updates of the Messages+ app are not compatible with your device, then that could also result in the error. Here, removing the updates of the Messages+ app may solve the problem. For illustration, we will go through the process of uninstalling updates of the Android version of the Messages+ app.
- Go to the Android phone Settings and select Application Manager or Apps.
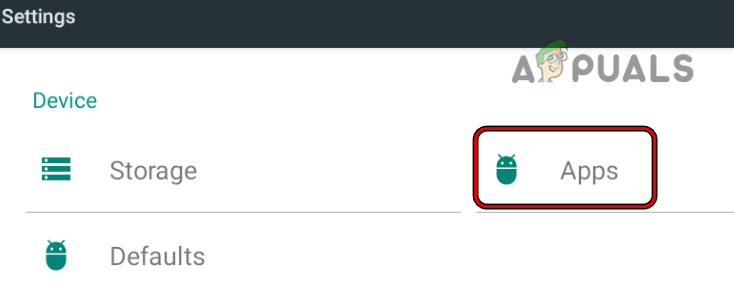
Open Apps in the Android Phone Settings - Now open Messages+ and tap on the three vertical ellipses.

Open Message+ in the Android Apps - Then select Uninstall Updates and afterward, confirm to remove the updates of the Messages+ app.
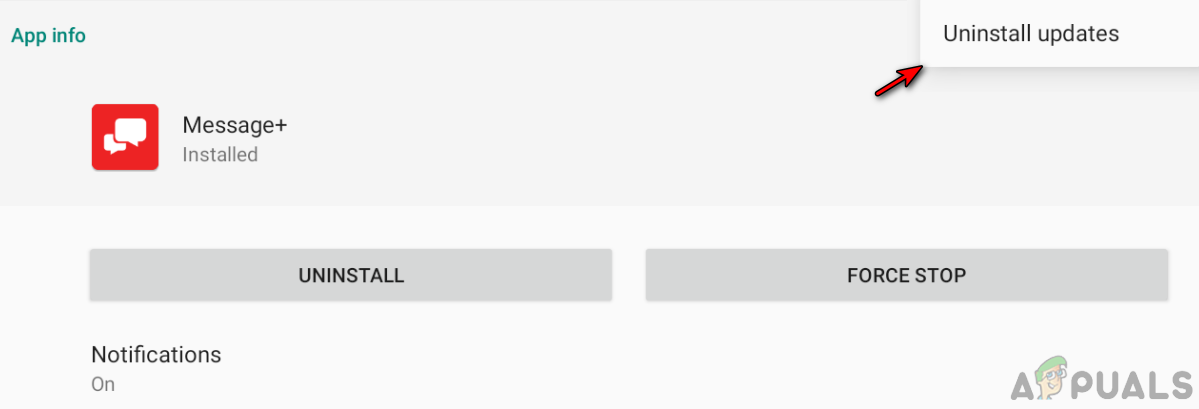
Uninstall Updates of the Message Plus App - Now restart your phone and upon restart, launch the Messages+ app and check if its provisioning error is cleared.
6. Update the Messages+ App to the Latest Build
If you are encountering the Verizon provisioning error only on the Messages+ app, then that could be a result of an outdated Messages+ app and due to this, the app is no more compatible with the device OS.
In such a case, updating the Messages+ app to the latest build may resolve the issue. For illustration, we will discuss the process of updating the Messages+ app on an Android phone.
- Launch the Google Play Store and search for the Messages+ app.
- Now check if an update of the Messages+ app is available and if an update is available, tap on Update.
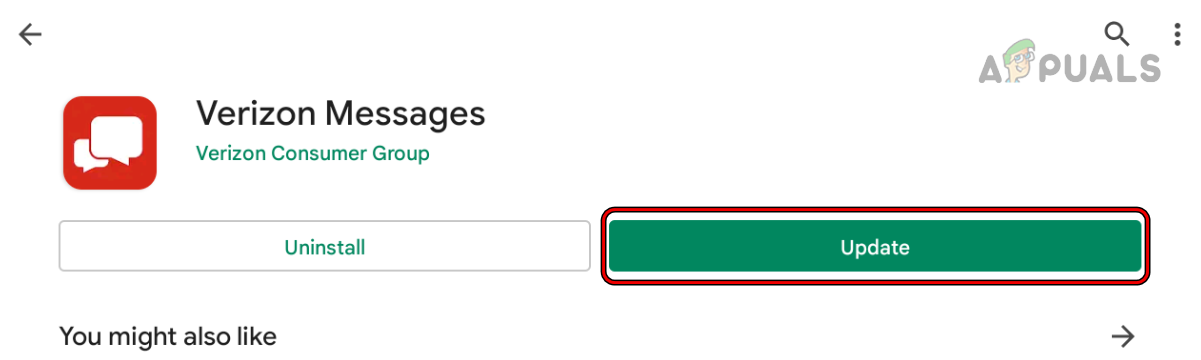
Update Verizon Messages or Message+ App to the Latest Build - Then wait till the app updates and afterward, tap on the Open button.
- Once the Messages+ app is opened, check if it is clear of the provisioning error.
7. Enable CDMA-Less Provisioning on the Verizon Website
If your phone does not have a CDMA radio (like a Pixel 5A or Pixel 6), then you may fail to receive SMS on your phone on Verizon and you may activate your phone as a CDMA-less device on the Verizon website. The general guidelines are as under for an E-SIM mobile:
- Go to your phone’s Settings and open About Phone or General>> About Phone.
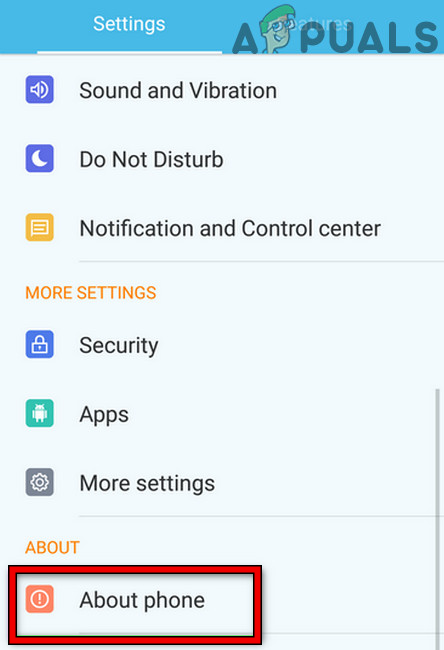
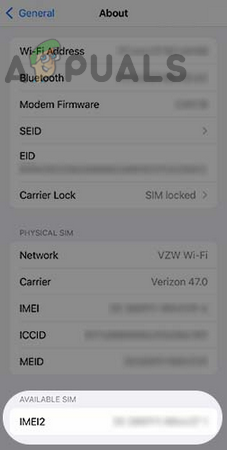
Tap on About Phone in Settings - Now under Available SIMs, note down the IMEI2 number (the E-SIM IMEI).
Note Down IMEI2 in the About Phone - Then hit the Home button, open Messages (like Google Messages), and tap on its More Options.
- Now select Settings and open Chat Features.

Disable Chat Features in the Messages Settings - Then disable Chat Features by toggling the status switch of Enable Chat Features to off.
- Afterward, launch a web browser (preferably, on a PC) and head to the Verizon website.
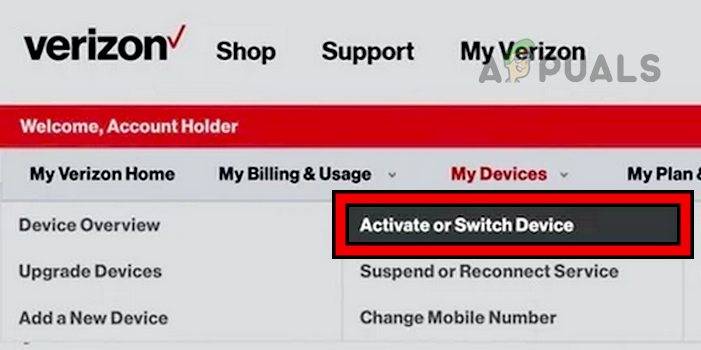
- Now head to Account and open My Devices.
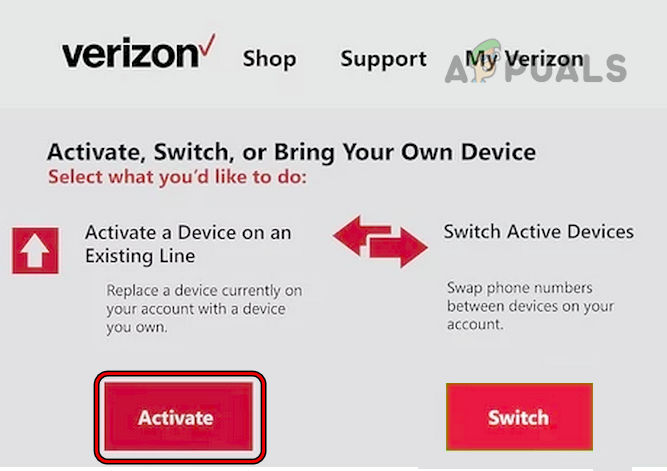
- Then select Activate or Switch Device and click on Activate on An Existing Line.
Open Activate or Switch Device in the Verizon Portal - Now select the line you want to activate and type the IMEI2 (noted earlier).
Activate a Device on an Existing Line on Verizon - Then follow the prompts on the screen to complete the activation process.
- Now switch off your old device and power on your new phone (if already powered on, restart it).
- Then connect the phone to Wi-Fi and activate the Verizon E-SIM.
- Now check your E-Mail to find the QR code to activate the Verizon E-SIM. If no E-Mail is received, you may scan the QR code shared on Reddit.
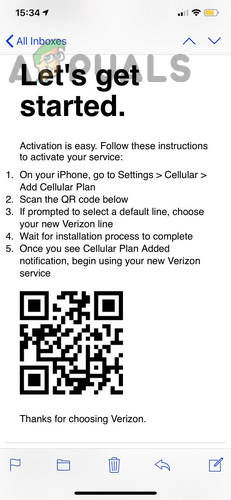
Scan the QR Code on Verizon - Then restart your phone and upon restart, check if the provisioning error on Verizon is cleared.
8. Reset the Network Settings or Phone to the Factory Defaults
You might also encounter the provisioning error on Verizon if the network settings of your phone or the phone’s OS are corrupt or incompatible. In this scenario, resetting the network settings or phone to the factory defaults may clear the error at hand. Before moving on, back up your data on the phone or note down the network settings (like APN) required later. For illustration, we will discuss the process for an iPhone.
- Open the Settings of your iPhone and select General.
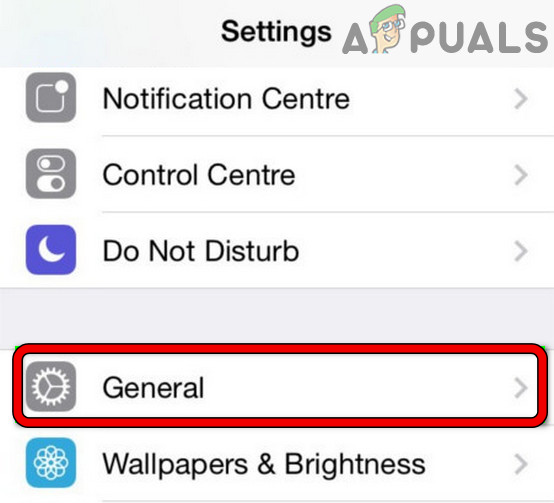
Open General Settings of iPhone - Now open Reset and tap on the Reset Network Settings option.
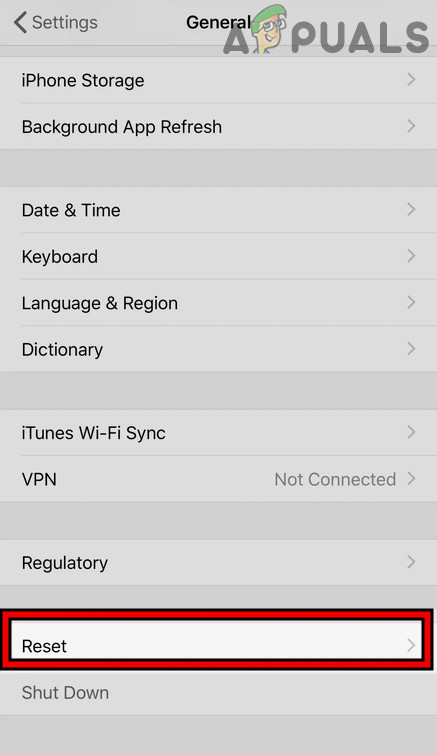
Open Reset in General Settings of Your iPhone - Then confirm to reset the phone’s network settings and afterward, restart your phone.

Tap on Reset Network Settings in iPhone - Upon restart, set up the network (like APN) on your iPhone and then check if the Verizon provisioning error is cleared.
- If not, make sure the phone is fully charged and connected to a Wi-Fi network.
- Then head to Reset in the General Settings of your iPhone and tap on Erase All Contents and Settings.
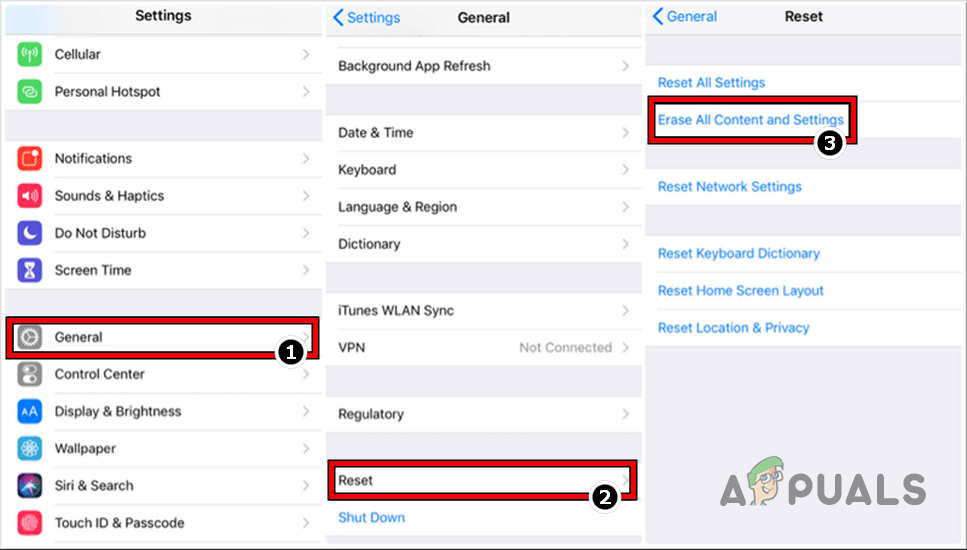
Reset iPhone to the Factory Defaults - Now confirm to reset your iPhone and wait till the process completes.
- Once done, re-setup your iPhone as a new device and hopefully, it will be clear of the provisioning error on Verizon.
If that fails, then you may flash your phone (if unlocked from another provider) with the Verizon firmware to resolve the provisioning error. If that is not an option or did not work, you may contact Verizon support and ask them to make your line CDMA-less (if your phone does not have a CDMA radio).