How to Use the Print Screen Feature
While most people use third-party services and applications to take screenshots on their computers, the screenshot functionality is readily available on the Windows Operating System from the get-go. People who use third-party services and applications to take screenshots on their computers do so because the process of taking screenshots through these programs and services is a bit more streamlined, optimized and convenient. However, the basic screenshot functionality has existed on the Windows Operating System ever since the now ancient times of Windows XP. Windows’s screenshot functionality has also only gotten better with time, reaching an entirely new level of user convenience on Windows 8, 8.1 and 10.
The key (quite literally) to Windows’ screenshot functionality is the Print Screen button on your keyboard. Every keyboard, be it a keyboard for desktop computers or a laptop’s in-built keyboard, has a Print Screen button. If you do not know what the Print Screen key does, when pressed, it simply commands Windows to capture every single thing that is on your screen (bar your mouse cursor) at the exact moment you press the key. This, in turn, allows you to create a screenshot containing everything that was on your screen. The Print Screen feature works pretty much the same way on all versions of the Windows Operating System currently supported by Microsoft. To use the Print Screen feature to create a screenshot, you need to:
- Make sure whatever window or object you want to create a screenshot of is on your screen. Everything on your computer screen at the moment you take the screenshot will be included in the final image, except, of course, for your mouse cursor. That being the case, make sure no personal data or sensitive information is on your screen unless you actually want it to be included in the screenshot.
- Locate the Print Screen button on your keyboard. On most keyboard layouts, the Print Screen button is located to the far right of the row of Function keys (F1–F12), and the button often has SysRq written on it under Print Screen.
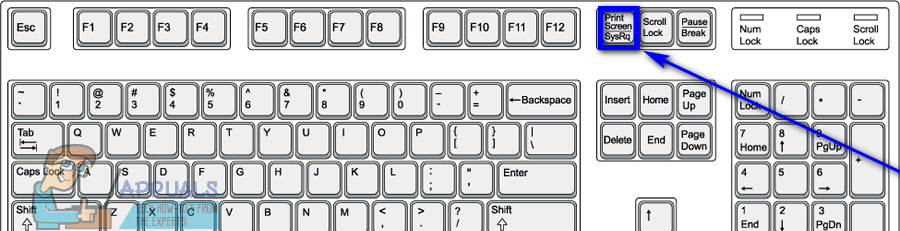
- Press the Print Screen button. Pressing the Print Screen button will get Windows to immediately capture a screenshot of everything on your screen. Alternatively, you can press Alt + Print Screen to have Windows only create a screenshot of the selected window on your screen, or (only on Windows 8, 8.1 and 10) the Windows Logo key + Print Screen to have Windows automatically capture everything on the screen, turn the screenshot into an image file and save it to the Screenshots sub-folder within the Pictures folder.
- Unless you’re using Windows 8, 8.1 or 10 and pressed the Windows Logo key + Print Screen, pressing the Print Screen button will only have Windows take a screenshot of whatever’s on your screen, not also turn the screenshot into an image file. The screenshot Windows takes is then copied to your clipboard, from where you can paste it wherever you want by pressing Ctrl + V. For example, you can paste the screenshot into a Word file to add it to a document, into an image processing program such as Paint to edit it and then save it as an image file, into an email to add it as an attachment or in a text box on a social network to make it a a part of your social media post.