How to Fix Touch Gestures Not Working in Windows 11?
If you’re having issues utilizing the Windows 11 touchpad gestures on your laptop, you are not the only one. Microsoft’s long and painful history of iterating on touchpad gestures often had the unintended consequence of producing more user confusion and even introducing new bugs and glitches.
This Windows 11-specific issue is most likely caused by the fact that the entire touchpad functionality is disabled from the Windows Settings menu, at the BIOS level, or via the hardware shortcut. Sometimes, a generic trackpad driver can also limit some available gestures.
If you’re only experiencing issues with Firefox, and the gestures work fine outside the browser, the issue is most likely caused by the widget.disable-swipe-tracker flag.
To address every potential cause mentioned above, start following the methods featured below:
1. Enable Touchpad from Windows Settings
The first thing you need to do when troubleshooting this issue is to ensure that gesture support is enabled at the operating system level.
Even if you didn’t explicitly disable the touchpad functionality from the Settings screen, mouse management software might have done it for you as soon as you plugged in a mouse.
Note: A variety of Razer mouse models can do this when Razer Synapse is installed.
So before migrating to any of the other solutions below, follow the instructions below to navigate to the Touchpad Settings inside the Windows 11 Settings menu and make sure that the touchpad functionality is allowed:
- Press the Windows key + I to open up the Settings screen of your Windows 11 computer.
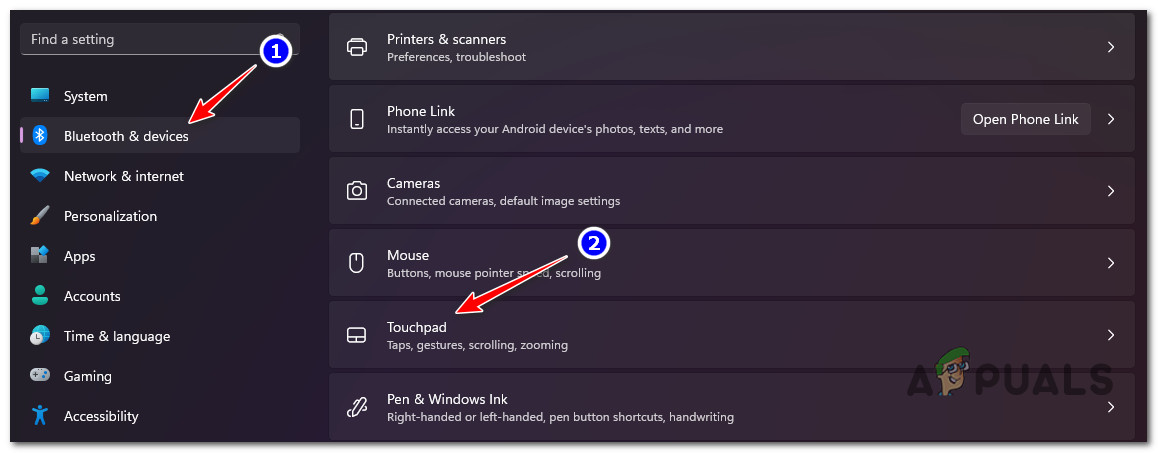
- Next, from the Settings menu, click on Bluetooth & devices from the vertical menu on the left.
- Move over to the right-hand side menu and click on Touchpad.
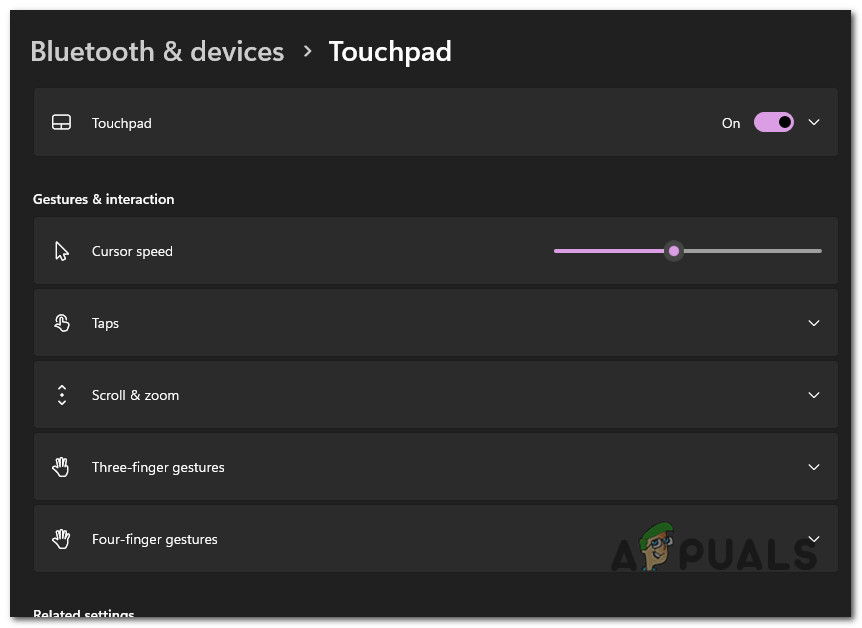
- Once inside the Touchpad settings menu, ensure the main toggle associated with Touchpad is enabled.
Access the Touchpad gestures - Next, move to Gestures & interaction and click on Scroll & zoom.
Note: This step is necessary to ensure that the Scrolling direction and pinch-to-zoom motion are configured. - From the Scroll & zoom menu, click on Scrolling direction, then set the behavior for the down motion.

Configure the gesture behavior - Next, move directly below and check the box associated with Pinch to zoom. If you use any other gestures, scroll down below and configure the remaining gestures.
Note: Keep in mind that this screen might be slightly different from user to user. Windows 11 will automatically scan which gestures are compatible with your hardware and exclude incompatible gestures from this screen. - Now that you’ve finally ensured that every compatible gesture is enabled, reboot your PC and attempt to use them again.
If the same issue is still occurring, move to the next method below.
2. Enable Touchpad via FN Shortcut
Remember that almost every laptop manufacturer includes a hardware key to help you toggle the touchpad on and off functionality. Typically, this is a combination of the FN key + an F key.
Note: For example, in my case, on a Lenovo Legion, it’s FN + F11.
The strange thing about this hardware shortcut is that it’s not connected with the touchpad ON / OFF toggle you can find on the Settings screen.
So, for example, if you disable the touchpad via the hardware key first and enable the touchpad from (Settings >Bluethooth & Devices > Touchpad), your touchpad will still refuse to work.
I struggled with the same issue myself until I realized that the two ways of disabling or enabling the touchpad are not congruent.
If the touchpad gestures on Windows 11 used to work before stopping abruptly, it’s possible that you’ve hit the hardware shortcut combination by mistake and disabled this functionality.
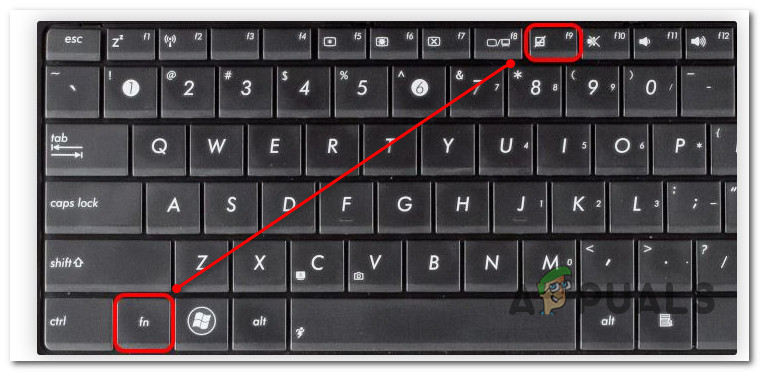
Note: Take a look at your F keys and see if you can spot the icon that resembles a touchpad. If you see it, press the FN key first and keep it pressed while pressing the F key.
If you verified that your touchpad gestures are not disabled via the hardware shortcut, move down to the next method below.
3. Enable Advanced Touchpad in BIOS
Another place where you should look to enable your touchpad settings if you can’t use any of the advanced gestures is your BIOS settings.
If you can’t use any of the newer gestures (like pinch to zoom or three-finger or four-finger gestures), the problem is most likely occurring at a kernel level.
Most BIOS laptop models will allow you to switch between Basic and Advanced Touchpad options. Typically, this setting is located in the main menu of your BIOS settings.
In case this scenario is applicable and you’re looking for specific instructions on enabling the advanced touchpad options inside your BIOS settings, follow the steps below:
- Reboot your PC and wait until you see the initial screen.
- When you see it, press the Setup key repeatedly until you access the BIOS menu.

Press the Setup screen Note: The setup key will be different depending on your laptop manufacturer. It’s usually either the ESC key, the DEL key, or one of the F keys.
- Once inside the BIOS screen, use your arrow keys to access the Main tab and see if you can spot an option named Touchpad.
Note: Sometimes, you will find the touchpad settings under Configure or Advanced tab. This is highly dependent on your OEM. - When you see it, set it to Enabled.
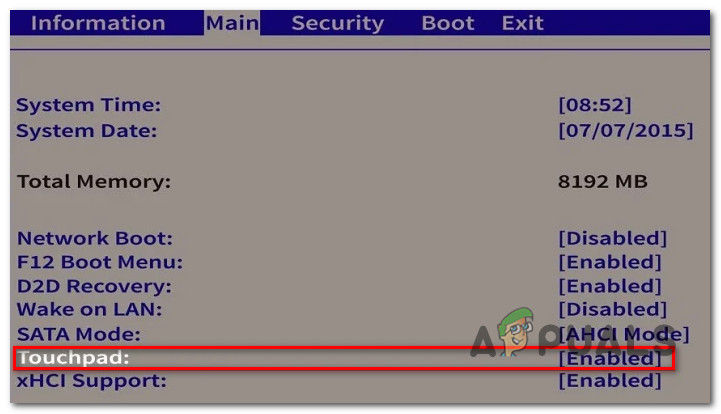
Enable the Touchpad menu from BIOS Settings Note: If you have to choose between Basic & Advanced, choose Advanced. This will allow you to use advanced gestures such as the pinch to zoom or three and four-finger gestures)
- Save the changes you’ve just enforced, reboot your PC and see if your touchpad gestures start functioning when you boot up your PC again.
If the same issue persists despite ensuring that the touchpad functionality is enabled in your BIOS settings, move down to the next method below.
4. Update touchpad drivers
Although Windows 11 comes with a series of reliable generic drivers that cover every interfacing aspect, from the touchpad and keyboard to Bluetooth, you should always go for the manufacturer-provided driver to avoid any inconsistencies.
If you’re still using generic drivers, you should navigate to your manufacturer’s driver download page and download the dedicated driver or your particular model.
Note: This is important because some mobile-centric manufacturers have implemented proprietary gestures unavailable for other OEMs.
Follow the instructions below to make sure you are using the dedicated touchpad drivers for your particular laptop model:
- Open your favorite browser and do an Internet search on “*Laptop Manufacturer* + *Laptop Model* + drivers.”
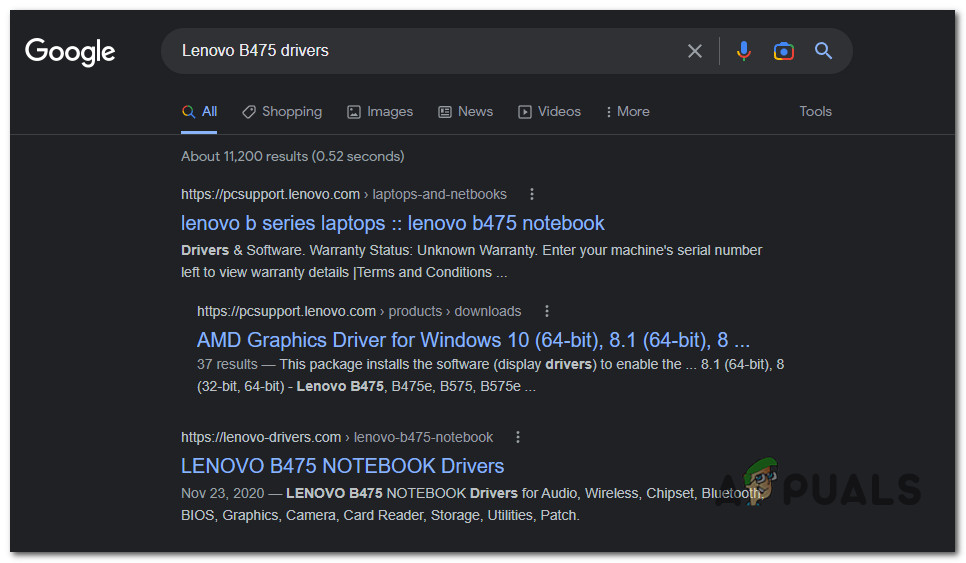
Searching for the correct drivers Note: *Laptop Manufacturer* + *Laptop Model* are only placeholders. Make sure to replace them with the actual manufacturer and laptop model. For example, in my case, the search query was “Lenovo B475 drivers“
- Once the results are in, make sure you click on the official download page of your manufacturer. It’s usually at the top of the screen.
- Next, look through the list of drivers for the Touchpad Driver and download it locally.
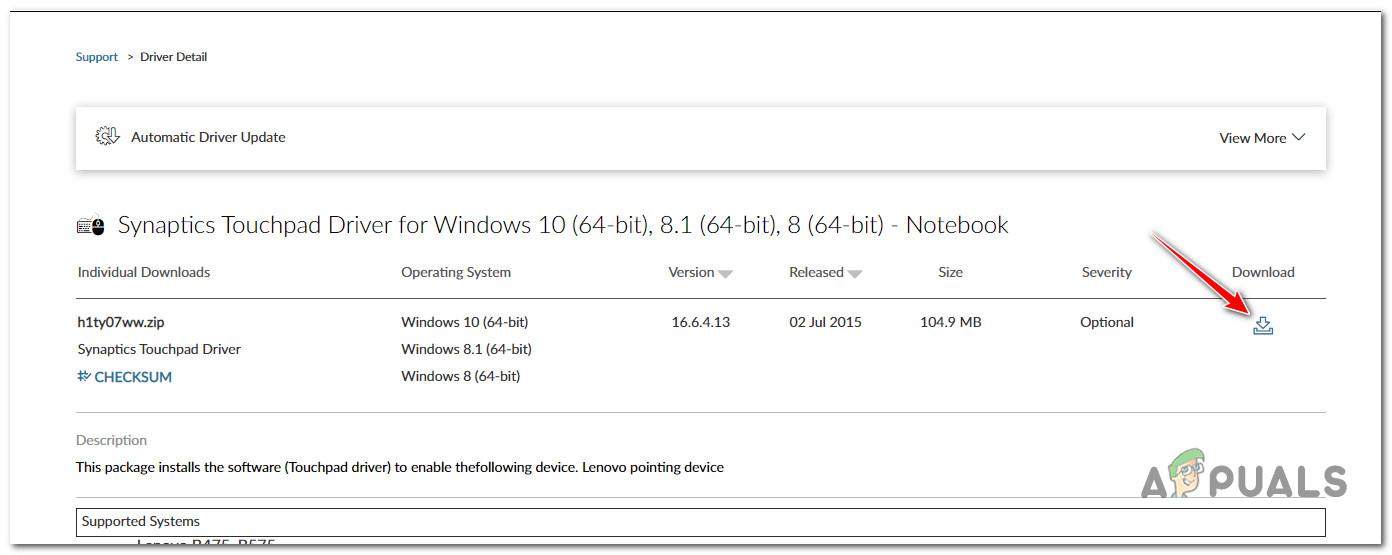
Downloading the dedicated touchpad driver - After downloading the driver locally, double-click on it and click Yes at the UAC prompt to open it with admin access.
- Follow the on-screen prompts to complete the installation of the touchpad driver, then reboot your PC.
If the issue is still not fixed and you’re only experiencing this issue while browsing on Firefox on Windows 11, move down to the next method below.
5. Enable touchpad gestures in Firefox (if applicable)
If you are using Firefox, you should have a series of unique gestures at your disposal to improve the browsing experience. Swiping left or right to trigger page navigation will make a huge difference when used correctly.
However, if you can’t take advantage of the browser-specific gestures but the generic touch gestures work just fine outside of Firefox, the issue is most likely caused by the widget.disable-swipe-tracker experimental flag.
Note: Skip this method if none of the touchpad gestures work on Windows 11.
To fix this issue, you’ll need to access the about:config menu inside Firefox and make sure that the problematic experimental flag (widget.disable-swipe-tracker) is set to false.
For step-by-step instructions on how to do this, follow the steps below:
- Open Firefox and click on the navigation bar at the top.
- Type ‘about:config’ inside the nav bar and press Enter to access the Hidden / Experimental menu of Firefox.
- When prompted by the Caution box, click on Accept the Risk and Continue to enter the hidden settings.
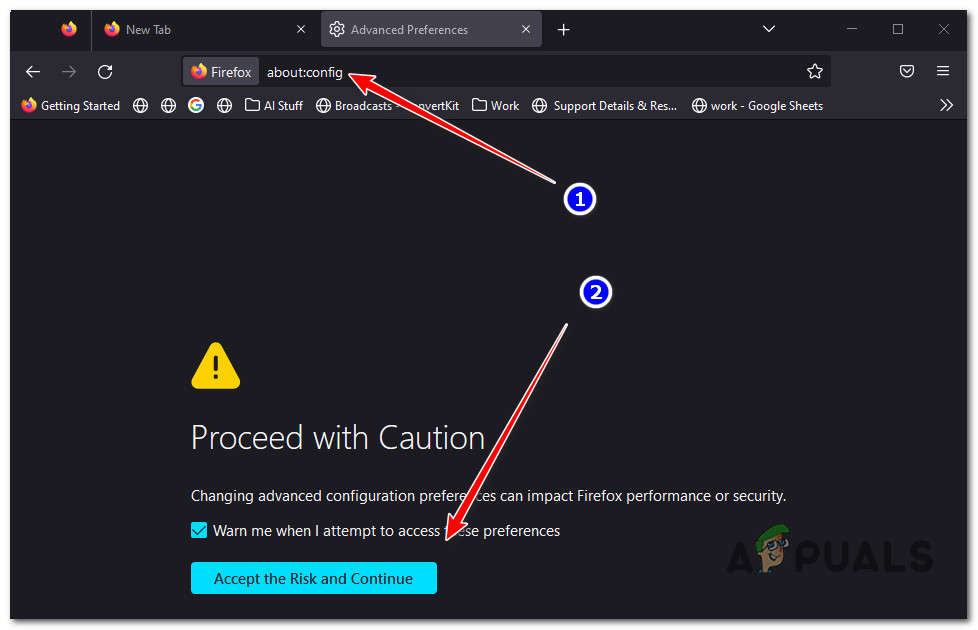
Access the Hidden Settings menu - Once inside the Advanced Preferences menu, use the Search Preference name to search for: the widget.disable-swipe-tracker.
- From the list of results, double-click on the widget.disable-swipe-tracker entry until the status changes to false.

Change the value of the swipe tracker Note: If the status is already false, leave it like this and save the changes.
- Restart Firefox and see if the problem is now fixed.


