Fix: Third Party Apps Stopped Working after Creators Update
Windows 10 Creators update is intended to enhance creative ability of the operating system. However, the updates make several changes in the operating system that leads to several errors. One of the errors is third party apps not working or frequently crashing after Creators update. Some users also report of inability to install third-party apps. Third party apps are the ones that are not available or not downloaded from the Windows app store. These apps are not digitally signed by Microsoft. It means the apps are not tested by Microsoft and may cause performance problems on your Windows 10 computer. To be on safer side, users need to always use apps that are digitally signed by Microsoft.
Now that you clearly understand the meaning of third party apps, let’s see the reasons of third party app crashing or not working after Windows Creators update. One of the known issues with Creators update is it randomly deletes drivers and apps. In some cases, the Creators updates also reset the apps that lead to various problems with apps. Also, the Creator updates make several changes in the operating system and you may have to upgrade your third party app before using it.
There are different ways to resolve the issue. In this article, we have listed a couple of methods that have worked.
Method 1: Disable Antivirus
The Creators updates do not always work well with third party antivirus solutions blocking app updates. To ensure the third party app receive important updates, you need to disable the antivirus that will allow the pre-installed apps to update. If you are using Windows Defender, you need to disable it as it might be blocking the critical third-party app updates.
- Right-click on the Antivirus icon in the System tray
- Select Open <antivirus name> user interface
- The Antivirus console opens. Look for options such as Protection, Shields, Real-time scanning and disable them. The way of disabling the antivirus differs with each antivirus application. Look in the help section to know exact steps to disable antivirus installed on your Windows 10 computer.
- To disable Windows Defender, type Settings in Taskbar search box.
- Click Settings
- Click Updates & Security
- In Settings Window, click Windows Defender
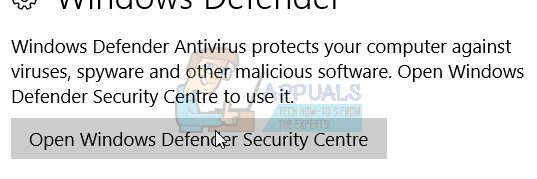
- Click Open Windows Defender Security Center
- The Windows Defender user console opens. Scroll down to find Settings
 (Gear icon)
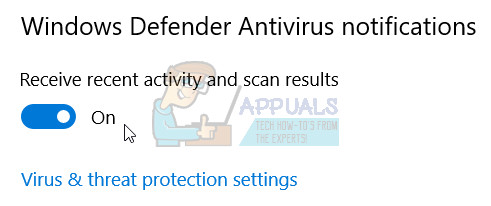
 - Under Windows Defender Antivirus notifications, look for Virus & threat protection settings and click on it
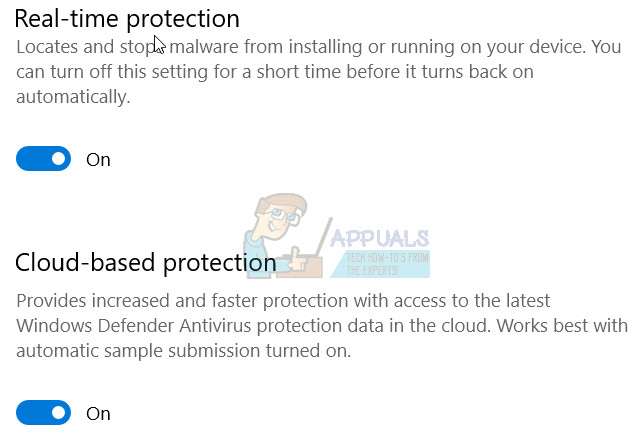
- Move the toggle switch under Real-time protection to Off position
- Move the toggle switch under Cloud based protection to Off position
- After one or two days, when your third party apps are updated, you can enable the Antivirus or windows Defender again
Method 2: Disable Firewall
Windows Firewall can lead to suspended updates and cause app crashes. After the Creators update, the windows Firewall is known to block the Windows store and cause app crashes. You can disable the windows Firewall by following steps.
- In the Windows search bar, type Windows Firewall and open it.
- Click on Turn Windows Firewall on or off
- Click on Turn off Windows Firewall under Private network settings
- Click on Turn Off Windows Firewall under Public Network Settings
- Click OK
- After the apps are updated, turn on the Firewall
Method 3: Check Date and Time
Though it may sound unusual, incorrect date and time can cause issues with Windows Store. Also updates can alter time and date settings and it is always good to be sure about it. To check date and time settings and set it correctly, follow the steps given below
- Right-click on date and time on the taskbar
- Click Adjust Date/Time
- In the window that opens, check the Time zone section and see if it is set correctly
- If not set correctly, select the right Time zone from the drop-down list
- Under Formats, check the Short date and Short time and see if it is set correctly
(Note: The Change option under Change date and time will be disabled if the computer is set to update time automatically. You need to switch off the automatic time set option to make changes to date and time)
- If not set correctly, move the Set time automatically toggle switch to Off position
- Click on Change under Change date and time
- Set the correct date and time and click Change
- If you want to synchronize the time and date with Internet time server, push the Set time automatically toggle switch to On position
Method 4: Reset Apps
Creator updates not only make changes to the system and the way it works, it also changes app settings. This might be the reason for third-party apps not working or frequently crashing after Creators update. You can set the apps to default settings by following the steps given below.
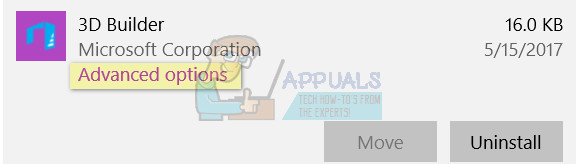
- Go to Start Menu -> Settings
- Click Apps -> Apps & features
- Click on troubled app and click Advanced options
- In the next window, click Reset.
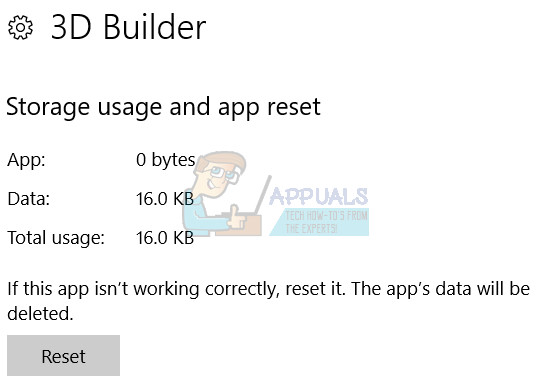
- You will get a warning about resetting the app, click Reset to confirm your action
- Wait for the process to complete and the Settings App will tell you the app is reset(You will see a check box that tells app has been reset)
Method 6: Reset Windows Store process
While you have tried resetting apps, you can also reset Windows Store process to resolve any conflicts that were created by Creators update. You can reset the Windows Store process by a command. Follow the steps given below to rest Windows Store.
- Go to Start Menu
- Type command prompt in search bar
- Right-click on Command Prompt in search results and select Run as administrator
- You will get a warning window stating “Do you want to allow this app to make changes to your PC?, click Yes to confirm
- Type the following command wsreset.exe and press Enter
- The Windows Store is launched, wait for the reset process to complete.
- Close the command prompt and restart your PC
Method 7: Clear Windows Store Cache
Clearing Windows Store cache might also resolve the third party apps not working issue. The cache of crashing app is stored in a folder and its worth trying this option All you need to do is locate the Windows Store Cache folder and delete the content inside it. Here are steps you need to follow.
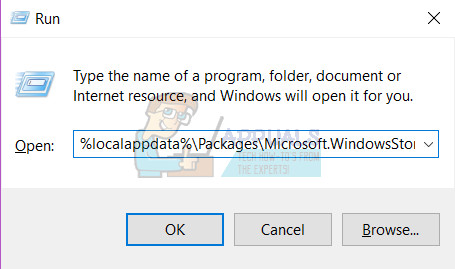
- Hold the Windows Key and Press R.
Type %localappdata%\Microsoft.WindowsStore_8wekyb3d8bbwe\LocalCache
- Press Ctrl+A to select all files in the LocalCache folder, right-click and select Delete
- Restart your computer
Method 8: Re-register ownership on Windows Store and Apps
This troubleshooting method is known to have highest success rate in resolving the third-party apps issue. However you need to follow the steps carefully as they are bit complicated. Here are the steps you need to follow
- Go to Start Menu
- Click File Explorer
- Click This PC
- Navigate to C:\Program Files
- Go to View tab and Check Hidden items
- Right-click on WindowsApps folder and select Properties
- Go to Security tab and click on Advanced
- Under Owner – Trusted Installer, click on Change
- In Enter the object name to select (Examples), type your Username and press OK
- Click Apply -> OK
- Now, right-click WindowsApps folder again and select Properties
- Go to Security tab and click on Advanced
- In Next window, go to Permissions tab and click on Add
- In Permission Entry for WindowsApps, click Select a principal
- In Enter the object name to select (Examples), type your Username and press OK
- Click Apply -> OK
- Under Basic Permissions, check Full Control and click OK
- Click Apply ->OK
- Go to Start Menu and type Powershell in search box
- Right-click on Windows Powershell and select Run as administrator
- You will get a warning window stating “Do you want to allow this app to make changes to your PC?, click Yes to confirm
- Go To Powershell Command Line, and type the following command and press enter afterwards
Get-AppXPackage | Foreach {Add-AppxPackage -DisableDevelopmentMode -Register “$($_.InstallLocation)\AppXManifest.xml”}
- After the process is completed, restart the PC.
Line 22 – Get-AppXPackage -AllUsers | Foreach {Add-AppxPackage -DisableDevelopmentMode -Register “$($_.InstallLocation)AppXManifest.xml”}