How to Tell if You’re Using SATA or PATA on Linux
Traditional Parallel ATA disks still exist to some degree alongside SATA drives. You may be used to calling PATA by the name IDE or a number of other names. Should you be running an active machine, you probably don’t want to open up the case just to see what kind of interface your system is using. Those who have certain types of Linux tablets and miniature notebooks might not even be able to open the case up to look at what’s going on inside.
Fortunately, there’s a simple command that will let you know what kind of device you’re working with. There are actually a handful of other other tools that might give you a bit more information about your disk if you happen to be looking for it. Any of these tools can be useful depending on what tasks you hope to accomplish with your system.
Method 1: Using the lspci Command
While it isn’t completely foul proof, you can use a simple single lspci line to check if you have a SATA or PATA hard drive. This method doesn’t always detect the type of drive you have, but if it does it always does it instantly and with an absolute minimum of playing around. Unlike many other methods, you won’t actually need to have super user administrative access either, which makes it remarkably easy to use and the goto method for most people who want to learn about their disk fast.
Open a terminal up by holding down Ctrl, Alt and T. You might also want to search for the word Terminal from the Ubuntu Unity Dash. KDE, LXDE and Xfce4 users can click on the Applications menu, point to System Tools and select Terminal as well. Once you’re at the command prompt, type lspci | grep SATA; lspci | grep PATA and push enter. If you’ve copied this line, then either push Shift, Ctrl and V to paste it or click on the Edit menu in the terminal window and select Paste. You won’t have your normal graphical paste shortcut in a command prompt environment.
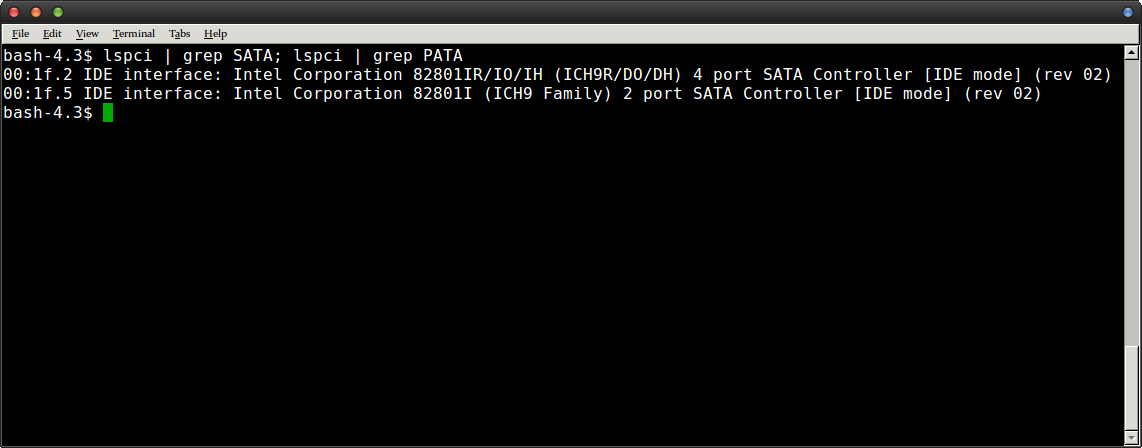
Should everything have worked, you’re now done because you’ve received a message that reads what type of hard disk or SSD you’re using as well as the type of interface that it’s attached to. It should read SATA or PATA right in the description. You’ll probably have one line for the disk itself and another for the controller interface. If this is all you’re looking for, then you’re done because you’ve actually found what you’re looking for with one simple command. Remember that the vast majority of newer disks don’t use the older standard, but you might see it if you’re working with more vintage equipment.
There’s a slim possibility that you won’t see either term because the system presents your drive as something that’s more exotic than either of these two standards. If that’s the case or if you’d rather have an entire dump of information about your drive, then read on.
Method 2: Using the lshw Program
Before you try this next method, keep in mind that it’s going to shoot a ton of verbose information at you. That makes it a little bewildering at first, but it’s perfect if you need to learn about your disk! At the prompt, type sudo lshw -class disk and push enter. You’re probably not used to waiting a bit for terminal programs like this to run, but it will take a moment as it collects information about your disk.
You’ll probably want to scroll up and down, because if you have an optical drive or a secondary hard disk then it gave you an eyeful about them as well. You’ll be told the product number as well as the description of the disk type. If you’re in need of reordering parts or anything like that, then you can actually copy the product number and then search for it online to find replacement parts. This is great for anyone who doesn’t want to have to shut their system down to check the exact model number.
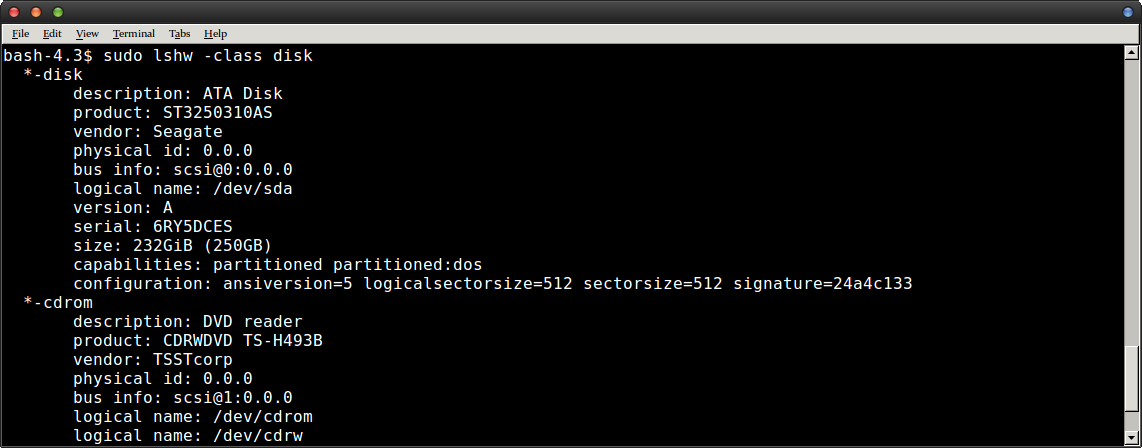
Curiously, you might find that your disk is marked as a SCSI drive when it’s somewhat doubtful that you have a SCSI adapter attached to your machine. This is simply how your Linux distribution is emulating the interface as a convenient way to interact with your drive. If you see a line that reads something like “description: ATA Disk”, then this is actually what your drive is. You might also see information about an attached optical drive, which you can choose to ignore at this point. That being said, you might want to use this command in the future to read up on the type of optical drive you have installed if you have one at all. It could possibly detect disks you have attached via the USB interface as well.
Method 3: Using the GNOME Disks Utility
If you have the GNOME Disks application installed, then you can start it by searching for it on the Ubuntu Unity Dash. You might want to click on the Applications menu, select Accessories and click on Disks, or you may wish to type gnome-disks at the terminal prompt. It should default to your main hard disk or SSD.
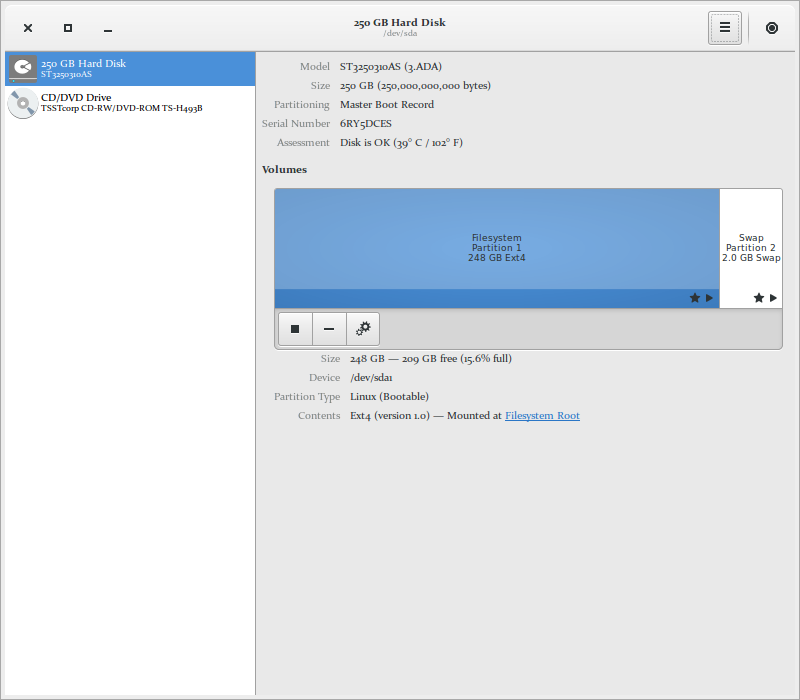
Looking at this window alone should show you partitioning and file system information. If you’d like to see SMART data, then hold down Ctrl and push S or click on the right-hand menu and select SMART Data & Self-Tests.
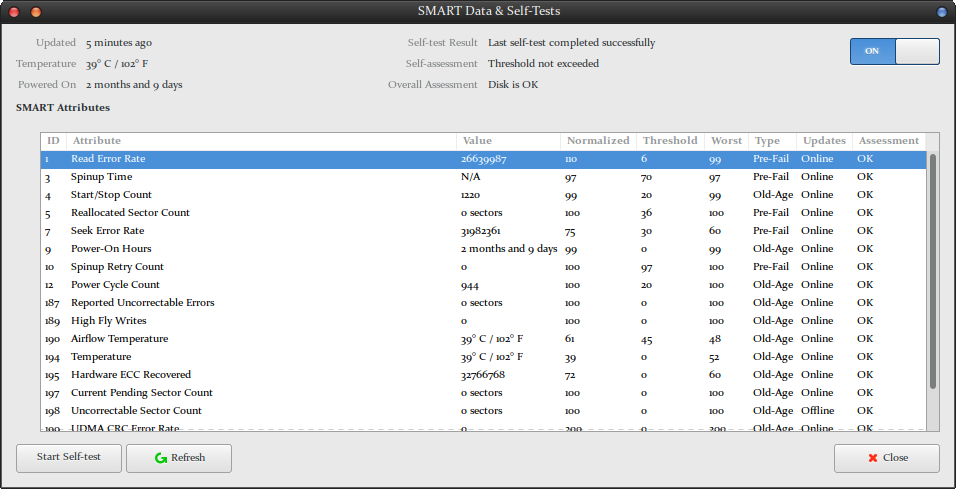
You’ll be treated with yet another fine page of information about the disk you’re using. This is particularly useful if you want to check any of the pre-fail conditions and possibly receive a warning about whether or not your disk is going to give out soon. This program will provide far more information than even the other two options, but this means you’ll certainly want to try the other two methods first as they don’t require nearly as much scrolling around.