FIX: Steps to Reset and Change IP Address
Computers communicate and talk to each other over an IP Address. There are two types of addresses. (i) Static (ii) and Dynamic. Static is purchased from the ISP by paying additional, and dynamic comes as part of your package. The major difference is simple, static doesn’t change and dynamic changes. Since this is your address on the Internet, it can be used to block you from accessing a certain site, a game etc. BUT there is a second part to it which is the private address, assigned to your computer in the private IP address range, which doesn’t go out on the internet, your router assigns you the private address, and translates it when speaking to websites/systems/servers over the Internet. Any computer connected to your network will have a different private address assigned by the router, but a single public address. Therefore, before resetting an IP address you will need to determine which IP Address. (Private or Public). If you are blocked on the internet, then the public, if you’re having issues locally, then the Private.
Method # 1: Power Cycling Process
The simplest method to reset your public and private IP address is by Power Cycling your router and if there is a modem, then the modem too. To do this, power both the devices off, wait for ten minutes and turn them back on. Most cable modems come with a battery back up, so if powering off doesn’t completely power off, then take the batteries off. Once you do this, both the Private and the Public IP Address should be re-setted depending on the lease time. If it doesn’t repeat the process for a longer time. You can check the IP Address, on www.getip.com (public) before resetting, and private by right-clicking your network adapter and choosing the Status -> Details. (see steps in Method 2 about how to get to network adapter)
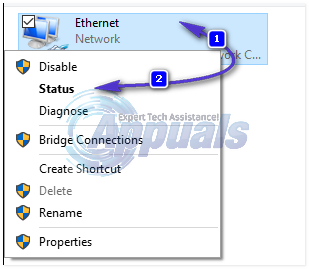
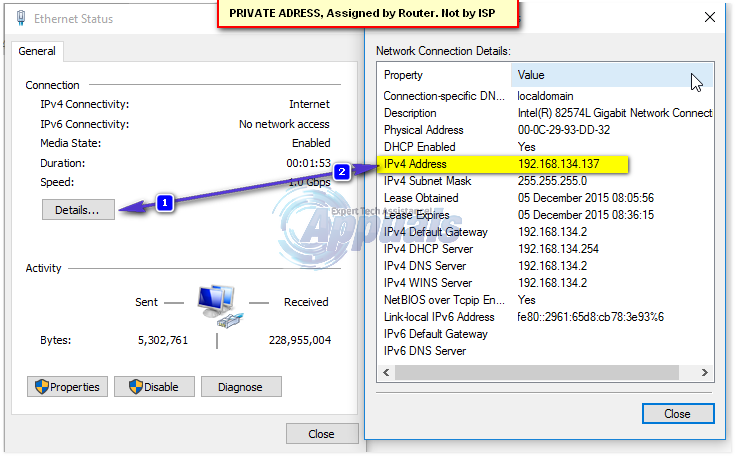
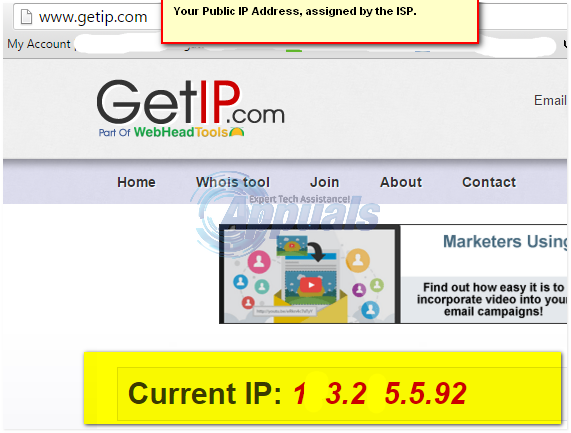
Method 2: Disable / Re-enable your Network Connection
This will only work for the Private Address.
- Hold the Windows Key and Press R. Type ncpa.cpl and click OK.
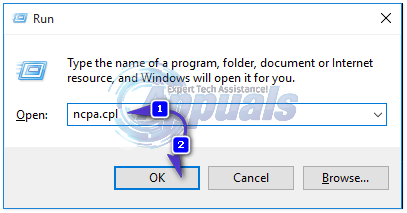
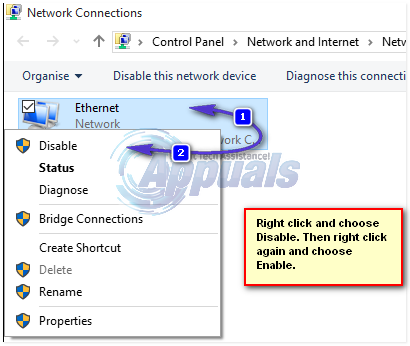
- Right-click your network adapter, and choose Disable. Then right-click again and choose Enable.
Method 3: Change IP Address Manually
You can also set a static private IP address, by manually assigning it. To do this, you will need the following information from your previously assigned (automatic IP address). These details can be obtained from the “Status -> Details” tab as described in Method 1 above. Here’s what you will need to hand before proceeding further.
i) Previous IP Address ii) Subnet Mask iii) Default Gateway

In this example, mine are:
Previous IP Address: 192.168.134.137

IPv4 Subnet Mask: 255.255.255.0

IPv4 Default Gateway: 192.168.134.2
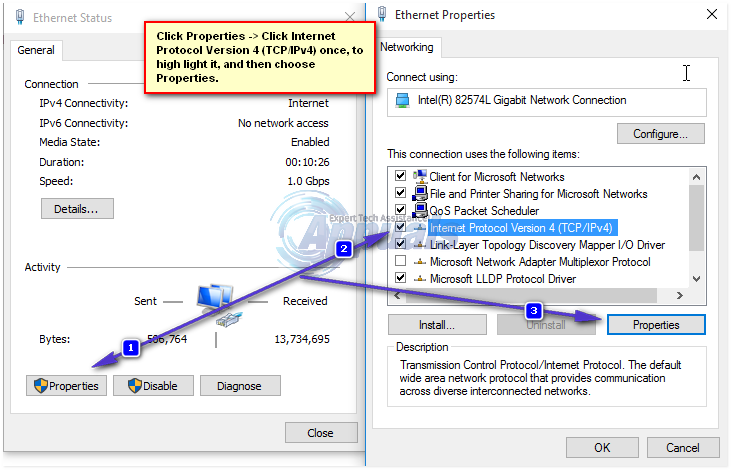
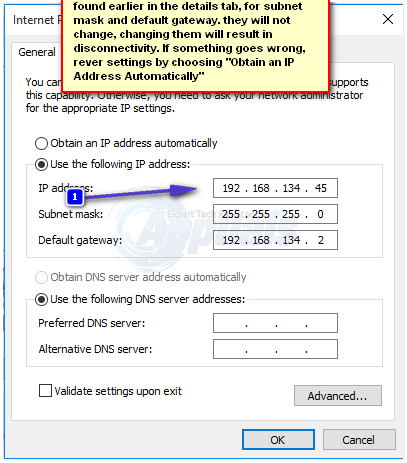
Now to change it, you need to think of a new number from 3 to 150. (It’s 254 technically, but i prefer the readers to do between 3 to 150). Replace this number with the number after the last “.(dot)” in the Previous IP Address, so the New IP Address have would be, 192.168.134.45, 45 is the number I picked. If your Previous IP address is 192.168.1.10, then you will only change the one after the last dot. Once you have it, go to the network connections -> right click your network adapter and choose Status. Now, instead of choosing details, choose Properties.
Then click “Internet Protocol Version 4 (TCP IPv4)” once to highlight it, and choose Properties.
Now choose the option “Use the following IP Address” enter the new IP address you figured out in the above examples, and the same default gateway and subnet mask. Then click Apply/OK. This should change the IP Manually. If you want to restore the settings, go back here and choose the option “Obtain an IP Address Automatically” to revert settings.
Method 4: Use Command Prompt To Reset
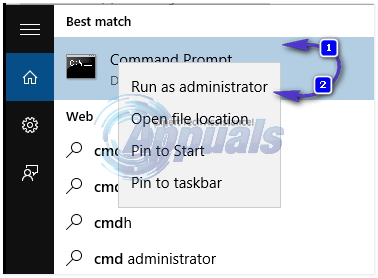
Click Start and type cmd in the search box. Right-click cmd and choose “run as administrator”.
In the elevated command prompt window that opens up; type the following commands, followed by entering.
ipconfig /release

ipconfig /renew