Steps to Easily Burn an ISO to a CD/DVD or USB
An ISO file is a digital duplicate of a physical CD or DVD. An ISO file has all the data that the CD or DVD that it has been created from has, all neatly packaged into a single file. While ISO files are digital versions of physical CDs and DVDs, on their own, they cannot be executed or viewed on a computer. To put an ISO file to use, it needs to be burned to a CD, DVD or USB. Burning an ISO file to a CD/DVD or USB and then making the media that it is burned to functional sounds pretty complicated and confusing but is actually a pretty straightforward process. However, comparatively speaking, it is much easier to burn an ISO to a CD or DVD than to burn it to a USB.
How to burn an ISO to a CD/DVD
Burning an ISO to a CD or DVD is extremely simple as all currently supported versions of the Windows Operating System – namely Windows Vista, Windows 7, Windows 8, Windows 8.1 and Windows 10 – have the ability to burn ISO and IMG files to CDs and DVDs built directly into them. However, the process you need to go through in order to burn an ISO file to a CD or DVD varies slightly from one version of the Windows Operating System to the other.
In Windows Vista:
Insert a blank rewritable CD or DVD into your DVD/CD-RW drive.
Press Windows Logo key + E to open Windows Explorer. In Windows Explorer, navigate to the folder in which the ISO file you want to burn is located (Desktop – for example). Click on the ISO file to highlight it. Click on Burn or Burn disc image in the toolbar located in the top left of the Windows Explorer
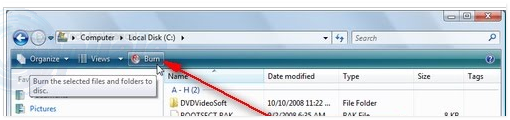
Follow the onscreen instructions to configure and start the disc image burning process.
In Windows 7:
Insert a blank rewritable CD or DVD into your DVD/CD-RW drive. Press Windows Logo key + E to open Windows Explorer. In Windows Explorer, navigate to the folder in which the ISO file you want to burn is located (Desktop – for example). From here, you can take two routes. You can either: Right-click on the ISO file.
Click on Burn disc image.
Follow the onscreen instructions to burn the ISO file to a disc. Or you can: Click on the ISO file to highlight it. Click on Burn or Burn disc image in the toolbar located in the top left of the Windows Explorer. Follow the onscreen instructions to configure and start the disc image burning process.
In Windows 8, 8.1 and 10
Insert a blank rewritable CD or DVD into your DVD/CD-RW drive. Press Windows Logo key + E to open Windows Explorer. In Windows Explorer, navigate to the folder in which the ISO file you want to burn is located (Desktop – for example).
Right-click on the ISO file.
Click on Burn disc image in the contextual menu. This will open the Windows Disc Image Burner – a utility that Microsoft started integrating into the Windows Operating System starting with Windows 8.
Open the dropdown menu in the Disc burner: field and select the disc burner (DVD/CD-RW drive) you want to use to burn the ISO file to a disc.
Click on Burn to start burning the ISO file to the inserted CD or DVD.
Wait for the bar in the Status area to become full. This will indicate that the ISO file has been burned to the CD or DVD successfully.
How to burn an ISO to a USB
Burning an ISO file to a USB flash drive is trickier than burning one to a CD or DVD, but that is only because there is no utility built into Windows that can handle this operation. Since that is the case, you will have to use a third-party program to burn an ISO file to a USB, and as far as such programs go, there is none better than Rufus. To burn an ISO file to a USB using Rufus, you need to:
Go here and download the latest version of Rufus. Install Rufus on your computer.
Insert the USB flash drive you want to burn the ISO file to into your computer. Since Rufus will format the USB before burning the ISO file to it, make sure that all valuable data on the USB has been backed up beforehand. Fire up Rufus. Open the dropdown menu under Device and select the USB flash drive you inserted.
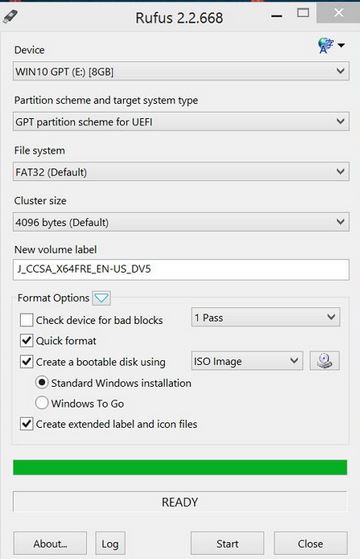
Note: If your USB flash drive isn’t showing up in the dropdown menu but is definitely connected to and visible in your computer, click on the white upside-down triangle next to Format options and make sure that the List USB Hard Drives option is enabled.
Enable the Quick format, Create a bootable disc using: and Create extended labels and icon files option by making sure the boxes beside them have been checked.
Open the dropdown menu beside the Create a bootable disc using: option and click on ISO image.
Click on the CD-ROM icon next to the dropdown menu and browse to and select the ISO file you want Rufus to burn to the USB.
Allow Rufus to scan the ISO file, after which it will configure all of the other options in the Rufus window automatically. Once it does so, click on Start and then simply wait for Rufus to successfully burn the ISO file to the USB drive.
Rufus is great but for Mac users, UUByte is the best option. Disk Utility is no longer working in Majove