How to Set Up NETGEAR Range Extender WN3000RP?
If you have obtained the WiFi Range Extender WN3000RP from Netgear and are looking to install it, this article will guide you through the entire process.
This device will help you extend the wireless network to an area outside your existing Wi-Fi network range. Fortunately, this range extender from Netgear is one of the easiest devices to set up in its class.
Here’s what you need to do to install and configure the Wi-Fi Range Extender WN3000RP from Netgear:
Step 1: Place and Plug in.
In this initial step, we will find a suitable place for the Wi-Fi Range Extender and plug it into a power source
- Sure, here’s the corrected sentence: “Take your extender and place it at an equal distance between your router and the wireless device that connects to it.
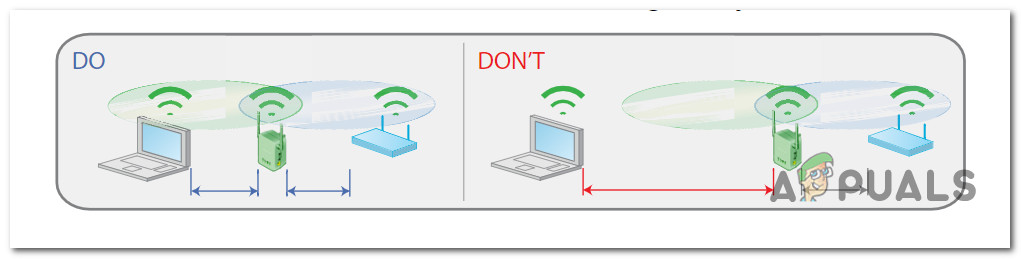
Choosing the ideal position for your WiFi Extender Note: Placing the extender outside the router’s effective range will result in slower download and upload speeds. If you are forced to use a location that is less than ideal, ensure your extender is closer to the device while still remaining within the router’s range.
- Once you’ve found the ideal location, plug the extender into the power outlet.
- Wait for a full minute until the extender starts operating. When it is ready to go, the status LED will turn green.
Once the WN3000RP NetGear range extender is plugged into the power source at the optimal distance, it’s time to configure it.
Step 2: Connect to an Existing Wi-Fi Network
When it comes to connecting your Wi-Fi range extender to the Wi-Fi network, you have two available options:
- : Connect it via Wi-Fi Protected Setup (WPS) – This option allows you to connect the extender to your Wi-Fi network without the need to type in the network name and password. All you need to do is press the physical button, and the connection will be paired automatically.
- Connect it manually via your Web Browser – If you go this route, you’ll need to connect to the extender network and navigate to a dedicated website that will walk you through the process of pairing the extender with your router.
Note: Option two is your only choice if your router does not support WPS.
Method 1: Connect Using WPS.
This is, by far, the easiest option. If your router supports WPS, follow the steps below:
- Short-press the WPS button on the Wi-Fi range extender.
- Short-press the WPS button on your wireless router.
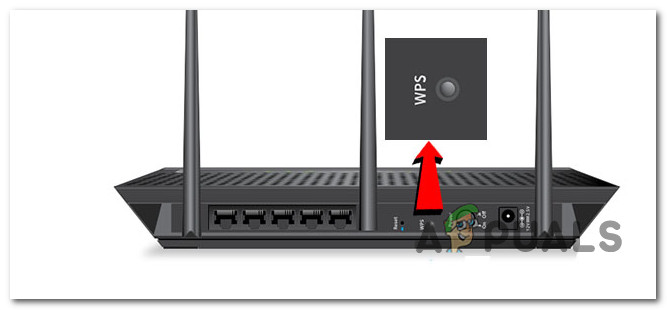
Press the WPS button on the router Note: From the moment you press the WPS button on your Wi-Fi range extender, you have exactly 2 minutes to press the corresponding WPS button on the router.
- The Link Rate LED on your extender will light up if the connection is successful. This signals that the Wi-Fi network is paired with your extender.
- Once the pairing is complete, you’ll notice that the extender wireless network name (SSID) will automatically change to the Wi-Fi network name with ‘_EXT’ at the end. Note: For example, if the network is named “Home,” the new extender network name will be “Home_EXT.
Important: To connect new Wi-Fi devices to your extender network, use the network security key you previously set up for your wireless router.
Method 2: Connect Manually from a Web Browser.
If WPS is unavailable, you are forced to go the manual route. This involves connecting using a wireless network manager and any browser.
Note: The instructions below will work on any device with wireless capabilities (Windows, macOS, iOS, Android, Chrome OS, etc.).
Here’s what you need to do:
- Ensure that your extender is powered on and displays the green status LED button.
- On a wireless device, preferably a PC, access your wireless network manager screen and click on NetGear_EXT.
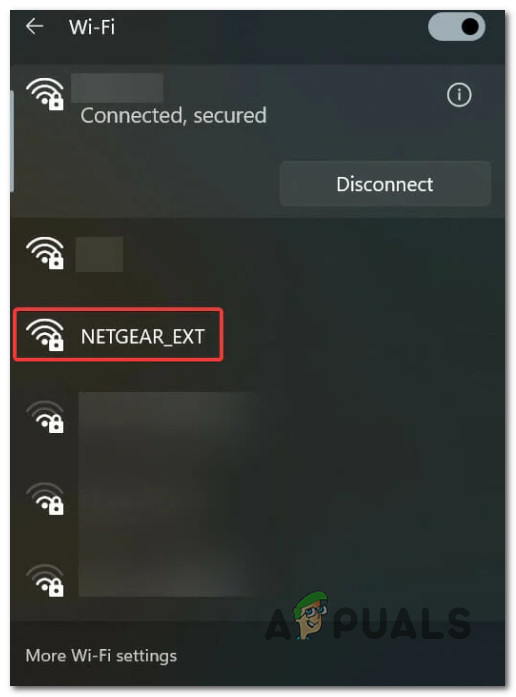
Connect to Netgear.EXT network Note: You can connect to the extender network from any device with wireless capabilities.
- Once the connection is established, you will notice the PC-to-Extender LED turning green. At this point, connect the extender to your existing Wi-Fi network.
- Open any web browser from the same device, and it should take you directly to the on-screen setup guide.
Configuring the Wi-Fi Extender manually. Note: If the redirect does not occur automatically, type ‘www.mywifiext.net‘ manually into your browser’s navigation bar at the top and press Enter.
- Next, you will be taken through a series of steps where you will need to select the Wi-Fi network, enter the password, and choose a new name for your extender network before finalizing the setup.
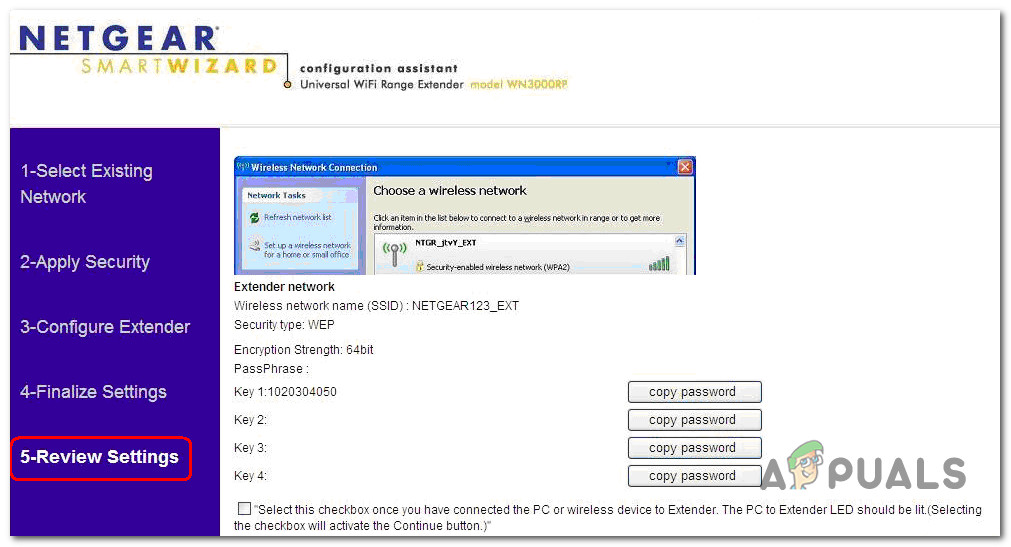
Configuring the extender network Note: If you wish to make any changes to the extender network after completing this setup, you can accomplish this by rerunning the setup guide from your browser and navigating to www.mywifiext.net. When prompted to log in, use ‘admin‘ as the username and ‘password‘ as the password.
Step 3: Perform Performance Tweaking.
Now that the Wi-Fi extender is fully configured, check the Link Rate LED to see if any other adjustments are needed.
- If the Link Rate LED is green, the extender network operates at maximum capacity.
- If the Link Rate LED is yellow, the extender network operates normally; however, the maximum speed is not achieved.
- If the Link Rate LED is red, the extender network operates with a poor connection.
- If the Link Rate LED is turned off, there is no connection between the extender and the router.
Note: If the link rate indicator is yellow or red, try moving the extender closer to the router until the LED turns green. In case the link rate LED is turned off, you have most likely made a mistake during the initial setup, and you should start from scratch.
I have a Verizon high speed browser, Model # GT704-WGB. I have tried to get my Net Gear extender to work. I can’t find the WPS on my router, can you help me?