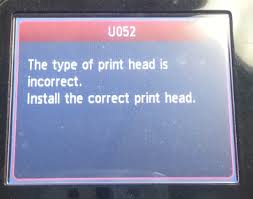
Step By Step Guide to Resolve “U052 This type of print head is incorrect.”
A lot of Canon printer users come across the error message, “U052 This type of print head is incorrect.” It is a very common error on Canon printers and is fairly easy to troubleshoot.
There are two different scenarios related to the U052 error message. One is where the print head is not installed at all, resulting in the ‘U052: This type of print head is incorrect’ error message.
In the second scenario, the print head is installed, but it is not functioning properly or might not be working at all. The following section will show step-by-step troubleshooting for both scenarios.
Receiving Error U052 with printhead installed.
1. Open the top lid of the printer to access the printer’s cartridges and print head. When you open the top lid, the cartridge slot will automatically lift up to the middle front of the printer.
2. Unplug the printer from the switchboard. Make sure that the cartridge lever, located just on the side of the cartridge cradle, is lifted up. In this position of the lever, the cartridge slot will not move automatically.
3. Remove all the ink cartridges from the cartridge slots.
4. Removing cartridges exposes the black print head. Now, gently remove the print head from the printer. The technique for removing the print head involves grabbing it where the cartridges are inserted, pulling it gently, and the print head will come out.
5. Then, perform the basic cleaning cycle on the print head.
6. Reinsert the print head and ink cartridges into the printer, ensuring that there are no open doors and the lever is returned to its original position.
7. Close the top lid of the printer.
8. Turn on the printer.
9. Take out a test print to check if the Error U052 has been resolved.
Getting U052 Without Any Print Head Installed.
1. Switch off the printer.
2. Open the top lid of the printer. If there are no cartridges or print heads in the printer, then the positioning of the cartridge slots will naturally be in the middle front of the printer with the lever lifted up.
3. Install the print head into the sliding rail, just beside the cartridge slot.
4. Install the cartridges into the cartridge slots. Close the lever, and ensure that there are no open doors and that the cartridges and print heads are properly installed.
5. Close the top lid of the printer.
6. Turn on the printer.
7. Take out a test print to check if the Error U052 has been resolved.
8. To resolve the Canon Printer error ‘U052: This type of print head is incorrect,’ the troubleshooting approach provided above should work for either of the scenarios. If the problem persists, contact the Canon Helpline or a printer technician.
In my case the replacement printhead did not work, directly out of the package. I tried it on 2 Pixma MX860 printers, on each of which an old printhead worked fine. I was tempted to return it – especially because the printhead as delivered was wet with ink and some other fluid, but found that a printhead cleaning procedure enabled it to function well (for me, this time).
For the procedure you will need: 1. Water; 2. Glass cleaner such as Windex; 3. Rubbing Alcohol; 4. A dish or bowl (plastic or glass or ceramic (or metal?) whose diameter is large enough to accommodate the printhead; 5. A heat source to dry the printhead after cleaning.
Procedure: 1. Spray the printhead liberally with glass cleaner. You may want to direct the spray into the incoming and outgoing ink orifices; 2. Soak the printhead in a water+glass cleaner solution dish for an indeterminate time; 3. Swish the printhead around in the solution to extract from the printhead ink that was presumably used in manufacturer testing; 4. Rinse the printhead off with clean water. Pat its orifices with a towel or paper towel; 5. Dispose of the solution; 6. Repeat steps 1 through 5 until no ink seems to be leaching from the printhead either into solution or onto the towel; 7. Pat the printhead dry with a soft towel or paper towel; Do NOT let the printhead dry any further yet!; 8. Soak the printhead in rubbing alcohol in the dish. Swish it around with the goal of displacing water left in the printhead with the rubbing alcohol. Let it sit in the solution for an hour or more; 9. Repeat step 8 with new rubbing alcohol another time or two; 10. Dry the printhead with non-destructive heat. I used a combination of soft toweling, sunshine and forced air house heat; 11. Try it out again in the printer.