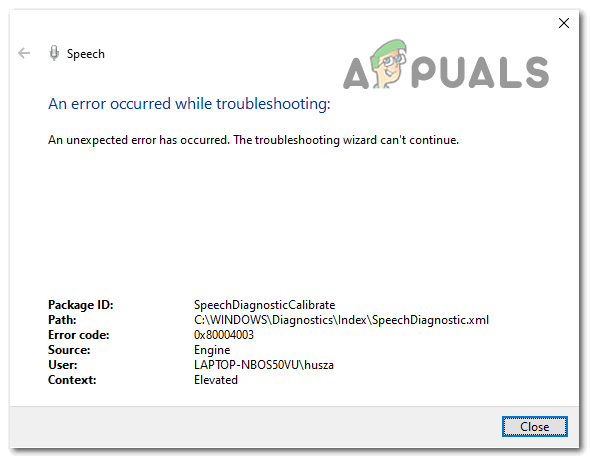
How to Fix Speech Diagnostic Calibrate Error 0x80004003
A lot of people have reported that since they have updated their Windows 11, the Speech Diagnostic Calibrate error 0x80004003 is occurring every time they are trying to troubleshoot an issue with their microphone. This error appears as a message on the screen suggesting that this specific error is happening.
In some cases, affected users have said that this error has appeared after doing an update to their Windows, while others have encountered this issue after upgrading from an older version to Windows 11. This error has been seen on both Windows 10 and Windows 11.
After many Windows users have complained online about this error, we have decided to take an in-depth look into this error to see what causes it. Here is a short list that contains every possible cause:
- Latest update – One of the most common causes for this error is the latest Windows update that you’ve installed. In most cases, the error has appeared after installing a new update on the computer. This could be happening because the update came with some problems that triggered this issue. To fix this, you need to uninstall the latest Windows update and install an older one to see if it will have any effect.
- File Explorer not working – The Windows File Explorer is a potential contributing factor in the occurrence of the Speech Diagnostic Calibrate error 0x80004003. This was causing Windows to malfunction in some instances, which resulted in the display of this error in those instances. Simply opening the Task Manager, locating the Windows File Explorer, and then restarting it should be all that is required to rectify the situation and get things back to normal.
- Disabled microphone – This error might be also caused if the microphone is actually disabled at a system level. This might be happening because it was disabled automatically after an update, or maybe you disabled it by mistake. All you have to do is to go to the Sound properties on your computer and make sure that your microphone is enabled properly.
Now that you are aware of what can cause your problem, here is a list of all the methods that people have used in order to fix the Speech Diagnostic Calibrate Error 0x80004003:
1. Uninstall the problematic update
The first thing you need to do when you encounter this error is to uninstall the recently installed update that might be causing this issue. According to some affected users, one of the most common causes of this issue is a problematic update.
In case you are using encountering this issue on Windows 11, the name of the update is KB5014697. For Windows 10, the update’s name is KB5014699. But this scenario is not applicable in every case because the cause might be a further update. So whatever your last update’s name is, you should uninstall it to see if it will fix the Speech Diagnostic Calibrate error 0x80004003.
All you have to do is to go to the Windows Update and access the history of the updates. There you will be able to uninstall the latest update.
In case you don’t know how to do this, here are the steps you need to follow:
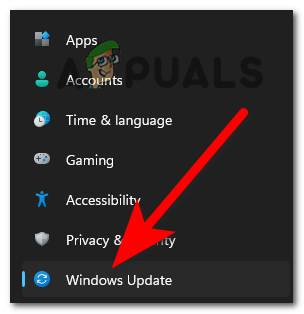
- The first thing you need to do is to open the Windows Settings. You can do this in many ways, one of them is to open a Run dialog box by pressing the Windows key + R, then type inside the search bar ‘ms-settings:‘ and press Enter.

Using a Run dialog box to open the Windows Settings - Now that you are inside the Windows Settings, you need to look on the left side menu until you find Windows Update. When you find it, select it.
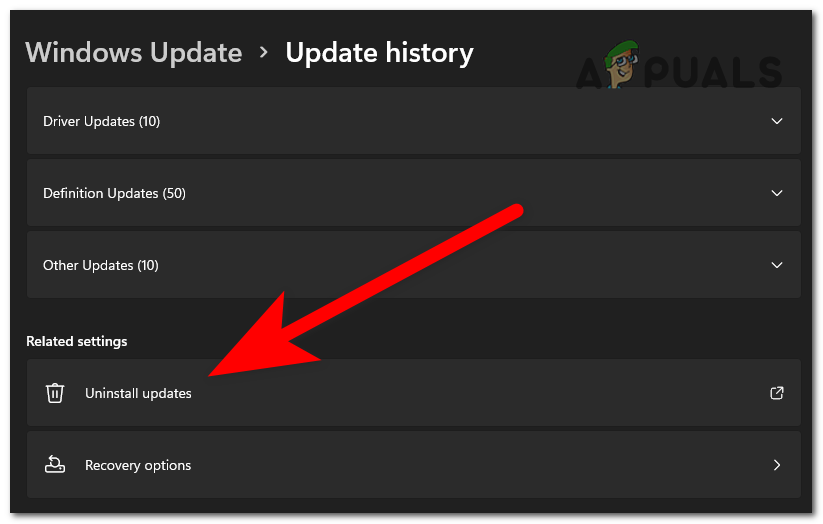
Inside the Windows Settings accessing the Windows Update - Once you do that, click on the Update history. Inside this section, you will be able to see an Uninstall updates button. Access the button to be redirected to the list of updates.
Accessing the list of updates - After that, all that is left to do is to uninstall the newest update on your PC. When you locate it, right-click on it and click on Uninstall.
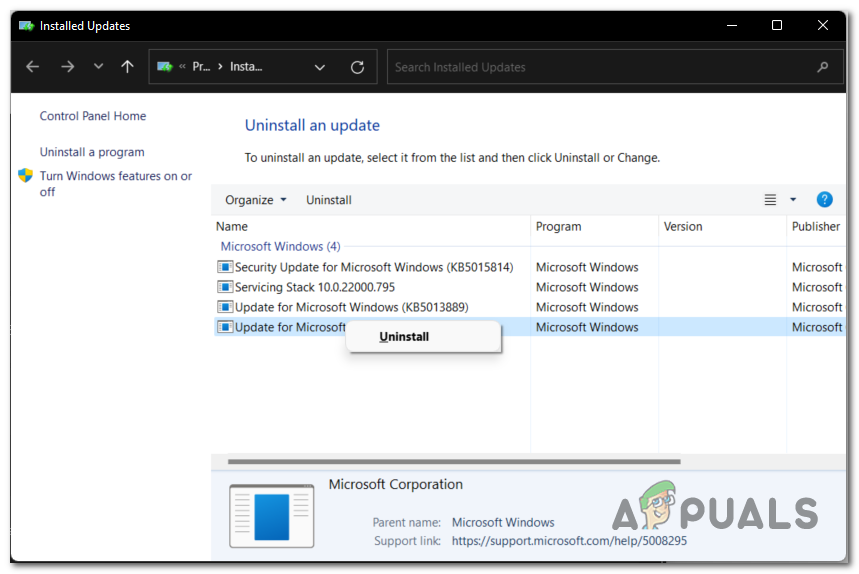
Uninstalling the most recent update installed on your PC - Follow the on-screen instructions to complete the uninstallation. Once the process is complete, you need to reboot your PC to be able to use it properly.
- When the computer boots back on, you should check if the error has disappeared.
In case the Speech Diagnostic Calibrate error 0x80004003 still appears, you should check the second method below.
2. Restart Windows Explorer
Restarting the Windows File Explorer has been reported to be successful in resolving this issue by those who have encountered it. Because of the issue that is occurring, the microphone might not be able to function because it won’t be detected.
Simply restarting the Windows File Explorer is all that is required to rectify the issue with your microphone. You may accomplish this by using the Task Manager, where you will find the option that allows you to restart the application.
If you are unsure of how to do this task, the following instructions will assist you in restarting File Explorer:
- Launching the Task Manager is the initial step in this method. You may accomplish this in a variety of ways, but the quickest and easiest method is to hit the CTRL, SHIFT, and ESC keys on your keyboard all at the same time. This will cause the window to open on its own.
- Once you have entered the Task Manager, navigate to the Processes area using the drop-down menu.
- After that, you need to look for Windows Explorer among the list of processes that are running on your computer. Once you locate it, make sure to select it before clicking the Restart button.
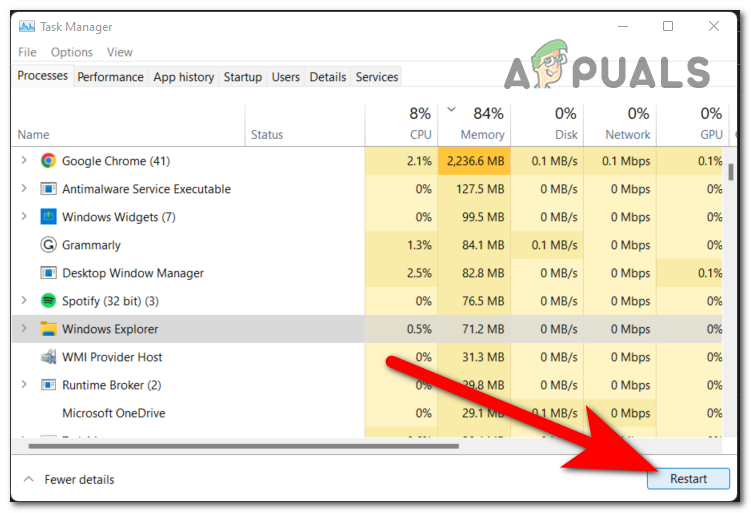
Restarting the File Explorer from the Task Manager - This operation will only take a few seconds to complete. Wait until it is finished, and then you will be able to close the Task Manager.
- Now it’s time to check to see if you can connect your microphone without the Speech Diagnostic Calibrate error 0x80004003 appearing.
If you have already done this and the issue continues to occur, continue on to the next possible solution below.
3. Run a Speech troubleshooter
Another thing that you can try is to run the Speech troubleshooter in order to see if it will be able to identify and fix the problem by itself. This method is very easy to do and could be efficient in resolving this error.
All you have to do is to go to the Windows Settings. There you will need to find the specific Speech troubleshooter, which you need to run and see if it will fix anything or not.
In case you don’t know how to do this, here are the steps that you need to follow:
- You need to start by opening the Windows Settings. One way to do this is to use a Run dialog box. Press the Windows key + R to open it and type inside the search bar ‘ms-settings:‘, then press Enter to open it.

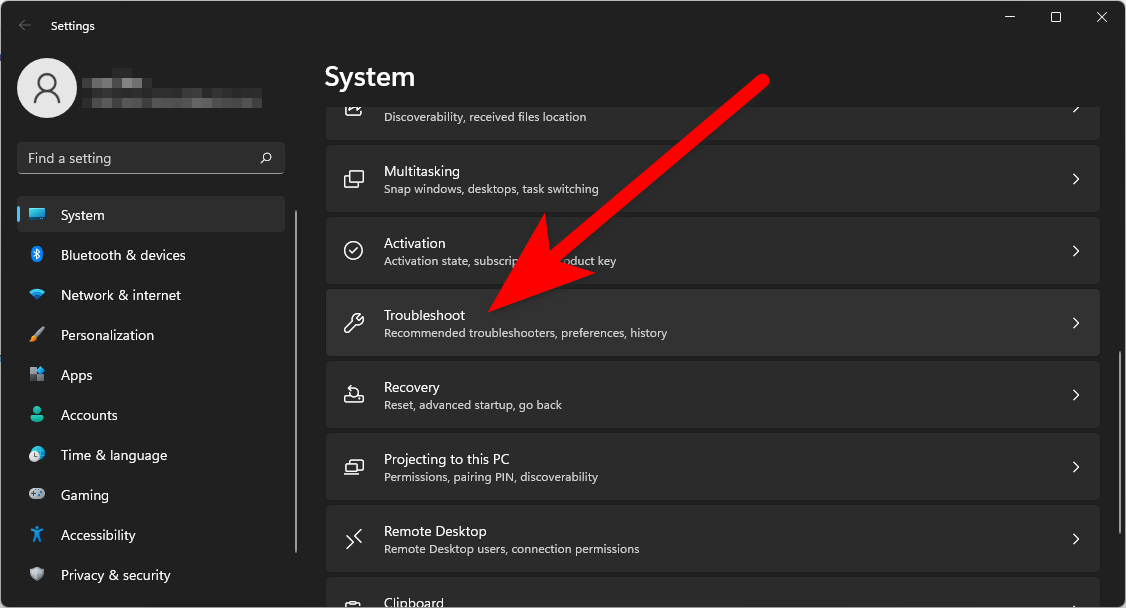
Opening the Windows Settings using a Run dialog box - Once you are inside the Windows Settings, select the System section from the left side menu. Now scroll down through the list of available sections inside the System tab until you find Troubleshoot, then click on it.
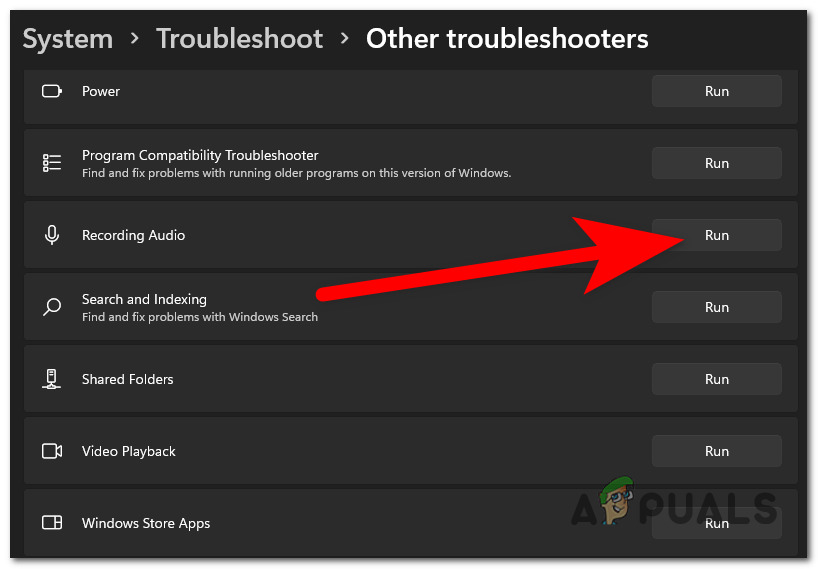
Inside the Windows Settings accessing the Troubleshoot section - After that, you will be able to see a list of all the troubleshooters that your Windows has. Look for the Recording Audio troubleshoot, then click on Run.
Running the troubleshoot for Speech - You need to follow the instructions that appear on your screen in order to complete this process.
- When it is done, reboot your PC and wait until it boots back.
- Once you’ve done that as well, all that’s left to do is to see if you have fixed your problem.
In case this method wasn’t helpful as well and the Speech Diagnostic Calibrate error 0x80004003 still occurs, go to the next method below.
4. Choose an older Audio driver
As users report, in order to fix this issue, you can also try to choose an older Audio driver over the latest one because that could be the cause. For some people, the cause was a Windows Update, but in case you’ve tried to uninstall it and it didn’t work, it is worth trying to change the driver in use for Audio to see if it will have any effect.
To do this, all you have to do is to go to the Device Manager and browse your computer for drivers. Select an older driver to see if the error will still appear after.
In case you don’t know how to select an older Audio driver, here is a step-by-step guide:
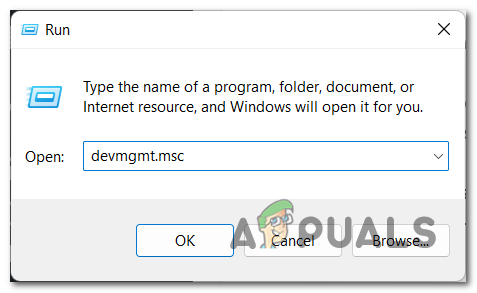
- Firstly you need to open the Device Manager. You can do this by using a Run dialog box that you open by pressing the Windows key + R. Inside the search bar, type ‘devmgmt.msc‘ and press Enter to instantly open the Device Manager.
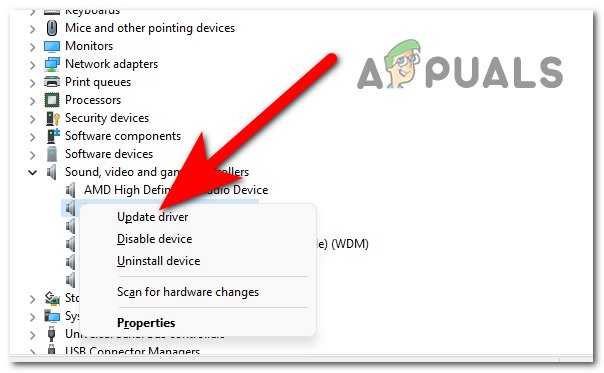
Using a Run dialog box to open the Device Manager - Once you are inside the Device Manager, scroll through the list and locate the Sound, video and game controllers section. When you see it, expand the drop-down menu.
- Now you will see a list of devices that your computer is using for sound. Locate your microphone or the device that you were trying to use when you encountered the error and right-click on it, then click on Update driver.
Going to the updates section of your audio device - After that, click on Browse my computer for drivers. On the next screen, click on Let me pick from a list of available drivers on my computer to go further with the process.
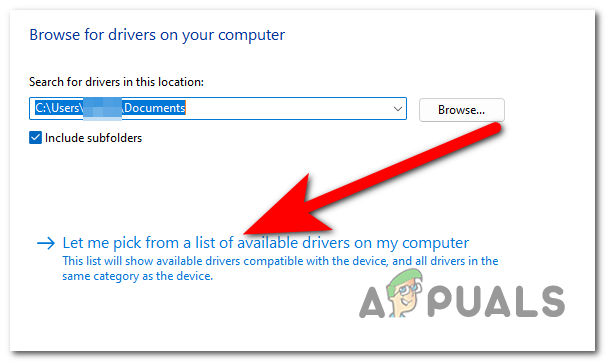
Accessing the list of old audio updates - Once you’ve done that, select an older driver from the list and click on Next. This will install the update and you will be taken to the first screen of Device Manager.
- After that, you can test to see if the Speech Diagnostic Calibrate error 0x80004003 error still occurs even after doing this.
In case this method wasn’t helpful as well, check below the next one.
5. Make sure that the microphone is enabled properly
People report that another thing that you need to do is to make sure that the microphone you are using is enabled properly. This has helped a lot of users to fix this issue because their microphone had settings that were making it not work how it should.
All you have to do is to go to the Control Panel and access the settings for your microphone. You need to make sure that the microphone is enabled properly and is set as default. In many cases, these settings were not set properly, causing the Speech Diagnostic Calibrate error 0x80004003.
Here is a guide that will show you how to do this:
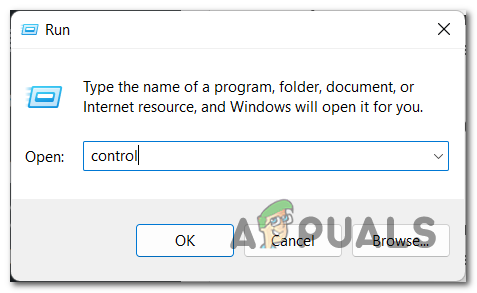
- You need to start by opening the Control Panel. One of the many ways to do this is by using a Run dialog box. Press the Windows key + R to open the box, then type inside the search bar ‘control‘ and press Enter.
Using a Run dialog box to open the Control Panel - Once you are inside the Control Panel, you need to go to the View by menu located in the top right corner and select Large icons.
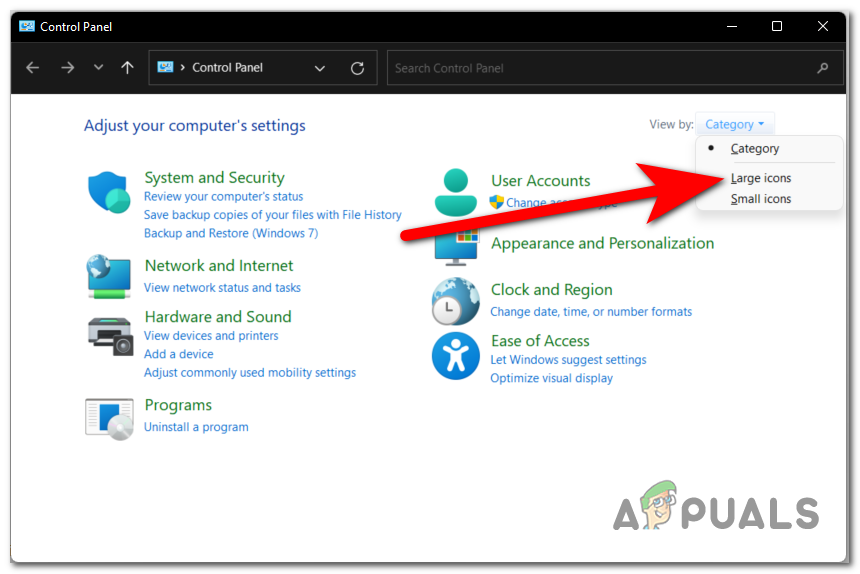
Changing the view mode to Large icons - When you are able to see all the large icons, scroll through the list until you find Sound. Click on it when you see it.
- Now that the Sound settings appear on your screen, click on the Recording tab and right-click on the microphone you use. Then click on Enable in case it is not enabled.

Enabling the microphone if it is disabled - After you are sure that the device is enabled, right-click on it again and click on Set as Default Communication Device.
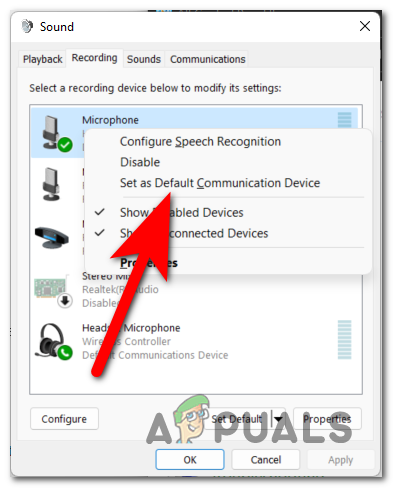
Setting your microphone as the default communication device - When you’ve done that, right-click once again on the microphone and click on Properties.
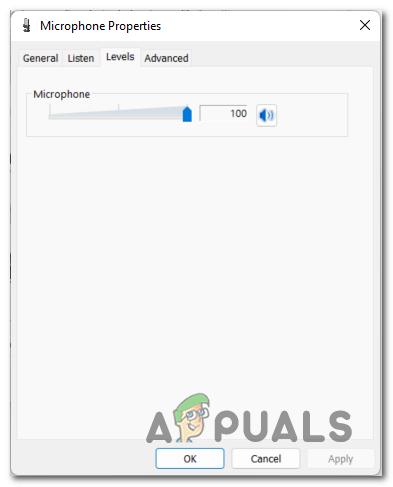
- Now go to the Levels tab and make sure the volume slider is set to the maximum value possible.
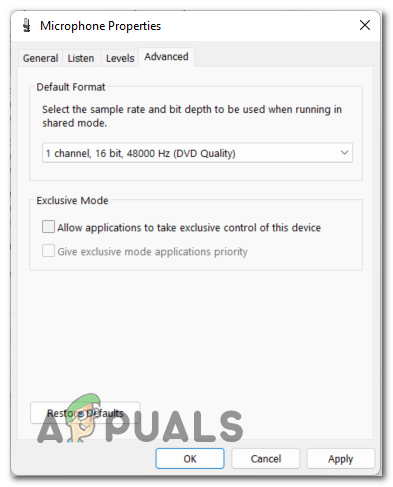
Making sure that the microphone volume is set to max - Once you’ve done that, click on the Advanced tab. Right under Exclusive Mode, you will see the Allow applications to take exclusive control of the device option. Right next to it, is a box. Make sure that the box is unchecked, then click on Apply.
Changing the last settings to make sure that the microphone is working - After that, you can close the Sound menu and Control Panel. Test to see if the Speech Diagnostic Calibrate error 0x80004003 still occurs even after doing this.
In case neither of the methods before has fixed your issue and is still occurring, check below the last possible fix.
6. Allow apps access to your microphone
The last thing you can do in order to try to fix this issue is to make sure that apps have access to your microphone. This might be a useful method because your microphone needs access to be able to be used in apps.
All you have to do is to turn on the Microphone Privacy in each app. You can do this from the Windows Settings in the Privacy section. You need to make sure that all the apps have access to your microphone.
In case you don’t know how to do this, here are the steps you need to follow:
- The first thing you need to do is to open the Windows Settings. To do this, you need to open a Run dialog box by pressing the Windows key + R, then type inside the search bar ‘ms-settings:‘ and press Enter.

Using a Run dialog box to open the Windows Settings - Now that you are inside the Windows Settings, look at the list of tabs located on the left side of the screen. Search for the Privacy & security section, then select it.
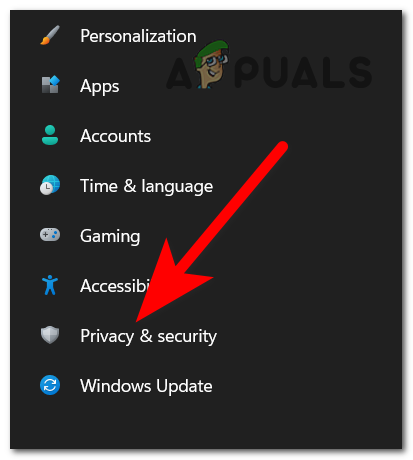
Accessing the Privacy & security section - Inside the Privacy & security tab, scroll down and look for Microphone. When you see it, click on it to access the microphone settings.
- Now all you have to do is to make sure that the Microphone access is turned on.
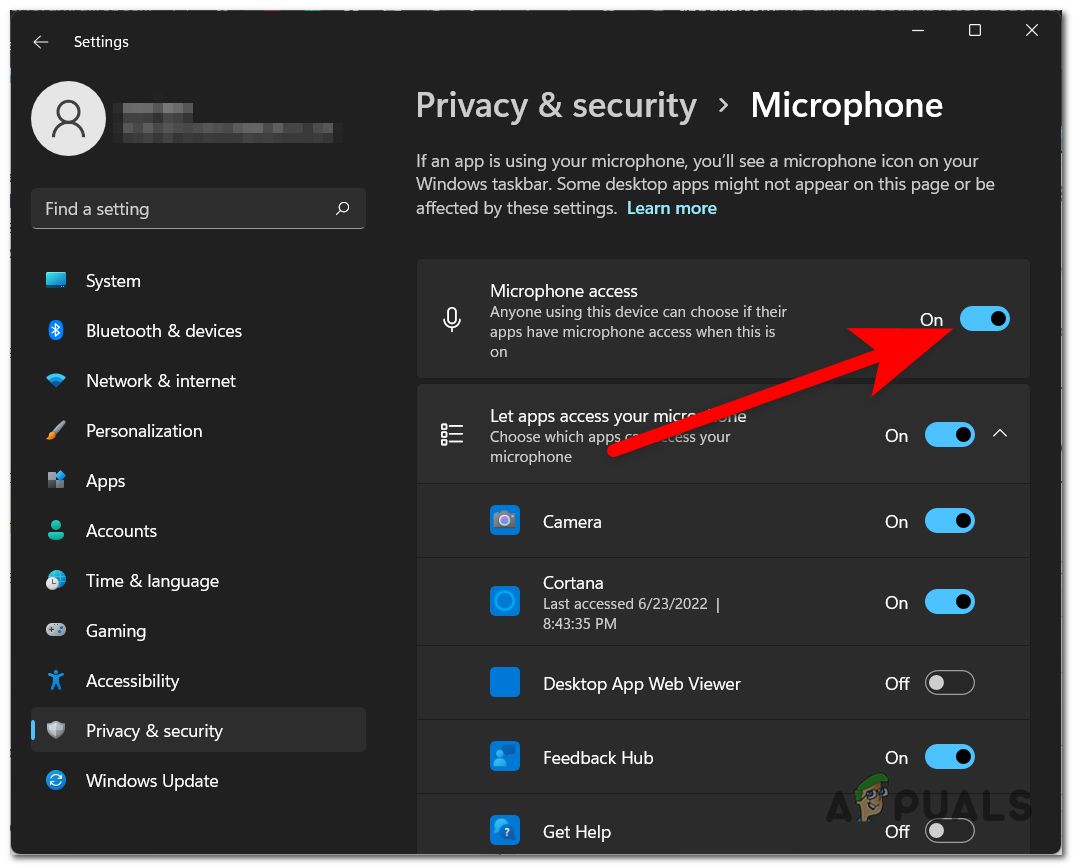
Enabling the microphone access - Once you have done that, you can also check the list of apps that are allowed to access your microphone. In case you want other apps from the list to have access, turn on the toggle associated with them.
- After you’ve done that, restart your PC and wait for the next startup.
- Once the PC boots back, the last thing that is left to do is to check if the Speech Diagnostic Calibrate error 0x80004003 still occurs.


