Speed Up Google Chrome: Effective Fixes for a Slow Browser
Understandably, nothing can be more annoying than slow and unresponsive Google Chrome. Although this browser is a popular choice among users, it can also become greedy when it comes to consuming your computer’s resources. But before you decide to switch to a different browser, consider spending a little time eliminating the factors causing the issue.
Reasons Behind A Slow and Unresponsive Google Chrome
while you may be thinking the issue has to do with some serious bug in your system, you should know that developers recently introduced a battery and resource-saving feature called Efficiency Mode. When this mode is enabled, your background tabs go to sleep after a certain period of inactivity. When you return to these tabs, Chrome reloads the pages again, often resulting in delayed or laggy performance.
If you’re having trouble boosting Chrome’s performance, you can try the following methods.
1. Ensure Chrome is Up-to-date
Updating Chrome to the latest version ensures it is free of bugs and glitches that might be causing it to malfunction. So, before moving on to other troubleshooting methods that could lead to losing settings, make sure your Chrome browser is up-to-date.
Here are the steps to do so:
- First, open the Chrome browser on your device.
- Then, click on the vertical three-dot icon at the top-right corner of the page.
- From the options, go to Help.
- Select About Google Chrome.
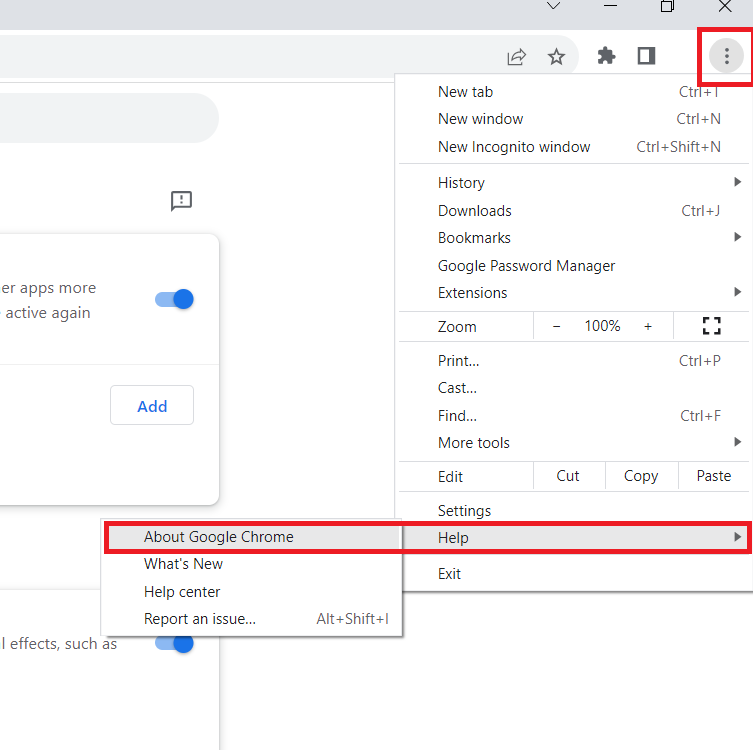
- The page will display information about the Google Chrome installation. If an update is available, it will download automatically.
2. Reinstall Chrome
Completely uninstalling and reinstalling the Chrome application will give the browser a fresh start. In addition, it will reset all the settings to default, eliminating any factors that may be causing Chrome to become unresponsive.
Note: Make sure to backup your Chrome’s user data before proceeding.
To reinstall Chrome, follow the steps below:
- Go to the Search icon from the taskbar and search for Control Panel.
- Open the application and click on Uninstall a program under Programs.
- Locate and select Google Chrome.
- Click on Uninstall.
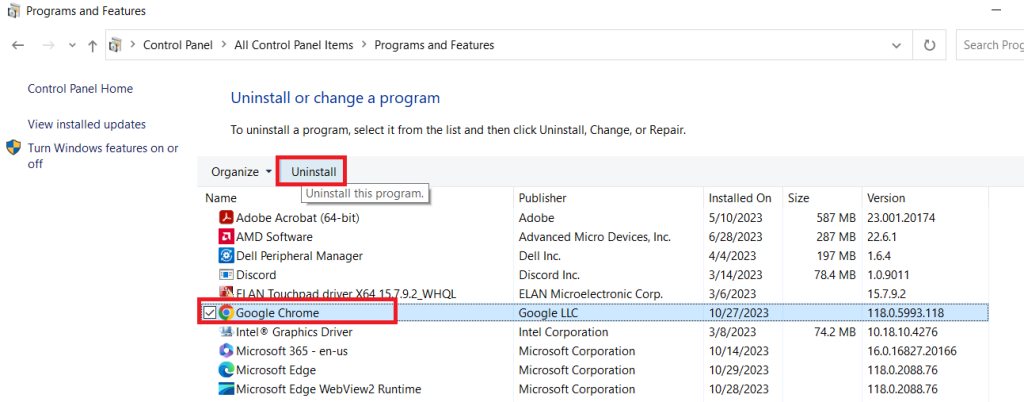
- Once complete, restart your computer.
- Download and install the latest version of Google Chrome from its official website.
- Restart your PC once more.
3. Run a “Clean up computer” scan
It’s possible that a program is interfering with the performance of Chrome. To check whether this is the case, you can use the built-in Chrome Scanner to scan for any suspicious programs and remove them.
Here’s how to do it:
- First, launch Google Chrome.
- From the three-dot menu icon in the upper-right corner of the screen, go to Settings.
- Scroll down and select Advanced.
- From there, go to the Reset and clean up section and click on Clean up computer.
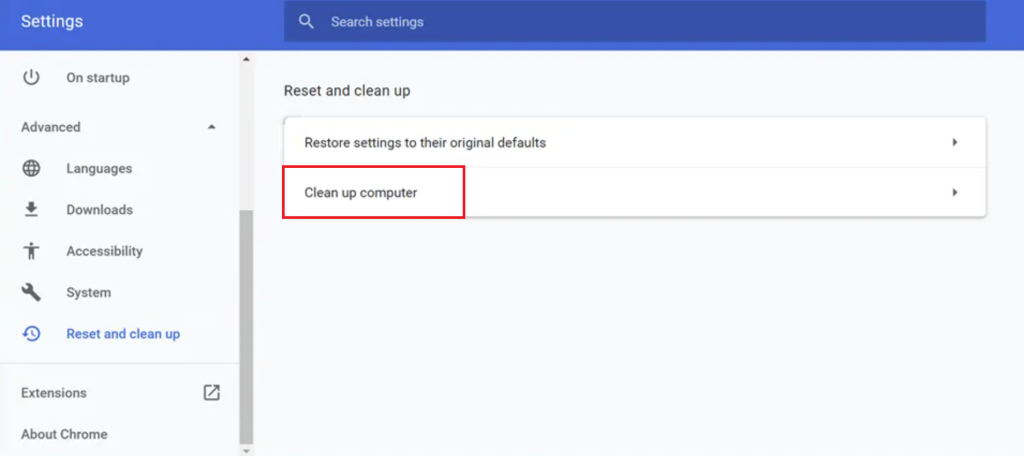
- Click on the Find option. This might take a moment.
- If any programs are found, click on the Remove option.
4. Close Unused Tabs
If you have too many tabs open on your browser, it can also cause Chrome to perform poorly. Therefore, closing all the unnecessary tabs will help free up some memory and boost Chrome’s performance. You can view the memory usage of each tab by accessing Chrome’s built-in Task Manager and close all the unused tabs.
Follow the instructions below to do so:
- Open the Chrome Browser and press the Shift + Esc keys to launch Chrome’s Task Manager.
- Click on the CPU tab to see which processes are taking up the most memory.
- To close a process, simply click on it, then select End process.
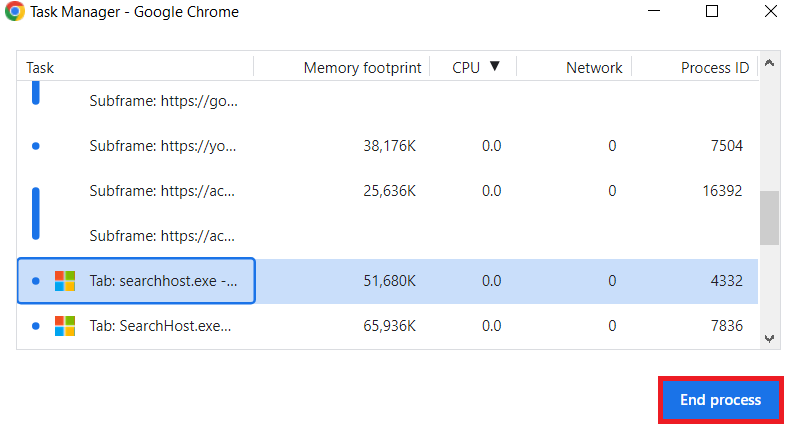
- Repeat the steps to close all unused tabs and free up memory.
5. Disable Unnecessary Extensions
Another method to fix Chrome malfunctioning is by disabling unnecessary extensions. Although extensions add various features to your browser, some might be incompatible with the new Chrome version. To determine if extensions are the cause of the problem, disable them one by one.
Here’s how you can do it:
- Open Chrome and click on the three-dot menu icon in the upper-right corner.
- Select Extensions.
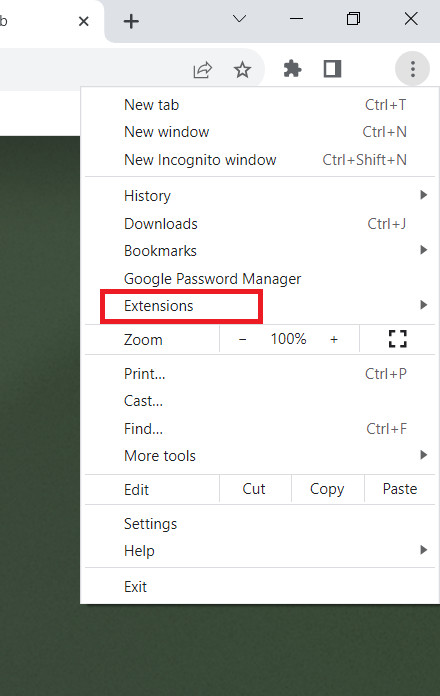
- This will take you to a page showing all the installed extensions. To disable an extension, switch off its toggle.
6. Regularly Clear Browser Cache & Cookies
Stored cache and cookies can become corrupt, which can lead to improper functioning of Chrome. Therefore, it’s best to delete your browsing data regularly to avoid such issues.
Here are the steps to clear cache and cookies:
- Click on the three dots in the upper-right corner of the Chrome window.
- Select Settings from the dropdown menu.
- In the left pane, select Privacy and security.
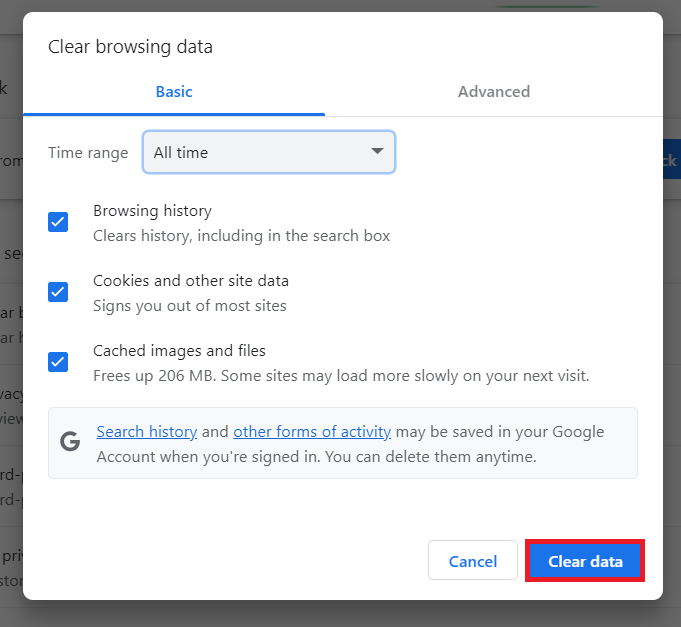
- Then, go to Clear browsing data.
- Choose a time range and the types of data you want to delete.
- Finally, click on the Clear data button.
7. Keep Your Hardware Up-to-date
Sometimes, the conflict between a hardware component and an application can cause the program to slow down or become unresponsive. Keeping all your hardware components up-to-date can ensure they aren’t the main culprits for slowing down Chrome’s performance.
8. Report the Issue to Chrome Help
If all the methods mentioned above fail to give you the desired results, consider reporting your issue to Google Chrome Support. To submit a report to Chrome Help, follow these steps:
- Launch Chrome.
- From the top-right corner, click on the vertical three-dot icon and select Help.
- Select Report an issue.
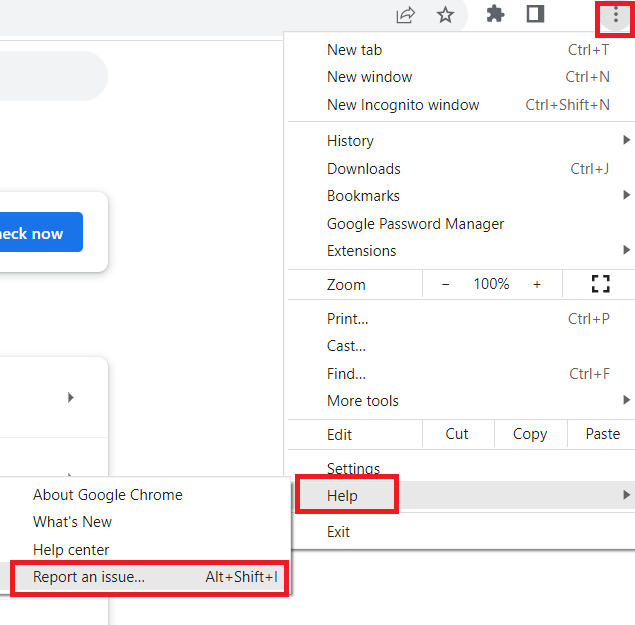
- Provide the required details and additional information, then click on Send.
Slow and Unresponsive Google Chrome - FAQs
Chrome often experiences slowdowns or performance lags when there are too many tabs open, the cache is full or corrupted, it’s running an outdated version, an installed extension or application is conflicting with the program, or there are issues with your internet connection.
To restart your Chrome browser, simply launch the program and type ‘chrome://restart’ into the address bar. That’s it! Your browser will automatically shut down and restart afterward.


