Fix: Uninstall SkypeHost.exe On Windows 10
With the release of the all new Windows 10, came all new features and applications with it. Among them was the integration of the Messaging app and Skype Video app into Windows 10. Skype Video app here provides built in capabilities for video chat. The process in question here, skypehost.exe, is the process used by the built in Skype App and Skype Video App in Windows 10.
As Windows 10 is still a fresh release, bugs are bound to be discovered. One of them is the high CPU usage of skypehost.exe and numerous errors caused by it in the background (can be checked through Event Viewer). Any attempt to stop it or disable it through mainstream procedures may stop it temporarily but it will start itself automatically unless it has been properly uninstalled.
Now here’s something that you should understand. Skype if running as an app on Windows 10, will result in High CPU Usage and other errors. However, if you run the Desktop version of Skype downloaded directly from the Skype site, then you will not have such issues. So first, we need to uninstall the app and then you can download and install Skype desktop (if you need to).
To stop Skype App from running in the background, all you have to do is uninstall the built in Messaging spp, Skype Video App, and Skype app from your Windows 10. There are 4 methods listed in this guide, start with the first one and follow all until SkypeHost has been completely removed. In most cases, method 1 will do.
Method 1: Remove It through Apps and Features
- Hold Windows Key and Press I. Click on System. Then click on Apps and Features in the left pane.
- Search for Messaging, Skype Video App, and Skype app. Select them click Uninstall.

Method 2: Remove it through PowerShell
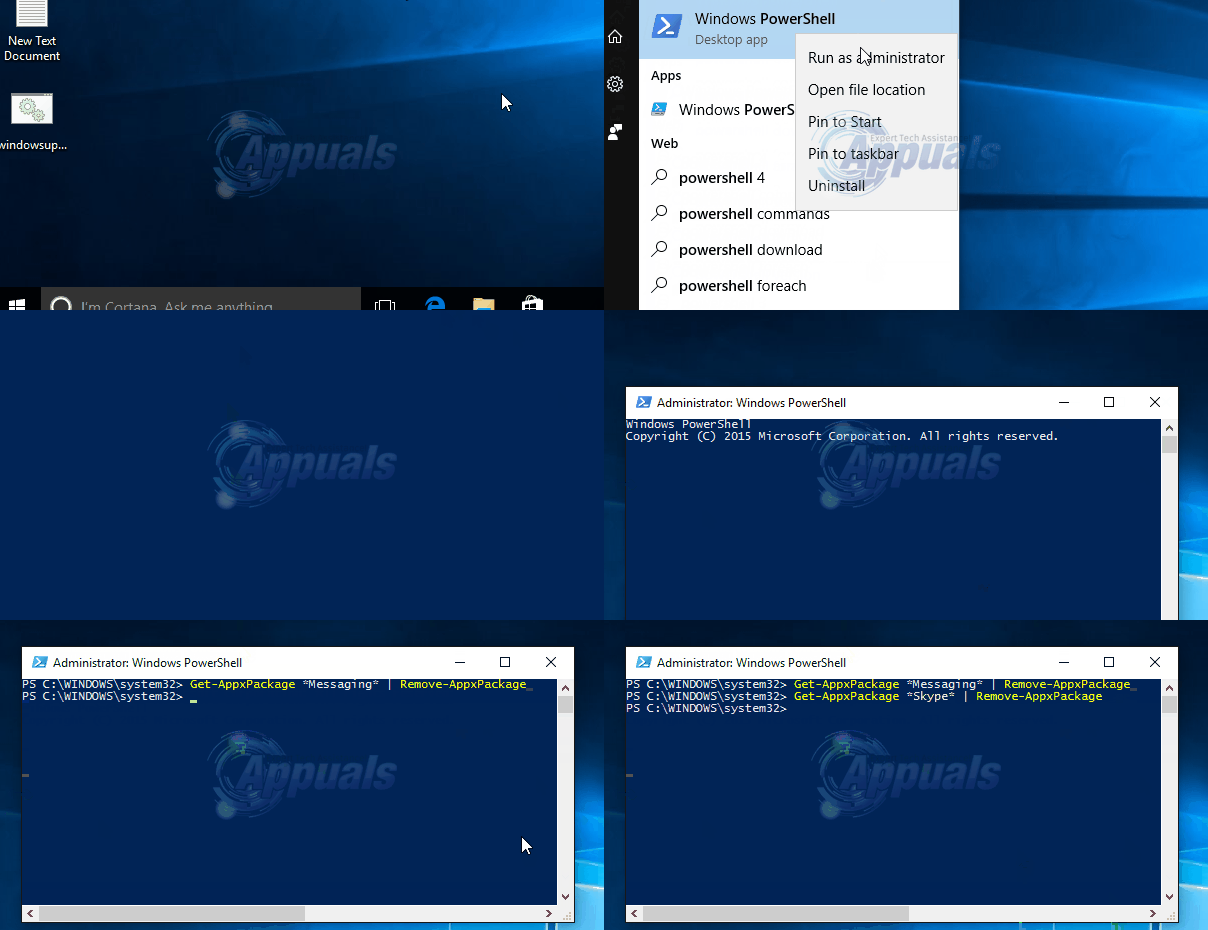
- Press the Windows key. Type PowerShell in the search box.
- Right click on Windows PowerShell in the search results and click Run As Administrator.
- In the Windows PowerShell window, type the following commands and press Enter after each:Get-AppxPackage *Messaging* | Remove-AppxPackageGet-AppxPackage *skypeapp* | Remove-AppxPackage
- Restart your system and test.

Method 3: Remove Skype App through Full Package Name:
- Open PowerShell through the method given above. In it type Get-AppxPackage | Select Name, PackageFullName and press Enter.
- From the list of results displayed, locate Microsoft.SkypeApp and note down the PackageFullName value.
- Then type the following command, and replace PackageFullName with the value you noted.Get-AppxPackage PackageFullName | Remove-AppxPackage
- Then press ENTER. If Microsoft.SkypeApp does not appears, then the app is already removed.
Method 4: Delete the Skypehost.exe File Manually
This method should only be used as a last resort. In this solution, we will use a batch file to eliminate this error. Create a batch file (.bat) with the following code Save the file. After the file has been saved/downloads, right click on the downloaded file “DelSkypeHost.bat” and choose Run As Administrator.
@ECHO OFF
ECHO
takeown /f "C:\Program Files\WindowsApps\*"
icacls "C:\Program Files\WindowsApps\*" /grant administrators:f
move "C:\Program Files\WindowsApps\*" "%userprofile%\desktop"
ren "%userprofile%\desktop\SkypeHost.exe" "SkypeHost3.exe"
del "%userprofile%\desktop\SkypeHost3.exe"
pause
The Skypehost.exe should be deleted and out of your hair now. If for some reason you get “Access Denied” error in the black command window, just restart Windows and delete skypehost from your desktop manually.
Installing Skype Desktop On Windows 10
After you have successfully uninstalled the Skype App, following any of the methods above; you can then download the Skype Desktop for Windows 10 from here and install it. After the setup file has been downloaded, run it. Once Skype is installed, you should see the usual icon for it (like the one you had with previous versions of Windows).